Cómo instalar osTicket con Nginx en Debian 11
osTicket es un sistema de tickets de soporte gratuito y de código abierto que se utiliza para escalar y agilizar tu servicio de atención al cliente y mejorar su experiencia. Ofrece una interfaz basada en web para gestionar, organizar y hacer un seguimiento de todos los tickets de soporte. Está escrito en PHP y es compatible con varias bases de datos, como MySQL y PostgreSQL.
Características
- Informes del panel de control
- Tema de ayuda configurable
- Acuerdos de nivel de servicio
- Filtros de tickets
- Portal de Atención al Cliente
- Respuesta automática
Este tutorial te mostrará cómo instalar osTicket en Debian 11.
Requisitos previos
- Un servidor que ejecute Debian 11.
- Un nombre de dominio válido apuntado con la IP de tu servidor.
- Una contraseña de root configurada en el servidor.
Cómo empezar
En primer lugar, actualiza y mejora todos los paquetes del sistema a la última versión mediante el siguiente comando.
apt update -y
apt upgrade -y
Una vez actualizados todos los paquetes, puedes instalar otros paquetes necesarios con el siguiente comando:
apt install ca-certificates apt-transport-https software-properties-common wget curl
Una vez instalados todos los paquetes necesarios, puedes pasar al siguiente paso.
Instalar Nginx y PHP
En primer lugar, instala el paquete del servidor web Nginx utilizando el siguiente comando.
apt install nginx -y
A continuación, añade el repositorio de PHP utilizando el siguiente comando.
curl -sSL https://packages.sury.org/php/README.txt | bash -x
A continuación, instala la última versión de PHP y otras dependencias PHP necesarias utilizando el siguiente comando.
apt install php8.1 php8.1-mysql php8.1-cgi php8.1-fpm php8.1-cli php8.1-curl php8.1-gd php8.1-imap php8.1-mbstring php8.1-intl php8.1-apcu php8.1-common php8.1-gettext php8.1-bcmath php8.1-xml php8.1-dom -y
Tras la instalación, edita el archivo de configuración de PHP.
nano /etc/php/8.1/fpm/php.ini
Cambia la siguiente línea.
cgi.fix_pathinfo=0
Guarda y cierra el archivo y reinicia el servicio PHP-FPM para aplicar los cambios.
systemctl restart php8.1-fpm
Instalar y configurar MariaDB
En primer lugar, instala el servidor de bases de datos MariaDB utilizando el siguiente comando.
apt install mariadb-server -y
A continuación, asegura la instalación de MariaDB con el siguiente comando.
mysql_secure_installation
Responde a todas las preguntas que aparecen a continuación:
Set root password? [Y/n] Y
New password:
Re-enter new password:
Remove anonymous users? [Y/n] Y
Disallow root login remotely? [Y/n] Y
Remove test database and access to it? [Y/n] Y
Reload privilege tables now? [Y/n] Y
A continuación, accede al shell de MariaDB como usuario root.
mysql -u root -p
A continuación, crea una base de datos y un usuario para osTicket.
MariaDB [(none)]> create database osticketdb;
MariaDB [(none)]> grant all privileges on osticketdb.* to osticketuser identified by 'secure-password';
A continuación, vacía los privilegios y sal del intérprete de comandos MariaDB con el siguiente comando.
MariaDB [(none)]> flush privileges;
MariaDB [(none)]> exit;
Instalar osTicket
En primer lugar, descarga la última versión de osTicket desde la página de descargas de GitHub.
wget https://github.com/osTicket/osTicket/releases/download/v1.17.2/osTicket-v1.17.2.zip
Una vez completada la descarga, crea un directorio para osTicket y extrae el archivo descargado dentro de ese directorio.
mkdir /var/www/html/osticket
unzip osTicket-v1.17.2.zip -d /var/www/html/osticket
A continuación, establece la propiedad y el permiso en el directorio osticket.
chown -R www-data:www-data /var/www/html/osticket
chmod -R 755 /var/www/html/osticket
A continuación, cambia el nombre del archivo de configuración de ejemplo de osTicket.
mv /var/www/html/osticket/upload/include/ost-sampleconfig.php /var/www/html/osticket/upload/include/ost-config.php
Cuando hayas terminado, puedes pasar al siguiente paso.
Configurar Nginx para osTicket
A continuación, tendrás que crear un archivo de configuración de host virtual Nginx para osTicket. Puedes crearlo con el siguiente comando.
nano /etc/nginx/conf.d/osticket.conf
Añade la siguiente configuración.
server {
listen 80;
server_name osticket.example.com;
root /var/www/html/osticket/upload;
index index.php index.html index.htm;
access_log /var/log/nginx/access.log;
error_log /var/log/nginx/error.log;


# Enable gzip
gzip on;
gzip_min_length 1000;
gzip_types text/plain application/x-javascript text/xml text/css application/xml;

set $path_info "";

location ~ /include {
deny all;
return 403;
}

if ($request_uri ~ "^/api(/[^\?]+)") {
set $path_info $1;
}

location ~ ^/api/(?:tickets|tasks).*$ {
try_files $uri $uri/ /api/http.php?$query_string;
}

if ($request_uri ~ "^/scp/.*\.php(/[^\?]+)") {
set $path_info $1;
}

location ~ ^/scp/ajax.php/.*$ {
try_files $uri $uri/ /scp/ajax.php?$query_string;
}

location / {
try_files $uri $uri/ index.php;
}

location ~ \.php$ {
fastcgi_param SCRIPT_FILENAME $document_root$fastcgi_script_name;
include fastcgi_params;
include snippets/fastcgi-php.conf;
fastcgi_pass unix:/run/php/php8.1-fpm.sock;
}
}
Guarda y cierra el archivo y luego verifica la configuración de Nginx con el siguiente comando.
nginx -t
Obtendrás la siguiente salida.
nginx: the configuration file /etc/nginx/nginx.conf syntax is ok
nginx: configuration file /etc/nginx/nginx.conf test is successful
A continuación, reinicia el servicio Nginx para aplicar los cambios.
systemctl restart nginx
También puedes comprobar el estado de Nginx utilizando el siguiente comando.
systemctl status nginx
Deberías ver el estado de Nginx en la siguiente salida.
? nginx.service - A high performance web server and a reverse proxy server
     Loaded: loaded (/lib/systemd/system/nginx.service; enabled; vendor preset: enabled)
     Active: active (running) since Wed 2022-12-21 08:15:10 UTC; 4s ago
       Docs: man:nginx(8)
    Process: 24700 ExecStartPre=/usr/sbin/nginx -t -q -g daemon on; master_process on; (code=exited, status=0/SUCCESS)
    Process: 24701 ExecStart=/usr/sbin/nginx -g daemon on; master_process on; (code=exited, status=0/SUCCESS)
   Main PID: 24702 (nginx)
      Tasks: 2 (limit: 2339)
     Memory: 3.1M
        CPU: 25ms
     CGroup: /system.slice/nginx.service
             ??24702 nginx: master process /usr/sbin/nginx -g daemon on; master_process on;
             ??24703 nginx: worker process

Dec 21 08:15:10 debian11 systemd[1]: nginx.service: Succeeded.
Dec 21 08:15:10 debian11 systemd[1]: Stopped A high performance web server and a reverse proxy server.
Dec 21 08:15:10 debian11 systemd[1]: Starting A high performance web server and a reverse proxy server...
Dec 21 08:15:10 debian11 systemd[1]: nginx.service: Failed to parse PID from file /run/nginx.pid: Invalid argument
Dec 21 08:15:10 debian11 systemd[1]: Started A high performance web server and a reverse proxy server.
En este punto, Nginx está instalado y configurado para osTicket. Ahora puedes proceder a acceder a osTicket.
Acceder a la Interfaz Web de osTicket
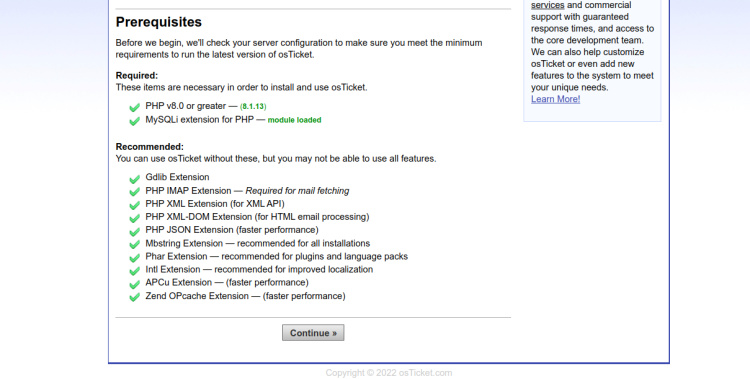
Abre tu navegador web y accede a la página de instalación de osTicket utilizando la URL http://osticket.example.com. Deberías ver la página de requisitos previos.
Haz clic en Continuar. Deberías ver la página de instalación básica.
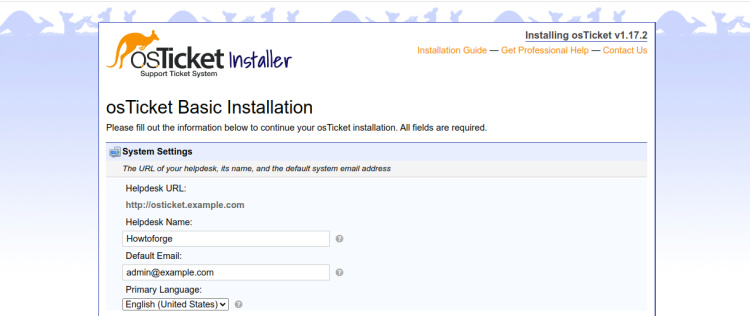
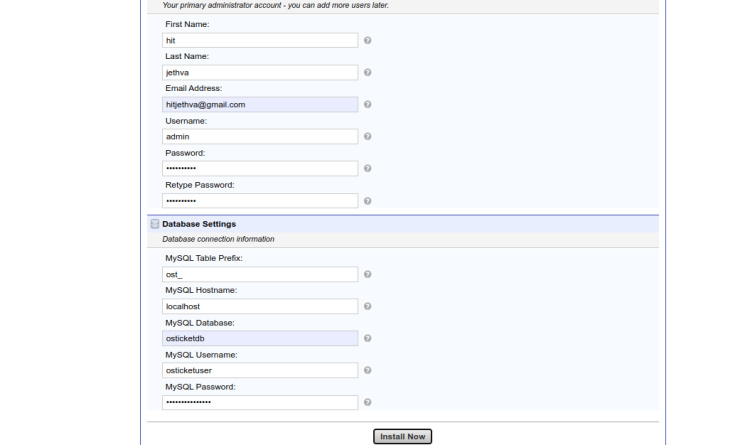
Define la URL de tu servicio de asistencia, el nombre, el correo electrónico, el nombre de la base de datos, el nombre de usuario y la contraseña, y haz clic en el botón Instalar ahora para iniciar la instalación. Una vez instalado osTicket, deberías ver la siguiente página.

Para acceder al panel de control de osTicket, escribe la URL http://osticket.example.com/scp en tu navegador web. Deberías ver la página de inicio de sesión de osTicket.

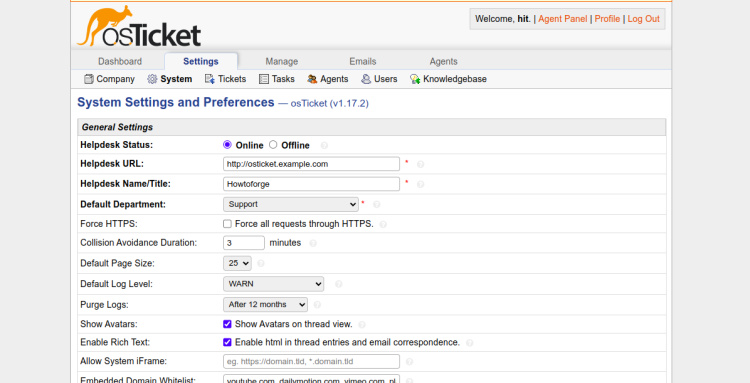
Introduce tu nombre de usuario y contraseña de administrador y pulsa el botón Iniciar sesión. Deberías ver el panel de control de osTicket en la siguiente pantalla.
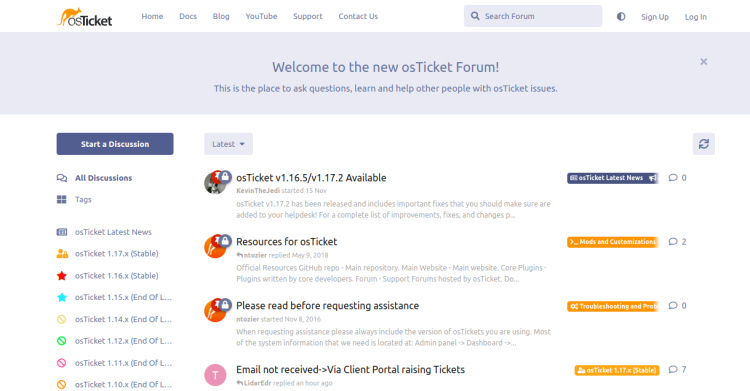
También puedes acceder a la página del foro de osTicket utilizando la URL https://forum.osticket.com.
Habilitar SSL en osTicket
Para instalar Let’s Encrypt SSL en el sitio web de osTicket, necesitarás instalar el paquete certbot en tu servidor.
Primero, instala el gestor de paquetes Snap con el siguiente comando:
apt install snapd
A continuación, actualiza el paquete Snap a la última versión:
snap install core
snap refresh core
A continuación, instala el paquete certbot con el siguiente comando:
snap install --classic certbot
A continuación, crea un enlace simbólico para el binario de Certbot en la ubicación del sistema:
ln -s /snap/bin/certbot /usr/bin/certbot
A continuación, ejecuta el siguiente comando para descargar e instalar los certificados SSL de Let’s Encrypt:
certbot --nginx -d osticket.example.com
Se te pedirá que proporciones tu dirección de correo electrónico y que aceptes las condiciones del servicio:
Saving debug log to /var/log/letsencrypt/letsencrypt.log
Enter email address (used for urgent renewal and security notices)
 (Enter 'c' to cancel): [email protected]

- - - - - - - - - - - - - - - - - - - - - - - - - - - - - - - - - - - - - - - -
Please read the Terms of Service at
https://letsencrypt.org/documents/LE-SA-v1.3-September-21-2022.pdf. You must
agree in order to register with the ACME server. Do you agree?
- - - - - - - - - - - - - - - - - - - - - - - - - - - - - - - - - - - - - - - -
(Y)es/(N)o: Y

- - - - - - - - - - - - - - - - - - - - - - - - - - - - - - - - - - - - - - - -
Would you be willing, once your first certificate is successfully issued, to
share your email address with the Electronic Frontier Foundation, a founding
partner of the Let's Encrypt project and the non-profit organization that
develops Certbot? We'd like to send you email about our work encrypting the web,
EFF news, campaigns, and ways to support digital freedom.
- - - - - - - - - - - - - - - - - - - - - - - - - - - - - - - - - - - - - - - -
(Y)es/(N)o: Y
Escribe Y y pulsa la tecla Intro para descargar e instalar los certificados SSL para tu dominio:
Account registered.
Requesting a certificate for osticket.example.com

Successfully received certificate.
Certificate is saved at: /etc/letsencrypt/live/osticket.example.com/fullchain.pem
Key is saved at:         /etc/letsencrypt/live/osticket.example.com/privkey.pem
This certificate expires on 2023-03-22.
These files will be updated when the certificate renews.
Certbot has set up a scheduled task to automatically renew this certificate in the background.

Deploying certificate
Successfully deployed certificate for osticket.example.com to /etc/nginx/conf.d/osticket.conf
Congratulations! You have successfully enabled HTTPS on https://osticket.example.com

- - - - - - - - - - - - - - - - - - - - - - - - - - - - - - - - - - - - - - - -
If you like Certbot, please consider supporting our work by:
 * Donating to ISRG / Let's Encrypt:   https://letsencrypt.org/donate
 * Donating to EFF:                    https://eff.org/donate-le
- - - - - - - - - - - - - - - - - - - - - - - - - - - - - - - - - - - - - - - -
Conclusión
Enhorabuena! has instalado con éxito osTicket con Nginx en Debian 11. Ahora puedes implantar osTicket en tu empresa y utilizarlo como sistema de gestión del servicio de asistencia. No dudes en preguntarme si tienes alguna duda.