Cómo instalar y configurar OrangeScrum en Ubuntu 20.04
Orangescrum es una aplicación de colaboración y gestión de proyectos gratuita y de código abierto. Es ideal para pequeñas y medianas empresas y te ayuda a crear y gestionar tus proyectos, equipos, documentos y tareas, y a comunicarte con los demás miembros del equipo. Es una aplicación de gestión de proyectos muy útil con una interfaz sencilla que te ayuda a planificar, organizar y gestionar tus tareas para cualquier proyecto. Viene con un montón de características, incluyendo, Scrum Board, Planificación de Sprint e Informes, Story Points, Project Backlog, y muchas más.
En este tutorial, te mostraremos cómo instalar la herramienta de gestión de proyectos OrangeScrum en un servidor Ubuntu 20.04.
Requisitos previos
- Un servidor con Ubuntu 20.04.
- Un nombre de dominio válido apuntado con la IP de tu servidor.
- Una contraseña de root configurada en el servidor.
Instalar Apache, MariaDB y PHP
En primer lugar, instala el servidor web Apache y el servidor de bases de datos MariaDB con el siguiente comando:
apt-get install apache2 mariadb-server -y
Después de instalar los paquetes anteriores, tendrás que instalar la versión 7.2 de PHP y otras extensiones necesarias en tu sistema. Por defecto, Ubuntu 20.04 viene con la versión 7.4 de PHP, por lo que tendrás que añadir el repositorio Ondrej en tu sistema.
Primero, instala los paquetes necesarios con el siguiente comando:
apt-get install software-properties-common gnupg2 -y
A continuación, añade el repositorio Ondrej con el siguiente comando:
add-apt-repository ppa:ondrej/php
A continuación, actualiza el repositorio e instala PHP junto con otros paquetes necesarios con el siguiente comando:
apt-get install php7.2 php7.2-bcmath php7.2-cgi php7.2-cli php7.2-common php7.2-curl php7.2-dba php7.2-enchant php7.2-fpm php7.2-gd php7.2-imap php7.2-intl php7.2-ldap php7.2-mbstring php7.2-mysql php7.2-opcache php7.2-imagick php7.2-memcache php7.2-soap php7.2-tidy php7.2-xml php7.2-zip libapache2-mod-php7.2 xvfb libfontconfig wkhtmltopdf unzip wget -y
Una vez instalados todos los paquetes, edita el archivo php.ini y cambia algunos ajustes necesarios:
nano /etc/php/7.2/apache2/php.ini
Cambia los siguientes valores:
post_max_size = 200M
upload_max_filesize = 200M
max_execution_time = 300
memory_limit = 512M
max_input_vars = 5000
date.timezone = Asia/Kolkata
Guarda y cierra el archivo y reinicia el servicio Apache para aplicar los cambios:
systemctl restart apache2
Cuando hayas terminado, puedes pasar al siguiente paso.
Crear una base de datos para OrangeScrum
A continuación, tendrás que crear una base de datos y un usuario para OrangeScrum. En primer lugar, inicia sesión en el intérprete de comandos MariaDB con el siguiente comando:
mysql
Una vez iniciada la sesión, crea una base de datos y un usuario con el siguiente comando:
MariaDB [(none)]> CREATE DATABASE orangescrumdb;
MariaDB [(none)]> GRANT ALL PRIVILEGES ON orangescrumdb.* TO 'orangescrumuser'@'localhost' IDENTIFIED BY 'password';
A continuación, vacía los privilegios y sal del intérprete de comandos MariaDB con el siguiente comando:
MariaDB [(none)]> FLUSH PRIVILEGES;
MariaDB [(none)]> exit;
A continuación, tendrás que desactivar el modo estricto para MariaDB. Puedes hacerlo creando el archivo disable_strict_mode.cnf:
nano /etc/mysql/conf.d/disable_strict_mode.cnf
Añade las siguientes líneas:
[mysqld]
sql_mode="IGNORE_SPACE,NO_ZERO_IN_DATE,NO_ZERO_DATE,ERROR_FOR_DIVISION_BY_ZERO,NO_AUTO_CREATE_USER,NO_ENGINE_SUBSTITUTION"
Guarda y cierra el archivo. A continuación, reinicia MariaDB para aplicar todos los cambios:
systemctl restart mariadb
Instalar OrangeScrum
En primer lugar, tendrás que descargar la última versión de OrangeScrum desde su sitio web oficial. Tras descargarla, descomprime el archivo descargado con el siguiente comando:
unzip orangescrum-master.zip
A continuación, mueve el directorio extraído al directorio raíz de Apache con el siguiente comando:
mv orangescrum-master /var/www/html/orangescrum
A continuación, cambia el directorio a Orangescrum e importa la base de datos OrangeScrum a tu base de datos:
cd /var/www/html/orangescrum
mysql -u orangescrumuser -p orangescrumdb < database.sql
Introduce la contraseña que hayas elegido para el usuario MySQL ‘orangescrumuser’ cuando te lo pida el comando mysql.
A continuación, edita el archivo database.php y define la configuración de tu base de datos:
nano app/Config/database.php
Cambia las siguientes líneas:
class DATABASE_CONFIG {

        public $default = array(
                'datasource' => 'Database/Mysql',
                'persistent' => false,
                'host' => 'localhost',
                'login' => 'orangescrumuser',
                'password' => 'password',
                'database' => 'orangescrumdb',
                'prefix' => '',
                'encoding' => 'utf8',
        );
}
Guarda y cierra el archivo cuando hayas terminado.
A continuación, da los permisos adecuados al directorio orangescrum:
chown -R www-data:www-data /var/www/html/orangescrum
chmod -R 775 /var/www/html/orangescrum
Configurar Apache para OrangeScrum
A continuación, tendrás que crear un nuevo archivo de configuración del host virtual de Apache para OrangeScrum. Puedes crearlo con el siguiente comando:
nano /etc/apache2/sites-available/orangescrum.conf
Añade las siguientes líneas:
<VirtualHost *:80>
        ServerAdmin [email protected]
        DocumentRoot /var/www/html/orangescrum/
        ServerName orangescrum.example.com
    <Directory /var/www/html/orangescrum/>
             DirectoryIndex index.php index.html
             AllowOverride All
             Allow from all
             Order allow,deny
             Options Indexes FollowSymlinks
    </Directory>
</VirtualHost>
Guarda y cierra el archivo y, a continuación, habilita el archivo de host virtual de Apache con el siguiente comando:
a2ensite orangescrum.conf
A continuación, habilita los módulos necesarios con el siguiente comando:
phpenmod mbstring
a2enmod rewrite
a2enmod headers
A continuación, reinicia el servicio Apache para aplicar los cambios:
systemctl restart apache2
Ahora puedes verificar el estado de Apache con el siguiente comando:
systemctl status apache2
Deberías obtener la siguiente salida:
? apache2.service - The Apache HTTP Server
     Loaded: loaded (/lib/systemd/system/apache2.service; enabled; vendor preset: enabled)
     Active: active (running) since Thu 2020-09-17 15:36:20 UTC; 5min ago
       Docs: https://httpd.apache.org/docs/2.4/
    Process: 40670 ExecStart=/usr/sbin/apachectl start (code=exited, status=0/SUCCESS)
   Main PID: 40689 (apache2)
      Tasks: 11 (limit: 2353)
     Memory: 47.1M
     CGroup: /system.slice/apache2.service
             ??40689 /usr/sbin/apache2 -k start
             ??40690 /usr/sbin/apache2 -k start
             ??40692 /usr/sbin/apache2 -k start
             ??40694 /usr/sbin/apache2 -k start
             ??40698 /usr/sbin/apache2 -k start
             ??40699 /usr/sbin/apache2 -k start
             ??40700 /usr/sbin/apache2 -k start
             ??40706 /usr/sbin/apache2 -k start
             ??40808 /usr/sbin/apache2 -k start
             ??40809 /usr/sbin/apache2 -k start
             ??40810 /usr/sbin/apache2 -k start

Sep 17 15:36:20 ubuntu2004 systemd[1]: Starting The Apache HTTP Server...
Asegura OrangeScrum con Let’s Encrypt SSL
A continuación, se recomienda asegurar OrangeScrum con Let’s Encrypt SSL. Primero, instala el cliente Certbot para gestionar el SSL.
apt-get install python3-certbot-apache -y
Tras instalar el cliente Certbot, ejecuta el siguiente comando para instalar Let’s Encrypt SSL para tu dominio:
certbot --apache -d orangescrum.example.com
Se te pedirá que proporciones tu correo electrónico y aceptes las condiciones del servicio, como se muestra a continuación:
Saving debug log to /var/log/letsencrypt/letsencrypt.log
Plugins selected: Authenticator apache, Installer apache
Enter email address (used for urgent renewal and security notices) (Enter 'c' to
cancel): [email protected]

- - - - - - - - - - - - - - - - - - - - - - - - - - - - - - - - - - - - - - - -
Please read the Terms of Service at
https://letsencrypt.org/documents/LE-SA-v1.2-November-15-2017.pdf. You must
agree in order to register with the ACME server at
https://acme-v02.api.letsencrypt.org/directory
- - - - - - - - - - - - - - - - - - - - - - - - - - - - - - - - - - - - - - - -
(A)gree/(C)ancel: A

- - - - - - - - - - - - - - - - - - - - - - - - - - - - - - - - - - - - - - - -
Would you be willing to share your email address with the Electronic Frontier
Foundation, a founding partner of the Let's Encrypt project and the non-profit
organization that develops Certbot? We'd like to send you email about our work
encrypting the web, EFF news, campaigns, and ways to support digital freedom.
- - - - - - - - - - - - - - - - - - - - - - - - - - - - - - - - - - - - - - - -
(Y)es/(N)o: Y
Obtaining a new certificate
Performing the following challenges:
http-01 challenge for orangescrum.example.com
Enabled Apache rewrite module
Waiting for verification...
Cleaning up challenges
Created an SSL vhost at /etc/apache2/sites-available/orangescrum-le-ssl.conf
Enabled Apache socache_shmcb module
Enabled Apache ssl module
Deploying Certificate to VirtualHost /etc/apache2/sites-available/orangescrum-le-ssl.conf
Enabling available site: /etc/apache2/sites-available/orangescrum-le-ssl.conf
A continuación, elige si deseas o no redirigir el tráfico HTTP a HTTPS, como se muestra a continuación:
Please choose whether or not to redirect HTTP traffic to HTTPS, removing HTTP access.
- - - - - - - - - - - - - - - - - - - - - - - - - - - - - - - - - - - - - - - -
1: No redirect - Make no further changes to the webserver configuration.
2: Redirect - Make all requests redirect to secure HTTPS access. Choose this for
new sites, or if you're confident your site works on HTTPS. You can undo this
change by editing your web server's configuration.
- - - - - - - - - - - - - - - - - - - - - - - - - - - - - - - - - - - - - - - -
Select the appropriate number [1-2] then [enter] (press 'c' to cancel): 2
Escribe 2 y pulsa Intro para continuar. Una vez finalizada la instalación, deberías ver el siguiente resultado:
Enabled Apache rewrite module
Redirecting vhost in /etc/apache2/sites-enabled/orangescrum.conf to ssl vhost in /etc/apache2/sites-available/orangescrum-le-ssl.conf

- - - - - - - - - - - - - - - - - - - - - - - - - - - - - - - - - - - - - - - -
Congratulations! You have successfully enabled https://orangescrum.example.com

You should test your configuration at:
https://www.ssllabs.com/ssltest/analyze.html?d=orangescrum.example.com
- - - - - - - - - - - - - - - - - - - - - - - - - - - - - - - - - - - - - - - -

IMPORTANT NOTES:
 - Congratulations! Your certificate and chain have been saved at:
   /etc/letsencrypt/live/orangescrum.example.com/fullchain.pem
   Your key file has been saved at:
   /etc/letsencrypt/live/orangescrum.example.com/privkey.pem
   Your cert will expire on 2020-11-11. To obtain a new or tweaked
   version of this certificate in the future, simply run certbot again
   with the "certonly" option. To non-interactively renew *all* of
   your certificates, run "certbot renew"
 - If you like Certbot, please consider supporting our work by:

   Donating to ISRG / Let's Encrypt:   https://letsencrypt.org/donate
   Donating to EFF:                    https://eff.org/donate-le
Ahora, puedes acceder a tu sitio web de Clasificados Abiertos de forma segura utilizando la URL https://orangescrum.example.com.
Acceder a OrangeScrum
Ahora, abre tu navegador web y escribe la URL https://orangescrum.example.com. Deberías ver la pantalla de registro de OrangeScrum:
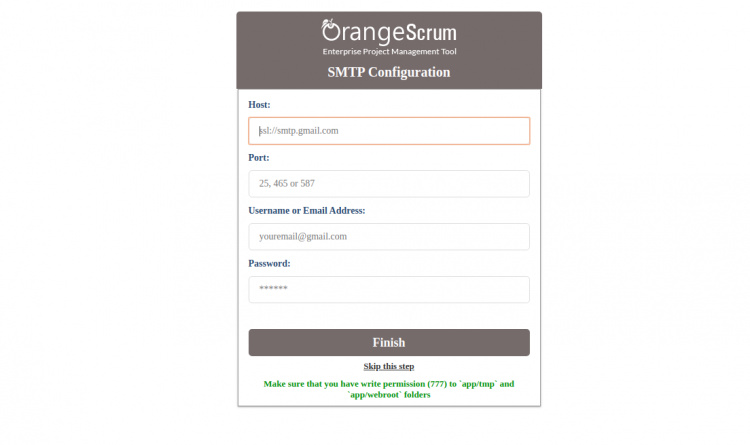
Proporciona tus datos SMTP o haz clic en el botón Omitir este paso . Deberías ver la siguiente pantalla:
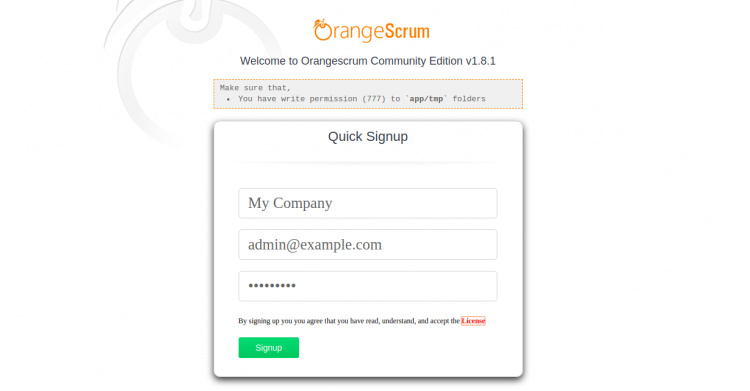
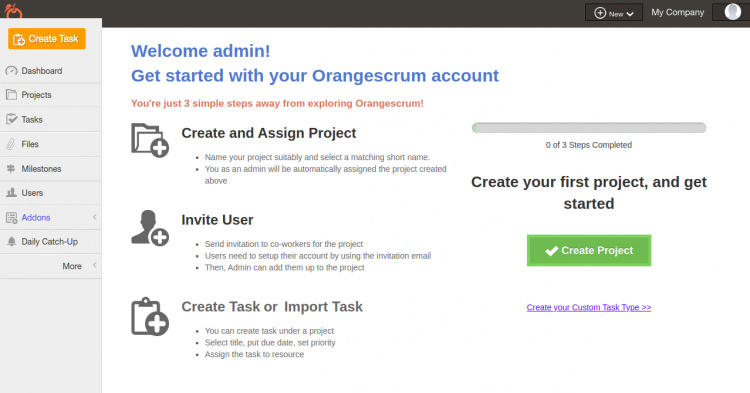
Introduce tu nombre de sitio, correo electrónico, contraseña y haz clic en el botón Registrarse. Serás redirigido al panel de control de Orangescrum en la siguiente página:
Conclusión
Enhorabuena! has instalado correctamente OrangeScrum con Let’s Encrypt SSL en el servidor Ubuntu 20.04. Ahora puedes crear tu primer proyecto, invitar a usuarios y crear y asignarles una tarea. No dudes en preguntarme si tienes alguna duda.