Cómo instalar WebERP en CentOS 8
webERP es un sistema de contabilidad y gestión empresarial gratuito, de código abierto y completo, basado en la web. Sólo necesitas un navegador web y un lector de PDF para utilizar el webERP. Con webERP, puedes gestionar muchas cosas, como pedidos de compra, tienda web, fabricación, ventas, libro mayor y envíos. Está escrito en PHP y utiliza MariaDB como base de datos. Este tutorial te mostrará cómo instalar webERP con Apache y Let’s Encrypt SSL en CentOS 8.
Requisitos previos
- Un servidor con CentOS 8.
- Un nombre de dominio válido apuntado con la IP de tu servidor.
- Una contraseña de root configurada en el servidor.
Instalar el servidor LAMP
En primer lugar, instala los paquetes Apache, MariaDB, PHP y otras extensiones de PHP mediante el siguiente comando:
dnf install httpd mariadb-server php php-mysqli php-curl php-json php-cgi php-xmlrpc php-gd php-mbstring unzip -y
Una vez instalados todos los paquetes, inicia el servicio de Apache y MariaDB y habilítalos para que se inicien al reiniciar el sistema mediante el siguiente comando:
systemctl start httpd mariadb
systemctl enable httpd mariadb
Una vez que hayas terminado, puedes pasar al siguiente paso.
Configurar MariaDB
A continuación, tendrás que establecer una contraseña de root de MariaDB y asegurar la instalación de MariaDB. Puedes hacerlo con el siguiente comando:
mysql_secure_installation
Responde a todas las preguntas como se muestra a continuación:
Enter current password for root (enter for none):
Set root password? [Y/n] Y
New password:
Re-enter new password:
Remove anonymous users? [Y/n] Y
Disallow root login remotely? [Y/n] Y
Remove test database and access to it? [Y/n] Y
Reload privilege tables now? [Y/n] Y

All done!  If you've completed all of the above steps, your MariaDB
installation should now be secure.

Thanks for using MariaDB!
A continuación, conéctate al shell de MariaDB con el siguiente comando:
mysql -u root -p
Una vez conectado, crea una base de datos y un usuario para webERP con el siguiente comando:
MariaDB [(none)]> create database weberp;
MariaDB [(none)]> create user weberp@localhost identified by 'password';
A continuación, concede todos los privilegios a la base de datos webERP con el siguiente comando:
MariaDB [(none)]> grant all privileges on weberp.* to weberp@localhost identified by 'password';
A continuación, vacía los privilegios y sal de MariaDB con el siguiente comando:
MariaDB [(none)]> flush privileges;
MariaDB [(none)]> exit;
Una vez que hayas terminado, puedes pasar al siguiente paso.
Instalar webERP
Primero, descarga la última versión de webERP con el siguiente comando:
wget https://sourceforge.net/projects/web-erp/files/webERP_4.15.zip
Una vez completada la descarga, extrae el archivo descargado al directorio raíz de la web de Apache con el siguiente comando:
unzip webERP_4.15.zip -d /var/www/html
A continuación, establece el permiso y la propiedad adecuados con el siguiente comando:
chown -R apache:apache /var/www/html/webERP
chmod -R 755 /var/www/html/webERP
Una vez que hayas terminado, puedes pasar al siguiente paso.
Configurar Apache para webERP
A continuación, tendrás que crear un nuevo archivo de configuración del host virtual de Apache para alojar el webERP. Puedes crearlo con el siguiente comando:
nano /etc/httpd/conf.d/weberp.conf
Añade las siguientes líneas:
<VirtualHost *:80>
ServerAdmin [email protected]
DocumentRoot /var/www/html/webERP
ServerName weberp.example.com
<Directory /var/www/html/webERP/>
Options FollowSymLinks
AllowOverride All
Order allow,deny
allow from all
</Directory>
ErrorLog /var/log/httpd/weberp.org-error_log
CustomLog /var/log/httpd/weberp.org-access_log common
</VirtualHost>
Guarda y cierra el archivo cuando hayas terminado. A continuación, reinicia el servicio Apache para aplicar los cambios:
systemctl restart httpd
Ahora, verifica el estado del Apache con el siguiente comando:
systemctl status httpd
Deberías obtener la siguiente salida:
? httpd.service - The Apache HTTP Server
   Loaded: loaded (/usr/lib/systemd/system/httpd.service; disabled; vendor preset: disabled)
  Drop-In: /usr/lib/systemd/system/httpd.service.d
           ??php-fpm.conf
   Active: active (running) since Sat 2021-05-01 05:57:27 EDT; 13s ago
     Docs: man:httpd.service(8)
 Main PID: 4896 (httpd)
   Status: "Running, listening on: port 80"
    Tasks: 213 (limit: 25014)
   Memory: 24.8M
   CGroup: /system.slice/httpd.service
           ??4896 /usr/sbin/httpd -DFOREGROUND
           ??4898 /usr/sbin/httpd -DFOREGROUND
           ??4899 /usr/sbin/httpd -DFOREGROUND
           ??4900 /usr/sbin/httpd -DFOREGROUND
           ??4901 /usr/sbin/httpd -DFOREGROUND

May 01 05:57:27 centos8 systemd[1]: Stopped The Apache HTTP Server.
May 01 05:57:27 centos8 systemd[1]: Starting The Apache HTTP Server...
En este punto, el servidor web Apache está configurado para alojar webERP. Ahora puedes pasar al siguiente paso.
Asegurar webERP con Let’s Encrypt SSL
A continuación, tendrás que instalar el cliente Certbot para instalar el SSL de Let’s Encrypt para webERP. Puedes instalarlo con el siguiente comando:
dnf install letsencrypt python3-certbot-apache
A continuación, obtén e instala un certificado SSL para tu dominio con el siguiente comando:
certbot --apache -d weberp.example.com
Se te pedirá que proporciones tu dirección de correo electrónico y que aceptes las condiciones del servicio:
Saving debug log to /var/log/letsencrypt/letsencrypt.log
Plugins selected: Authenticator apache, Installer apache
Enter email address (used for urgent renewal and security notices)
 (Enter 'c' to cancel): [email protected]

- - - - - - - - - - - - - - - - - - - - - - - - - - - - - - - - - - - - - - - -
Please read the Terms of Service at
https://letsencrypt.org/documents/LE-SA-v1.2-November-15-2017.pdf. You must
agree in order to register with the ACME server. Do you agree?
- - - - - - - - - - - - - - - - - - - - - - - - - - - - - - - - - - - - - - - -
(Y)es/(N)o: Y

- - - - - - - - - - - - - - - - - - - - - - - - - - - - - - - - - - - - - - - -
Would you be willing, once your first certificate is successfully issued, to
share your email address with the Electronic Frontier Foundation, a founding
partner of the Let's Encrypt project and the non-profit organization that
develops Certbot? We'd like to send you email about our work encrypting the web,
EFF news, campaigns, and ways to support digital freedom.
- - - - - - - - - - - - - - - - - - - - - - - - - - - - - - - - - - - - - - - -
(Y)es/(N)o: Y
Account registered.
Requesting a certificate for weberp.example.com
Performing the following challenges:
http-01 challenge for weberp.example.com
Waiting for verification.
Cleaning up challenges
Deploying Certificate to VirtualHost /etc/httpd/conf.d/weberp.conf
Redirecting all traffic on port 80 to ssl in /etc/httpd/conf.d/weberp.conf

- - - - - - - - - - - - - - - - - - - - - - - - - - - - - - - - - - - - - - - -
Congratulations! You have successfully enabled https://weberp.example.com
- - - - - - - - - - - - - - - - - - - - - - - - - - - - - - - - - - - - - - - -
Subscribe to the EFF mailing list (email: [email protected]).


IMPORTANT NOTES:
 - Congratulations! Your certificate and chain have been saved at:
   /etc/letsencrypt/live/weberp.example.com/fullchain.pem
   Your key file has been saved at:
   /etc/letsencrypt/live/weberp.example.com/privkey.pem
   Your certificate will expire on 2021-06-09. To obtain a new or
   tweaked version of this certificate in the future, simply run
   certbot again with the "certonly" option. To non-interactively
   renew *all* of your certificates, run "certbot renew"
 - If you like Certbot, please consider supporting our work by:

   Donating to ISRG / Let's Encrypt:   https://letsencrypt.org/donate
   Donating to EFF:                    https://eff.org/donate-le
Ahora puedes acceder a tu sitio web de forma segura utilizando la URL https://weberp.example.com.
Configurar el cortafuegos
A continuación, tendrás que permitir los puertos 80 y 443 a través del cortafuegos. Puedes permitirlos con el siguiente comando:
firewall-cmd --permanent --add-service=http
firewall-cmd --permanent --add-service=https
A continuación, recarga el cortafuegos para aplicar los cambios:
firewall-cmd --reload
Accede a la interfaz web de webERP
Ahora, abre tu navegador web y accede a la interfaz webERP utilizando la URL https://weberp.example.com. Deberías ver la siguiente página:
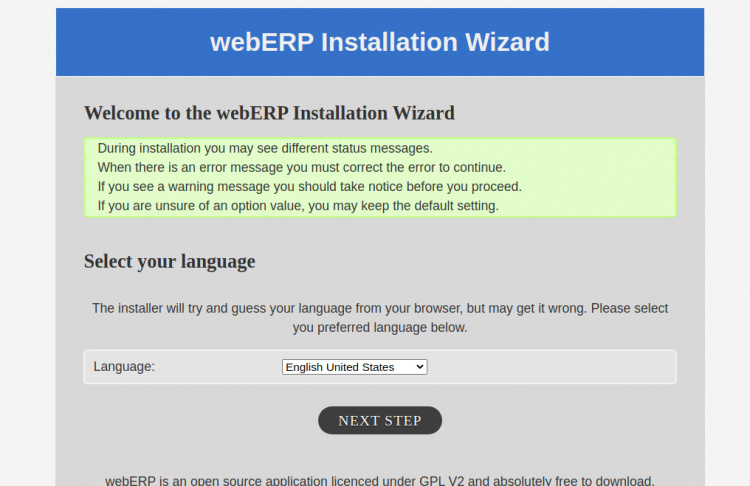
Selecciona tu idioma y haz clic en el PASO SIGUIENTE. Deberías ver la siguiente página:
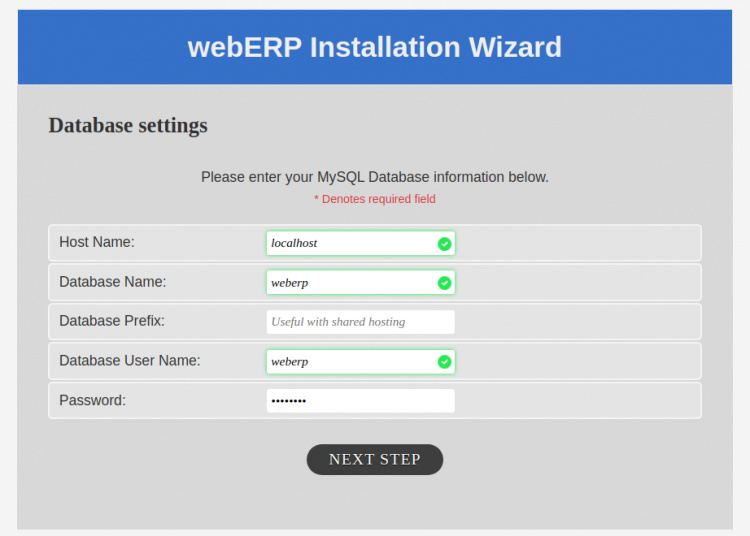
Proporciona el nombre de tu base de datos, el usuario y la contraseña y haz clic en el SIGUIENTE PASO. Deberías ver la siguiente página:
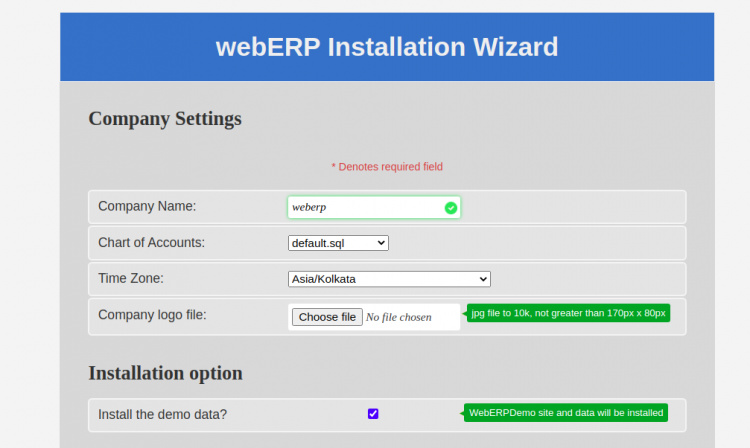
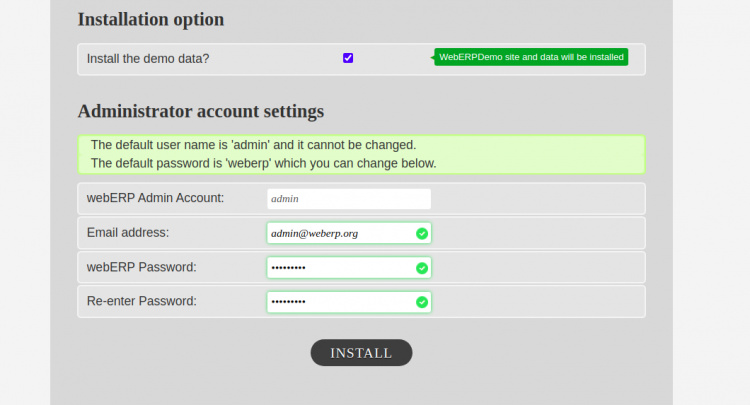
Proporciona el nombre de tu empresa, la zona horaria, el nombre de usuario y la contraseña del administrador y haz clic en el botón INSTALAR. Una vez finalizada la instalación, deberías ver la siguiente página:

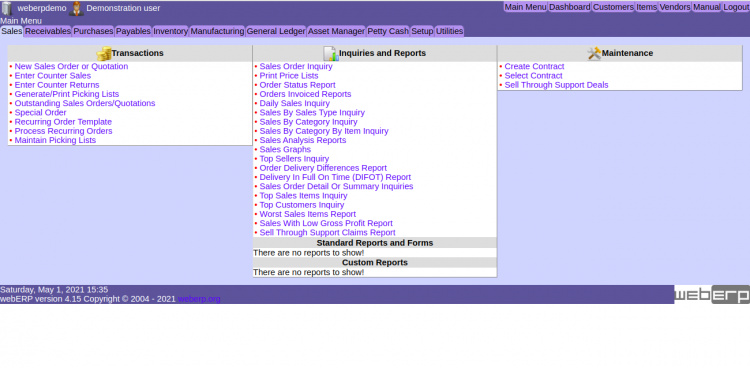
Proporciona tu nombre de usuario y contraseña de administrador y haz clic en el botón Iniciar sesión. Serás redirigido al panel de control de webERP:
Conclusión
Enhorabuena! has instalado con éxito webERP con Apache y Let’s Encrypt SSL en CentOS 8. Ahora puedes explorar webERP para obtener más funciones e implementarlas en tu entorno de producción.