Cómo instalar Seafile Self-Hosted Cloud Storage con Nginx en Ubuntu 22.04
Seafile es una plataforma autoalojada de código abierto para sincronizar y compartir archivos. Permite a los usuarios almacenar y cifrar datos en sus servidores sin depender de proveedores de terceros en la nube. Seafile te permite compartir archivos y carpetas mediante sincronización entre plataformas y enlaces protegidos por contraseña a archivos con fechas de caducidad. Seafile también versiona archivos que permiten al usuario restaurar archivos o carpetas eliminados y modificados.
En este tutorial, aprenderás a instalar Seafile en un servidor Ubuntu 22.04, MySQL y Nginx como servidor proxy inverso.
Requisitos previos
- Un servidor que ejecute Ubuntu 22.04 con un mínimo de 2 núcleos de CPU y 2 GB de RAM.
- Un usuario no root con privilegios sudo.
- Un nombre de dominio completo (FQDN) como
seafile.example.com. - Asegúrate de que todo está actualizado.
$ sudo apt update $ sudo apt upgrade - Pocos paquetes que necesite tu sistema.
$ sudo apt install wget curl nano software-properties-common dirmngr apt-transport-https gnupg2 ca-certificates lsb-release ubuntu-keyring unzip -yPuede que algunos de estos paquetes ya estén instalados en tu sistema.
Paso 1 – Configurar el Cortafuegos
El primer paso es configurar el cortafuegos. Ubuntu viene con ufw (Uncomplicated Firewall) por defecto.
Comprueba si el cortafuegos se está ejecutando.
$ sudo ufw status
Deberías obtener la siguiente salida.
Status: inactive
Permite el puerto SSH para que el cortafuegos no rompa la conexión actual al activarlo.
$ sudo ufw allow OpenSSH
Permite también los puertos HTTP y HTTPS.
$ sudo ufw allow http
$ sudo ufw allow https
Habilita el cortafuegos
$ sudo ufw enable
Command may disrupt existing ssh connections. Proceed with operation (y|n)? y
Firewall is active and enabled on system startup
Comprueba de nuevo el estado del cortafuegos.
$ sudo ufw status
Deberías ver un resultado similar.
Status: active

To                         Action      From
--                         ------      ----
OpenSSH                    ALLOW       Anywhere
80/tcp                     ALLOW       Anywhere
443                        ALLOW       Anywhere
OpenSSH (v6)               ALLOW       Anywhere (v6)
80/tcp (v6)                ALLOW       Anywhere (v6)
443 (v6)                   ALLOW       Anywhere (v6)
Paso 2 – Instalar las dependencias de Seafile
Como Seafile está escrito en el framework Django de Python, necesitas instalar sus dependencias y paquetes de Python para que funcione.
Ejecuta el siguiente comando para instalar las herramientas de Python, el gestor de paquetes Pip, las librerías SQL y Memcached.
$ sudo apt install -y python3 python3-setuptools python3-pip libmysqlclient-dev memcached libmemcached-dev
Ejecuta el siguiente comando para instalar las dependencias de Python.
$ sudo pip3 install --timeout=3600 django==3.2.* future==0.18.* mysqlclient==2.1.* \
    pymysql pillow==9.3.* pylibmc captcha==0.4 markupsafe==2.0.1 jinja2 sqlalchemy==1.4.3 \
    psd-tools django-pylibmc django_simple_captcha==0.5.* djangosaml2==1.5.* pysaml2==7.2.* pycryptodome==3.16.* cffi==1.15.1 lxml
Paso 3 – Instalar MySQL
Ubuntu 22.04 incluye la última versión de MySQL. Puedes instalarla con un solo comando.
$ sudo apt install -y mysql-server
Comprueba la versión de MySQL.
$ mysql --version
mysql  Ver 8.0.32-0ubuntu0.22.04.2 for Linux on x86_64 ((Ubuntu))
Este paso es necesario para las versiones de MySQL 8.0.28 y superiores. Entra en la Shell de MySQL.
$ sudo mysql
Ejecuta el siguiente comando para establecer la contraseña de tu usuario root. Asegúrate de que tiene una mezcla de números, mayúsculas, minúsculas y caracteres especiales.
mysql> ALTER USER 'root'@'localhost' IDENTIFIED WITH mysql_native_password BY 'YourPassword12!';
Sal del intérprete de comandos.
mysql> exit
Ejecuta el script de instalación segura de MySQL.
$ sudo mysql_secure_installation
Primero se te pedirá la contraseña de root. Introdúcela. A continuación, se te pedirá que instales el Componente Validar Contraseña. Comprueba la seguridad de las contraseñas utilizadas en MySQL. Pulsa Y para instalarlo. A continuación, se te pedirá que establezcas el nivel de la política de validación de contraseñas. Elige 2, ya que es el más fuerte.
Securing the MySQL server deployment.

Enter password for user root:

VALIDATE PASSWORD COMPONENT can be used to test passwords
and improve security. It checks the strength of password
and allows the users to set only those passwords which are
secure enough. Would you like to setup VALIDATE PASSWORD component?

Press y|Y for Yes, any other key for No: Y

There are three levels of password validation policy:

LOW    Length >= 8
MEDIUM Length >= 8, numeric, mixed case, and special characters
STRONG Length >= 8, numeric, mixed case, special characters and dictionary                  file

Please enter 0 = LOW, 1 = MEDIUM and 2 = STRONG: 2
Using existing password for root.

Estimated strength of the password: 100
A continuación, introduce N para negarte a cambiar la contraseña de root. Además, introduce Y para eliminar usuarios anónimos, no permitir inicios de sesión remotos de root, eliminar la base de datos de prueba y recargar las tablas de privilegios.
Change the password for root ? ((Press y|Y for Yes, any other key for No) : N

 ... skipping.
By default, a MySQL installation has an anonymous user,
allowing anyone to log into MySQL without having to have
a user account created for them. This is intended only for
testing, and to make the installation go a bit smoother.
You should remove them before moving into a production
environment.

Remove anonymous users? (Press y|Y for Yes, any other key for No) : Y
Success.


Normally, root should only be allowed to connect from
'localhost'. This ensures that someone cannot guess at
the root password from the network.

Disallow root login remotely? (Press y|Y for Yes, any other key for No) : Y
Success.

By default, MySQL comes with a database named 'test' that
anyone can access. This is also intended only for testing,
and should be removed before moving into a production
environment.


Remove test database and access to it? (Press y|Y for Yes, any other key for No) : Y
 - Dropping test database...
Success.

 - Removing privileges on test database...
Success.

Reloading the privilege tables will ensure that all changes
made so far will take effect immediately.

Reload privilege tables now? (Press y|Y for Yes, any other key for No) : Y
Success.

All done!
Paso 4 – Configurar MySQL
Accede al shell de MySQL. Introduce tu contraseña de root cuando se te solicite.
$ sudo mysql -u root -p
Crea las tres bases de datos siguientes.
mysql> CREATE DATABASE ccnet_db CHARACTER SET utf8;
mysql> CREATE DATABASE seafile_db CHARACTER SET utf8;
mysql> CREATE DATABASE seahub_db CHARACTER SET utf8;
Crea una cuenta de usuario SQL para acceder a estas bases de datos. Seafile sólo funciona con el plugin de autenticación mysql_native_password y como MySQL 8 no lo utiliza por defecto, por lo tanto tienes que especificarlo al crearlo.
mysql> CREATE USER 'seafile'@'localhost' IDENTIFIED WITH mysql_native_password BY 'Your_password2';
Concede al usuario todos los privilegios sobre las tres bases de datos.
mysql> GRANT ALL PRIVILEGES ON `ccnet_db`.* to `seafile`@localhost;
mysql> GRANT ALL PRIVILEGES ON `seafile_db`.* to `seafile`@localhost;
mysql> GRANT ALL PRIVILEGES ON `seahub_db`.* to `seafile`@localhost;
Vacía los privilegios del usuario.
mysql> FLUSH PRIVILEGES;
Sal del intérprete de comandos.
mysql> exit
Paso 5 – Crear un directorio y un usuario para Seafile
Crea el directorio para los archivos de programa de Seafile.
$ sudo mkdir /opt/seafile
Crea el usuario para Seafile.
$ sudo adduser --home /opt/seafile --shell /bin/bash seafile
Cambia la propiedad del directorio al nuevo usuario.
$ sudo chown -R seafile: /opt/seafile
Paso 6 – Descargar e instalar Seafile
Inicia sesión como usuario de Seafile. Introduce tu contraseña de usuario cuando se te solicite.
$ su seafile
Visita la página de descargas de Seafile y coge el enlace de descarga de la última versión de Seafile. En el momento de escribir este tutorial, la última versión es la 10.0.1.
Descarga el archivo del servidor Seafile.
$ wget https://s3.eu-central-1.amazonaws.com/download.seadrive.org/seafile-server_10.0.1_x86-64.tar.gz
Extrae el archivo.
$ tar xf seafile-server_10.0.1_x86-64.tar.gz
Cambia al directorio Seafile.
$ cd seafile-server-10.0.1/
Ejecuta el script de instalación de Seafile.
$ ./setup-seafile-mysql.sh
Se iniciará el script de instalación. Pulsa la tecla ENTER para continuar.
Checking python on this machine ...

-----------------------------------------------------------------
This script will guide you to setup your seafile server using MySQL.
Make sure you have read seafile server manual at

        https://download.seafile.com/published/seafile-manual/home.md

Press ENTER to continue
-----------------------------------------------------------------
A continuación, configura tu servidor Seafile proporcionando un nombre para tu servidor, un nombre de dominio (seafile.ejemplo.com) y el puerto. Puedes dejar vacío el campo del puerto para que Seafile se ciña al 8082 como puerto por defecto. Una vez configurado, pulsa la tecla ENTER para continuar.
What is the name of the server? It will be displayed on the client.
3 - 15 letters or digits
[ server name ] Howtoforge

What is the ip or domain of the server?
For example: www.mycompany.com, 192.168.1.101
[ This server's ip or domain ] seafile.example.com

Which port do you want to use for the seafile fileserver?
[ default "8082" ]
A continuación, se te pedirá que elijas una forma de inicializar las bases de datos de Seafile. Como ya hemos creado la base de datos, elige la 2ª opción.
-------------------------------------------------------
Please choose a way to initialize seafile databases:
-------------------------------------------------------

[1] Create new ccnet/seafile/seahub databases
[2] Use existing ccnet/seafile/seahub databases

[ 1 or 2 ] 2
A continuación, se te pedirá que introduzcas los detalles de la base de datos para Seafile. Deja vacíos los campos de host y puerto para que Seafile seleccione los valores por defecto. Introduce los demás valores según lo configurado en el Paso 4.
What is the host of mysql server?
[ default "localhost" ]

What is the port of mysql server?
[ default "3306" ]

Which mysql user to use for seafile?
[ mysql user for seafile ] seafile

What is the password for mysql user "seafile"?
[ password for seafile ]

verifying password of user seafile ...  done

Enter the existing database name for ccnet:
[ ccnet database ] ccnet_db

verifying user "seafile" access to database ccnet_db ...  done

Enter the existing database name for seafile:
[ seafile database ] seafile_db

verifying user "seafile" access to database seafile_db ...  done

Enter the existing database name for seahub:
[ seahub database ] seahub_db

verifying user "seafile" access to database seahub_db ...  done
A continuación, se te mostrarán las configuraciones de Seafile. Pulsa la tecla ENTER para continuar la instalación.
---------------------------------
This is your configuration
---------------------------------

    server name:            Howtoforge
    server ip/domain:       seafile.example.com

    seafile data dir:       /opt/seafile/seafile-data
    fileserver port:        8082

    database:               use existing
    ccnet database:         ccnet_db
    seafile database:       seafile_db
    seahub database:        seahub_db
    database user:          seafile


---------------------------------
Press ENTER to continue, or Ctrl-C to abort
---------------------------------
Verás la siguiente pantalla si la instalación se ha realizado correctamente.
Generating ccnet configuration ...

Generating seafile configuration ...

done
Generating seahub configuration ...

----------------------------------------
Now creating ccnet database tables ...

----------------------------------------
----------------------------------------
Now creating seafile database tables ...

----------------------------------------
----------------------------------------
Now creating seahub database tables ...

----------------------------------------

creating seafile-server-latest symbolic link ...  done


-----------------------------------------------------------------
Your seafile server configuration has been finished successfully.
-----------------------------------------------------------------

run seafile server:     ./seafile.sh { start | stop | restart }
run seahub  server:     ./seahub.sh  { start <port> | stop | restart <port> }

-----------------------------------------------------------------
If you are behind a firewall, remember to allow input/output of these tcp ports:
-----------------------------------------------------------------

port of seafile fileserver:   8082
port of seahub:               8000

When problems occur, Refer to

        https://download.seafile.com/published/seafile-manual/home.md

for information.
Paso 7 – Iniciar el Servidor Seafile
Cambia al directorio /opt/seafile/seafile-server-latest.
$ cd /opt/seafile/seafile-server-latest
Ejecuta el siguiente comando para iniciar el servidor Seaf.
$ ./seafile.sh start
Obtendrás la siguiente salida.
Starting seafile server, please wait ...
** Message: 04:42:32.937: seafile-controller.c(621): No seafevents.

Seafile server started

Done.
Ejecuta el siguiente comando para iniciar Seahub.
$ ./seahub.sh start
La primera vez que se inicie Seahub, se te pedirán los datos de la cuenta de administrador.
LC_ALL is not set in ENV, set to en_US.UTF-8
Starting seahub at port 8000 ...

----------------------------------------
It's the first time you start the seafile server. Now let's create the admin account
----------------------------------------

What is the email for the admin account?
[ admin email ] [email protected]

What is the password for the admin account?
[ admin password ]

Enter the password again:
[ admin password again ]


----------------------------------------
Successfully created seafile admin
----------------------------------------


Seahub is started

Done.
Detén los servidores Seafile y Seahub.
$ ./seafile.sh stop
$ ./seahub.sh stop
Paso 8 – Configurar Seafile
Abre el archivo /opt/seafile/conf/seafile.conf para editarlo.
$ nano /opt/seafile/conf/seafile.conf
Añade el parámetro host = 127.0.0.1 en la sección [fileserver].
[fileserver]
host = 127.0.0.1
port = 8082
Guarda el archivo pulsando Ctrl + X e introduciendo Y cuando se te solicite.
Abre el archivo /opt/seafile/conf/seahub_settings.py para editarlo.
$ nano /opt/seafile/conf/seahub_settings.py
Modifica el valor de SERVICE_URL para que refleje el protocolo HTTPS.
SERVICE_URL = "https://seafile.example.com/"
Añade la siguiente línea debajo.
FILE_SERVER_ROOT = "https://seafile.example.com/seafhttp"
Añade el siguiente código al final del archivo.
CACHES = {
    'default': {
        'BACKEND': 'django_pylibmc.memcached.PyLibMCCache',
        'LOCATION': '127.0.0.1:11211',
    },
}
Guarda el archivo pulsando Ctrl + X e introduciendo Y cuando se te solicite.
Sal del shell de usuario Seafile.
$ exit
Paso 9 – Crear el Servicio Systemd
Para asegurarte de que Seafile se inicia automáticamente al arrancar y puede resistir los reinicios, tienes que crearle archivos de unidad de servicio Systemd.
Crea y abre el archivo /etc/systemd/system/seafile.service para editarlo.
$ sudo nano /etc/systemd/system/seafile.service
Pega en él el siguiente código.
[Unit]
Description=Seafile
# add mysql.service or postgresql.service depending on your database to the line below
After=network.target mysql.service

[Service]
Type=forking
ExecStart=/opt/seafile/seafile-server-latest/seafile.sh start
ExecStop=/opt/seafile/seafile-server-latest/seafile.sh stop
LimitNOFILE=infinity
User=seafile
Group=seafile

[Install]
WantedBy=multi-user.target
Guarda el archivo pulsando Ctrl + X e introduciendo Y cuando se te pida.
Crea y abre el archivo /etc/systemd/system/seahub.service para editarlo.
$ sudo nano /etc/systemd/system/seahub.service
Pega en él el siguiente código.
[Unit]
Description=Seafile hub
After=network.target seafile.service

[Service]
Type=forking
# change start to start-fastcgi if you want to run fastcgi
ExecStart=/opt/seafile/seafile-server-latest/seahub.sh start
ExecStop=/opt/seafile/seafile-server-latest/seahub.sh stop
User=seafile
Group=seafile

[Install]
WantedBy=multi-user.target
Guarda el archivo pulsando Ctrl + X e introduciendo Y cuando se te solicite.
Recarga el demonio Systemctl.
$ sudo systemctl daemon-reload
Ejecuta los siguientes comandos para activar e iniciar los servicios Seafile y Seahub.
$ sudo systemctl enable --now seafile
$ sudo systemctl enable --now seahub
Comprueba el estado de ambos servicios.
$ sudo systemctl status seafile
? seafile.service - Seafile
     Loaded: loaded (/etc/systemd/system/seafile.service; enabled; vendor preset: enabled)
     Active: active (running) since Wed 2023-04-19 07:20:38 UTC; 24s ago
      Tasks: 19 (limit: 1026)
     Memory: 11.6M
        CPU: 102ms
     CGroup: /system.slice/seafile.service
             ??3601 /opt/seafile/seafile-server-10.0.1/seafile/bin/seafile-controller -c /opt/seafile/ccnet -d /opt/seafile/seafile-data -F /opt/seafile/conf
A continuación, comprueba el estado de Seahub.
$ sudo systemctl status seahub
? seahub.service - Seafile hub
     Loaded: loaded (/etc/systemd/system/seahub.service; enabled; vendor preset: enabled)
     Active: active (running) since Wed 2023-04-19 07:20:54 UTC; 19s ago
    Process: 3655 ExecStart=/opt/seafile/seafile-server-latest/seahub.sh start (code=exited, status=0/SUCCESS)
   Main PID: 3668 (python3)
      Tasks: 6 (limit: 1026)
     Memory: 85.8M
        CPU: 1.177s
     CGroup: /system.slice/seahub.service
             ??3668 python3 /opt/seafile/seafile-server-10.0.1/seahub/thirdpart/bin/gunicorn seahub.wsgi:application -c /opt/seafile/conf/gunicorn.conf.py --preload
Paso 10 – Instala Nginx
Ubuntu 22.04 incluye una versión antigua de Nginx. Para instalar la última versión, necesitas descargar el repositorio oficial de Nginx.
Importa la clave de firma de Nginx.
$ curl https://nginx.org/keys/nginx_signing.key | gpg --dearmor \
| sudo tee /usr/share/keyrings/nginx-archive-keyring.gpg >/dev/null
Añade el repositorio de la versión estable de Nginx.
$ echo "deb [signed-by=/usr/share/keyrings/nginx-archive-keyring.gpg arch=amd64] \
http://nginx.org/packages/ubuntu `lsb_release -cs` nginx" \
| sudo tee /etc/apt/sources.list.d/nginx.list
Actualiza los repositorios del sistema.
$ sudo apt update
Instala Nginx.
$ sudo apt install nginx
Verifica la instalación.
$ nginx -v
nginx version: nginx/1.24.0
Iniciar el servidor Nginx.
$ sudo systemctl start nginx
Paso 11 – Instalar SSL
Necesitamos instalar Certbot para generar el certificado SSL. Puedes instalar Certbot utilizando el repositorio de Ubuntu o descargar la última versión utilizando la herramienta Snapd. Nosotros utilizaremos la versión Snapd.
Ubuntu 22.04 viene con Snapd instalado por defecto. Ejecuta los siguientes comandos para asegurarte de que tu versión de Snapd está actualizada.
$ sudo snap install core && sudo snap refresh core
Instala Certbot.
$ sudo snap install --classic certbot
Utiliza el siguiente comando para asegurarte de que se puede ejecutar el comando Certbot creando un enlace simbólico al directorio /usr/bin.
$ sudo ln -s /snap/bin/certbot /usr/bin/certbot
Ejecuta el siguiente comando para generar un certificado SSL.
$ sudo certbot certonly --nginx --agree-tos --no-eff-email --staple-ocsp --preferred-challenges http -m [email protected] -d seafile.example.com
El comando anterior descargará un certificado en el directorio /etc/letsencrypt/live/seafile.example.com de tu servidor.
Genera un certificado de grupo Diffie-Hellman.
$ sudo openssl dhparam -dsaparam -out /etc/ssl/certs/dhparam.pem 4096
Comprueba el servicio programador de renovaciones de Certbot.
$ sudo systemctl list-timers
Encontrarás snap.certbot.renew.service como uno de los servicios programados para ejecutarse.
NEXT                        LEFT          LAST                        PASSED        UNIT                       ACTIVATES
Wed 2023-04-19 10:31:47 UTC 2h 55min left Wed 2023-04-19 03:31:58 UTC 4h 3min ago   ua-timer.timer             ua-timer.service
Wed 2023-04-19 12:02:42 UTC 4h 26min left Wed 2023-04-19 03:19:20 UTC 4h 16min ago  motd-news.timer            motd-news.service
Wed 2023-04-19 18:19:56 UTC 10h left      Wed 2023-04-19 07:19:52 UTC 16min ago     apt-daily.timer            apt-daily.service
Wed 2023-04-19 22:51:00 UTC 15h left      n/a                         n/a           snap.certbot.renew.timer   snap.certbot.renew.service
Realiza una ejecución en seco del proceso para comprobar si la renovación SSL funciona correctamente.
$ sudo certbot renew --dry-run
Si no ves ningún error, ya está todo listo. Tu certificado se renovará automáticamente.
Paso 12 – Configurar Nginx
Crea y abre el archivo /etc/nginx/conf.d/seafile.conf para editarlo.
$ sudo nano /etc/nginx/conf.d/seafile.conf
Pega en él el siguiente código.
log_format seafileformat '$http_x_forwarded_for $remote_addr [$time_local] "$request" $status $body_bytes_sent "$http_referer" "$http_user_agent" $upstream_response_time';

server {
    listen       80;
    listen       [::]:80;
    server_name  seafile.example.com;
    rewrite ^ https://$http_host$request_uri? permanent;    # Forced redirect from HTTP to HTTPS

    server_tokens off;      # Prevents the Nginx version from being displayed in the HTTP response header
}

server {
    listen 443 ssl http2;
    listen [::]:443 ssl http2;

    ssl_certificate /etc/letsencrypt/live/seafile.example.com/fullchain.pem;
    ssl_certificate_key /etc/letsencrypt/live/seafile.example.com/privkey.pem;
    ssl_trusted_certificate /etc/letsencrypt/live/seafile.example.com/chain.pem;
    ssl_session_timeout  5m;
    ssl_session_cache shared:MozSSL:10m;
    ssl_session_tickets off;
    ssl_protocols TLSv1.2 TLSv1.3;
    ssl_prefer_server_ciphers on;
    ssl_ciphers ECDHE-ECDSA-AES128-GCM-SHA256:ECDHE-RSA-AES128-GCM-SHA256:ECDHE-ECDSA-AES256-GCM-SHA384:ECDHE-RSA-AES256-GCM-SHA384:ECDHE-ECDSA-CHACHA20-POLY1305:ECDHE-RSA-CHACHA20-POLY1305:DHE-RSA-AES128-GCM-SHA256:DHE-RSA-AES256-GCM-SHA384;
    ssl_ecdh_curve X25519:prime256v1:secp384r1:secp521r1;
    ssl_stapling on;
    ssl_stapling_verify on;
    ssl_dhparam /etc/ssl/certs/dhparam.pem;
    resolver 8.8.8.8;

    server_name seafile.example.com;
    server_tokens off;

    location / {
        proxy_pass         http://127.0.0.1:8000;
        proxy_set_header   Host $host;
        proxy_set_header   X-Real-IP $remote_addr;
        proxy_set_header   X-Forwarded-For $proxy_add_x_forwarded_for;
        proxy_set_header   X-Forwarded-Host $server_name;
        proxy_read_timeout 1200s;

        proxy_set_header   X-Forwarded-Proto https;

        # used for view/edit office file via Office Online Server
        client_max_body_size 0;

        access_log      /var/log/nginx/seahub.access.log seafileformat;
        error_log       /var/log/nginx/seahub.error.log;
    }

    location /seafhttp {
        rewrite ^/seafhttp(.*)$ $1 break;
        proxy_pass http://127.0.0.1:8082;
        client_max_body_size 0;
        proxy_set_header   X-Forwarded-For $proxy_add_x_forwarded_for;

        proxy_connect_timeout  36000s;
        proxy_read_timeout  36000s;
        proxy_send_timeout  36000s;

        send_timeout  36000s;

        # Uncomment the following line if you want to support uploads > 4GB
        # proxy_request_buffering off;

        access_log      /var/log/nginx/seafhttp.access.log seafileformat;
        error_log       /var/log/nginx/seafhttp.error.log;
    }

    location /media {
        root /opt/seafile/seafile-server-latest/seahub;
    }
}
Guarda el archivo pulsando Ctrl + X e introduciendo Y cuando se te pida una vez hayas terminado.
Abre el archivo /etc/nginx/nginx.conf para editarlo.
$ sudo nano /etc/nginx/nginx.conf
Añade la siguiente línea antes de la línea include /etc/nginx/conf.d/*.conf;.
server_names_hash_bucket_size 64;
Guarda el archivo pulsando Ctrl + X e introduciendo Y cuando se te solicite.
Verifica la sintaxis del archivo de configuración de Nginx.
$ sudo nginx -t
nginx: the configuration file /etc/nginx/nginx.conf syntax is ok
nginx: configuration file /etc/nginx/nginx.conf test is successful
Reinicia el servicio Nginx.
$ sudo systemctl restart nginx
Paso 13 – Accede a Seafile
Abre la URL https://seafile.example.com en tu navegador y obtendrás la siguiente pantalla de acceso.
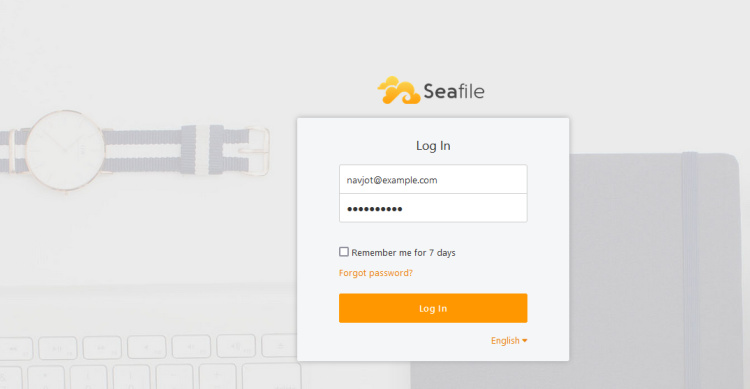
Introduce las credenciales que creaste en el paso 7 y haz clic en el botón Iniciar sesión para continuar. Te aparecerá la siguiente página.
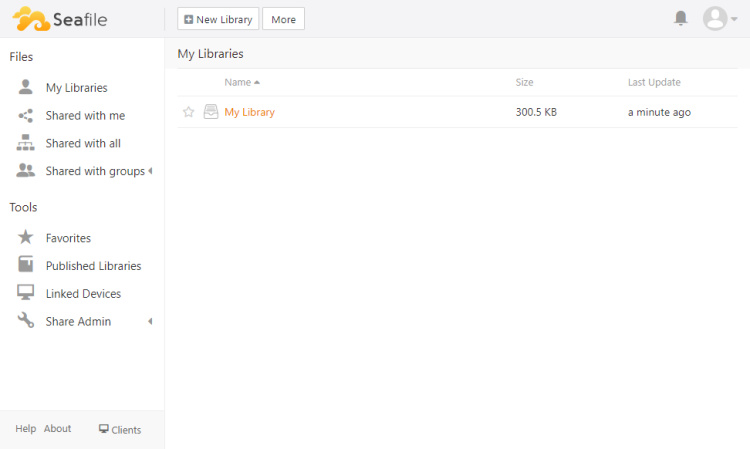
Haz clic en Mi biblioteca para abrir la biblioteca predeterminada.
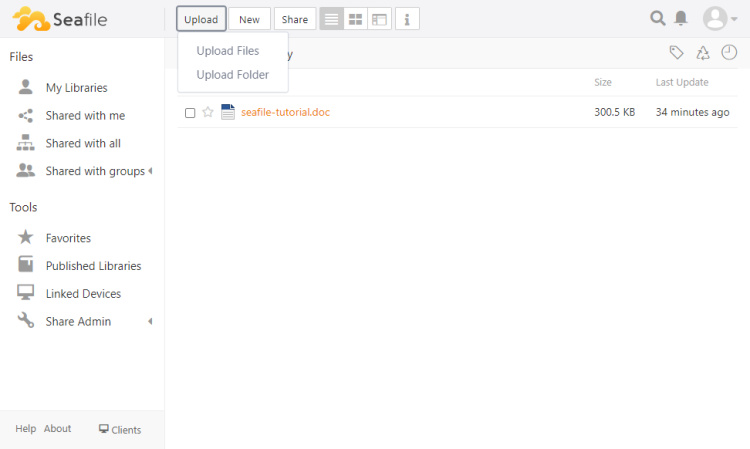
Haz clic en el botón Subir y selecciona la opción Subir archivos. Selecciona el archivo que quieres subir y haz clic en el botón Abrir.
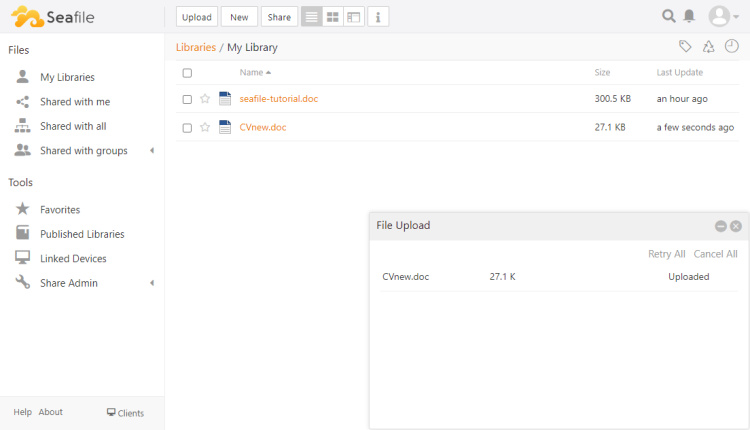
La barra de progreso se cargará y tu archivo se subirá en breve.
Para acceder al panel de Administración, haz clic en el icono de la imagen de perfil en la zona superior derecha.
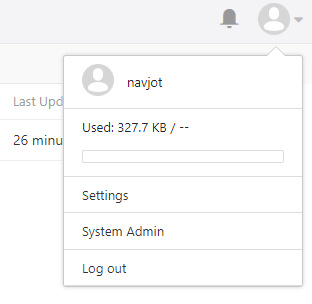
Selecciona la opción Administrador del sistema para abrir el panel de administración.
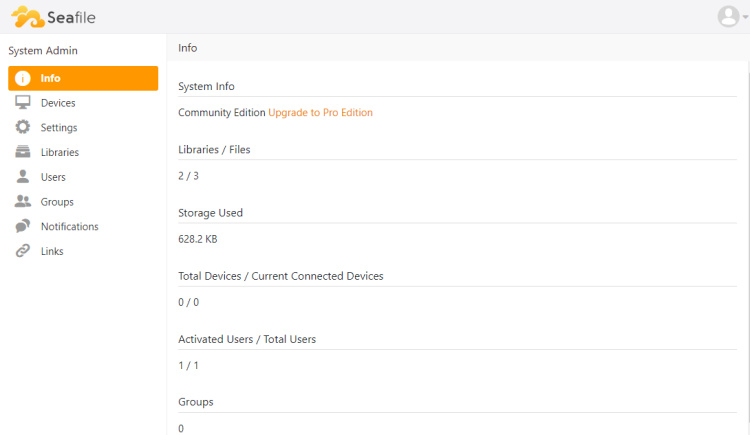
A partir de aquí, puedes cambiar la marca de tu sitio, activar contraseñas más seguras y la autenticación de dos factores, desactivar los registros y gestionar varios usuarios, entre otras opciones.
Conclusión
Con esto concluye nuestro tutorial sobre la instalación del almacenamiento en la nube autoalojado Seafile en un servidor Ubuntu 22.04. Si tienes alguna pregunta, publícala en los comentarios a continuación.