Cómo instalar osTicket en Ubuntu 22.04
osTicket es un sistema de gestión de tickets de código abierto y uno de los más utilizados por las pequeñas y medianas empresas. Es un portal de atención al cliente basado en web, sencillo y fácil de usar, que te ayuda a gestionar y hacer un seguimiento de todos los tickets. osTicket te permite definir reglas de enrutamiento de tickets para enviarlos a la persona correcta. Puedes personalizar y añadir tu logotipo, imágenes y vídeos a los tickets. osTicket admite muchos tipos de bases de datos, como MySQL y PostgreSQL, y puede integrarse con LDAP/Directorio Activo para la autenticación central.
Este post explicará cómo instalar osTicket con Apache en Ubuntu 22.04.
Requisitos previos
- Un servidor que ejecute Ubuntu 22.04.
- Un nombre de dominio válido apuntando a la IP de tu servidor.
- Una contraseña de root está configurada en el servidor.
Instalar Apache, MariaDB y PHP
En primer lugar, tendrás que instalar el servidor web Apache, MariaDB, PHP y otras extensiones de PHP en tu servidor. Puedes instalar todos los paquetes utilizando el siguiente comando.
apt install apache2 mariadb-server php libapache2-mod-php php-mysql php-cgi php-fpm php-cli php-curl php-gd php-imap php-mbstring php-pear php-intl php-apcu php-common php-bcmath -y
Una vez instalados todos los paquetes, inicia y habilita el servicio Apache y MariaDB utilizando el siguiente comando.
systemctl start apache2
systemctl enable apache2
systemctl start mariadb
systemctl enable mariadb
Crear una base de datos para osTicket
En primer lugar, asegura la instalación de MariaDB con el siguiente comando.
mysql_secure_installation
Responde a todas las preguntas para establecer una contraseña de root de MariaDB y asegurar la instalación:
Enter current password for root (enter for none):
OK, successfully used password, moving on...

Set root password? [Y/n] Y
New password:
Re-enter new password:
Password updated successfully!

Remove anonymous users? [Y/n] Y
Disallow root login remotely? [Y/n] Y
Remove test database and access to it? [Y/n] Y
Reload privilege tables now? [Y/n] Y
A continuación, inicia sesión en el shell de MariaDB con el siguiente comando.
mysql -u root -p
Una vez dentro, crea una base de datos y un usuario para osTicket con el siguiente comando.
MariaDB [(none)]> CREATE DATABASE osticket;
MariaDB [(none)]> CREATE USER 'osticket'@'localhost' IDENTIFIED BY 'securepassword';
A continuación, concede todos los privilegios a la base de datos osTicket con el siguiente comando.
MariaDB [(none)]> GRANT ALL PRIVILEGES ON osticket.* TO osticket@localhost IDENTIFIED BY "securepassword";
A continuación, vacía los privilegios y sal del intérprete de comandos MariaDB con el siguiente comando.
MariaDB [(none)]> FLUSH PRIVILEGES;
MariaDB [(none)]> EXIT;
Cuando hayas terminado, puedes pasar al siguiente paso.
Descarga osTicket
Primero, descarga la última versión de osTicket con el siguiente comando.
wget https://github.com/osTicket/osTicket/releases/download/v1.17.2/osTicket-v1.17.2.zip
Una vez descargado osTicket, crea un directorio de osTicket y extrae el archivo descargado dentro de ese directorio.
mkdir /var/www/html/osticket
unzip osTicket-v1.17.2.zip -d /var/www/html/osticket
A continuación, cambia la propiedad y el permiso del directorio osTicket con el siguiente comando:
chown -R www-data:www-data /var/www/html/osticket
chmod -R 755 /var/www/html/osticket
Ahora, cambia el nombre del archivo de configuración de muestra de osTicket con el comando que se indica a continuación:
mv /var/www/html/osticket/upload/include/ost-sampleconfig.php /var/www/html/osticket/upload/include/ost-config.php
Una vez que hayas terminado, puedes pasar al siguiente paso.
Crear un host virtual Apache
A continuación, tendrás que crear un archivo de configuración de host virtual Apache para osTicket. Puedes crearlo con el siguiente comando.
nano /etc/apache2/sites-available/osticket.conf
Añade las siguientes líneas:
<VirtualHost *:80>
        ServerName osticket.example.com
        ServerAdmin admin@localhost
        DocumentRoot /var/www/html/osticket/upload

        <Directory /var/www/html/osticket/upload>
                Require all granted
                Options FollowSymlinks
                AllowOverride All
        </Directory>

        ErrorLog ${APACHE_LOG_DIR}/osticket.error.log
        CustomLog ${APACHE_LOG_DIR}/osticket.access.log combined
</VirtualHost>
Guarda y cierra el archivo cuando hayas terminado. A continuación, activa el host virtual osTicket y habilita el módulo de reescritura de Apache con el siguiente comando:
a2ensite osticket.conf
a2enmod rewrite
A continuación, reinicia el servicio Apache para aplicar los cambios de configuración:
systemctl restart apache2
Puedes comprobar el estado de Apache con el siguiente comando.
systemctl status apache2
Deberías obtener la siguiente salida.
? apache2.service - The Apache HTTP Server
     Loaded: loaded (/lib/systemd/system/apache2.service; enabled; vendor preset: enabled)
     Active: active (running) since Wed 2022-12-21 07:20:15 UTC; 3s ago
       Docs: https://httpd.apache.org/docs/2.4/
    Process: 62019 ExecStart=/usr/sbin/apachectl start (code=exited, status=0/SUCCESS)
   Main PID: 62023 (apache2)
      Tasks: 6 (limit: 2238)
     Memory: 15.4M
        CPU: 42ms
     CGroup: /system.slice/apache2.service
             ??62023 /usr/sbin/apache2 -k start
             ??62024 /usr/sbin/apache2 -k start
             ??62025 /usr/sbin/apache2 -k start
             ??62026 /usr/sbin/apache2 -k start
             ??62027 /usr/sbin/apache2 -k start
             ??62028 /usr/sbin/apache2 -k start

Dec 21 07:20:15 ubuntu2204 systemd[1]: apache2.service: Deactivated successfully.
Dec 21 07:20:15 ubuntu2204 systemd[1]: Stopped The Apache HTTP Server.
Dec 21 07:20:15 ubuntu2204 systemd[1]: Starting The Apache HTTP Server...
Iniciar el Asistente de Instalación de osTicket
Ahora puedes iniciar el asistente de instalación de osTicket utilizando la URL http://osticket.example.com. Deberías ver la siguiente página.
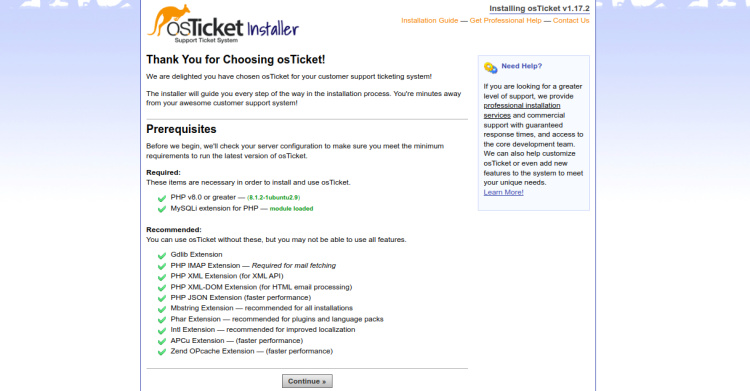
Haz clic en Continuar. Deberías ver la página de instalación básica.
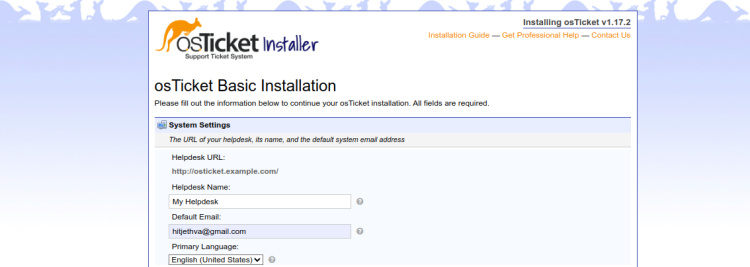
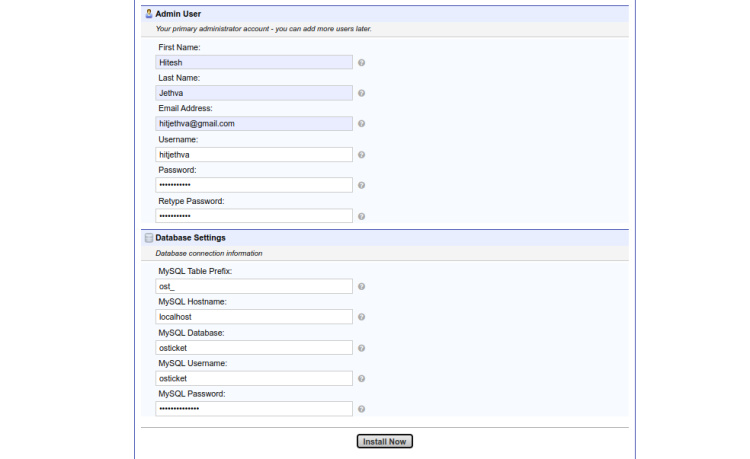
Define la URL de tu servicio de asistencia, el nombre, el correo electrónico, el nombre de la base de datos, el nombre de usuario y la contraseña, y haz clic en el botón Instalar ahora para iniciar la instalación. Una vez instalado osTicket, deberías ver la siguiente página.

Para acceder al panel de control de osTicket, escribe la URL http://osticket.example.com/scp en tu navegador web. Deberías ver la página de inicio de sesión de osTicket.
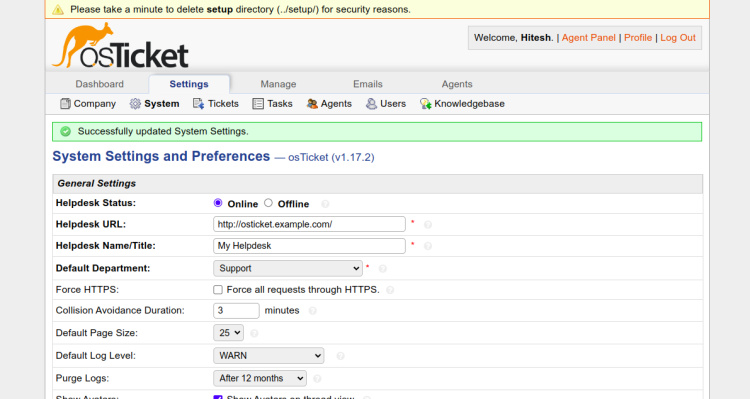
Introduce tu nombre de usuario y contraseña de administrador y pulsa el botón Iniciar sesión. Deberías ver el panel de control de osTicket en la siguiente pantalla.
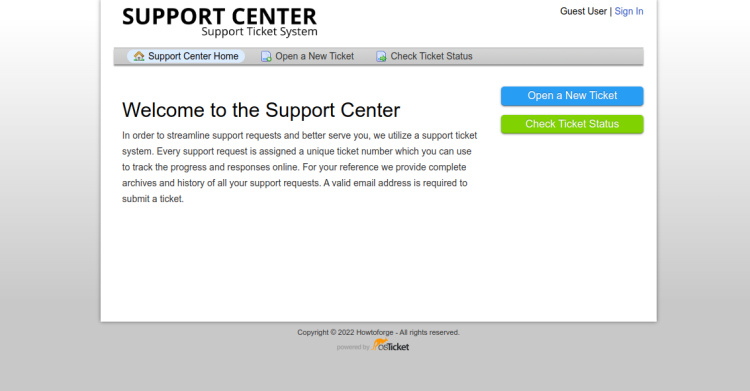
También puedes acceder a la página por defecto de osTicket utilizando la URL http://osticket.example.com.

Asegurar osTicket con Let’s Encrypt SSL
Para asegurar tu sitio web con Let’s Encrypt SSL, necesitarás instalar el paquete certbot en tu servidor.
Primero, instala el gestor de paquetes Snap con el siguiente comando:
apt install snapd
A continuación, actualiza el paquete Snap a la última versión:
snap install core
snap refresh core
A continuación, instala el paquete certbot con el siguiente comando:
snap install --classic certbot
A continuación, crea un enlace simbólico para el binario de Certbot en la ubicación del sistema:
ln -s /snap/bin/certbot /usr/bin/certbot
A continuación, ejecuta el siguiente comando para descargar e instalar los certificados SSL de Let’s Encrypt:
certbot --apache -d osticket.example.com
Se te pedirá que proporciones tu dirección de correo electrónico y que aceptes las condiciones del servicio:
Saving debug log to /var/log/letsencrypt/letsencrypt.log
Enter email address (used for urgent renewal and security notices)
 (Enter 'c' to cancel): [email protected]

- - - - - - - - - - - - - - - - - - - - - - - - - - - - - - - - - - - - - - - -
Please read the Terms of Service at
https://letsencrypt.org/documents/LE-SA-v1.3-September-21-2022.pdf. You must
agree in order to register with the ACME server. Do you agree?
- - - - - - - - - - - - - - - - - - - - - - - - - - - - - - - - - - - - - - - -
(Y)es/(N)o: Y

- - - - - - - - - - - - - - - - - - - - - - - - - - - - - - - - - - - - - - - -
Would you be willing, once your first certificate is successfully issued, to
share your email address with the Electronic Frontier Foundation, a founding
partner of the Let's Encrypt project and the non-profit organization that
develops Certbot? We'd like to send you email about our work encrypting the web,
EFF news, campaigns, and ways to support digital freedom.
- - - - - - - - - - - - - - - - - - - - - - - - - - - - - - - - - - - - - - - -
(Y)es/(N)o: Y
Escribe Y y pulsa la tecla Intro para descargar e instalar los certificados SSL para tu dominio:
Account registered.
Requesting a certificate for osticket.example.com

Successfully received certificate.
Certificate is saved at: /etc/letsencrypt/live/osticket.example.com/fullchain.pem
Key is saved at:         /etc/letsencrypt/live/osticket.example.com/privkey.pem
This certificate expires on 2023-03-22.
These files will be updated when the certificate renews.
Certbot has set up a scheduled task to automatically renew this certificate in the background.

Deploying certificate
Successfully deployed certificate for osticket.example.com to /etc/apache2/sites-enable/osticket.conf
Congratulations! You have successfully enabled HTTPS on https://osticket.example.com

- - - - - - - - - - - - - - - - - - - - - - - - - - - - - - - - - - - - - - - -
If you like Certbot, please consider supporting our work by:
 * Donating to ISRG / Let's Encrypt:   https://letsencrypt.org/donate
 * Donating to EFF:                    https://eff.org/donate-le
- - - - - - - - - - - - - - - - - - - - - - - - - - - - - - - - - - - - - - - -
Conclusión
En este post, te hemos mostrado cómo instalar osTicket con Apache en un servidor Ubuntu 22.04. Ahora puedes desplegar osTicket en tu organización para escalar y agilizar tu servicio de atención al cliente y mejorar drásticamente su experiencia.