Cómo instalar Jupyter Notebook en Ubuntu 22.04
Jupyter Notebook es una plataforma informática interactiva, gratuita, de código abierto y basada en la web, que permite a los usuarios editar y ejecutar documentos a través de un navegador web. Se basa en Python y permite crear y compartir documentos que contienen código en vivo, ecuaciones y visualizaciones a través de la web. Su objetivo es desarrollar software de código abierto, estándares abiertos y servicios para la informática interactiva a través de múltiples lenguajes de programación.
En este tutorial, te mostraré cómo instalar el software Jupyter Notebook en Ubuntu 22.04.
Requisitos previos
- Un servidor que ejecute Ubuntu 22.04.
- Un nombre de dominio válido apuntado con la IP de tu servidor.
- Una contraseña de root configurada en el servidor.
Cómo empezar
En primer lugar, se recomienda actualizar y poner al día todos tus paquetes de software a la última versión. Puedes actualizarlos todos ejecutando el siguiente comando:
apt update -y
apt upgrade -y
Una vez actualizados todos los paquetes, puedes pasar al siguiente paso:
Instalar Python
En primer lugar, tendrás que instalar Python y otras dependencias en tu servidor. Puedes instalarlos todos ejecutando el siguiente comando:
apt-get install python3 python3-pip -y
Una vez instalados todos los paquetes, puedes verificar la versión de Python con el siguiente comando:
python3 --version
Deberías ver la siguiente salida:
Python 3.10.6
A continuación, actualiza PIP a la última versión con el siguiente comando:
pip3 install --upgrade pip
A continuación, verifica la versión de PIP con el siguiente comando:
pip3 --version
Deberías ver la siguiente salida:
pip 22.2.2 from /usr/local/lib/python3.10/dist-packages/pip (python 3.10)
A continuación, instala el paquete de entorno virtual Python con el siguiente comando:
pip3 install virtualenv
Una vez hecho esto, puedes pasar al siguiente paso.
Instalar Jupyter Notebook
En primer lugar, crea un directorio para almacenar tu Notebook con el siguiente comando:
mkdir ~/project
A continuación, navega hasta el directorio del proyecto y crea un entorno virtual Python con el siguiente comando:
cd ~/project
virtualenv notebookenv
A continuación, activa el entorno virtual con el siguiente comando:
source notebookenv/bin/activate
A continuación, instala el Cuaderno Jupyter con el siguiente comando:
pip install jupyter
Una vez instalado el Cuaderno Jupyter, ejecútalo con el siguiente comando:
jupyter notebook --allow-root
Si todo va bien, obtendrás la siguiente salida:
[I 14:23:26.729 NotebookApp] Serving notebooks from local directory: /root/project
[I 14:23:26.729 NotebookApp] Jupyter Notebook 6.4.12 is running at:
[I 14:23:26.729 NotebookApp] http://localhost:8888/?token=5dbdfdbf2e2dc72ccdaaa7361db8c55877ecfbc45676e625
[I 14:23:26.729 NotebookApp]  or http://127.0.0.1:8888/?token=5dbdfdbf2e2dc72ccdaaa7361db8c55877ecfbc45676e625
[I 14:23:26.730 NotebookApp] Use Control-C to stop this server and shut down all kernels (twice to skip confirmation).
[W 14:23:26.734 NotebookApp] No web browser found: could not locate runnable browser.
[C 14:23:26.734 NotebookApp]

    To access the notebook, open this file in a browser:
        file:///root/.local/share/jupyter/runtime/nbserver-3214-open.html
    Or copy and paste one of these URLs:
        http://localhost:8888/?token=5dbdfdbf2e2dc72ccdaaa7361db8c55877ecfbc45676e625
     or http://127.0.0.1:8888/?token=5dbdfdbf2e2dc72ccdaaa7361db8c55877ecfbc45676e625
Pulsa CTRL+C para detener Jupyter Notebook.
Una vez que hayas terminado, puedes pasar al siguiente paso.
Generar la contraseña de Jupyter Notebook
Se recomienda proteger el Cuaderno Jupyter con una contraseña. En primer lugar, genera un archivo de configuración de Jupyter Notebook con el siguiente comando:
jupyter notebook --generate-config
Deberías ver la siguiente salida:
Writing default config to: /root/.jupyter/jupyter_notebook_config.py
A continuación, establece la contraseña de Jupyter Notebook con el siguiente comando:
jupyter notebook password
Establece una contraseña como se muestra a continuación:
Enter password:
Verify password:
[NotebookPasswordApp] Wrote hashed password to /root/.jupyter/jupyter_notebook_config.json
A continuación, desactívate del entorno virtual Python con el siguiente comando:
deactivate
Una vez que hayas terminado, puedes pasar al siguiente paso.
Crear un archivo de servicio Systemd para Jupyter Notebook
A continuación, tendrás que crear un archivo de servicio systemd para gestionar el Cuaderno Jupyter. Puedes crearlo con el siguiente comando:
nano /etc/systemd/system/jupyter.service
Añade los siguientes códigos:
[Unit]
Description=Jupyter Notebook

[Service]
Type=simple
PIDFile=/run/jupyter.pid
ExecStart=/root/project/notebookenv/bin/jupyter-notebook --config=/root/.jupyter/jupyter_notebook_config.py --allow-root
User=root
Group=root
WorkingDirectory=/root/project/notebookenv
Restart=always
RestartSec=10

[Install]
WantedBy=multi-user.target
Guarda y cierra el archivo, luego vuelve a cargar el demonio systemd con el siguiente comando:
systemctl daemon-reload
A continuación, inicia el Jupyter Notebook y habilítalo para que se inicie al reiniciar el sistema con el siguiente comando:
systemctl start jupyter
systemctl enable jupyter
Para verificar el estado del Cuaderno Jupyter, ejecuta el siguiente comando:
systemctl status jupyter
Deberías ver la siguiente salida:
? jupyter.service - Jupyter Notebook
     Loaded: loaded (/etc/systemd/system/jupyter.service; disabled; vendor preset: enabled)
     Active: active (running) since Tue 2022-10-11 14:27:01 UTC; 4s ago
   Main PID: 3649 (jupyter-noteboo)
      Tasks: 1 (limit: 2242)
     Memory: 53.4M
        CPU: 980ms
     CGroup: /system.slice/jupyter.service
             ??3649 /root/project/notebookenv/bin/python /root/project/notebookenv/bin/jupyter-notebook --config=/root/.jupyter/jupyter_noteb>

Oct 11 14:27:01 ubuntu2204 systemd[1]: Started Jupyter Notebook.
Oct 11 14:27:02 ubuntu2204 jupyter-notebook[3649]: [I 14:27:02.288 NotebookApp] Serving notebooks from local directory: /root/project/noteboo>
Oct 11 14:27:02 ubuntu2204 jupyter-notebook[3649]: [I 14:27:02.289 NotebookApp] Jupyter Notebook 6.4.12 is running at:
Oct 11 14:27:02 ubuntu2204 jupyter-notebook[3649]: [I 14:27:02.289 NotebookApp] http://localhost:8888/
Oct 11 14:27:02 ubuntu2204 jupyter-notebook[3649]: [I 14:27:02.290 NotebookApp] Use Control-C to stop this server and shut down all kernels (>
Oct 11 14:27:02 ubuntu2204 jupyter-notebook[3649]: [W 14:27:02.293 NotebookApp] No web browser found: could not locate runnable browser.
Una vez que hayas terminado, puedes continuar con el siguiente paso.
Configurar Nginx como Proxy Inverso para Jupyter Notebook
En este punto, Jupyter Notebook está iniciado y ejecutándose en el puerto 8888. Ahora, tendrás que configurar Nginx como proxy inverso para acceder a Jupyter Notebook a través del puerto 80.
En primer lugar, instala el paquete del servidor web Nginx con el siguiente comando:
apt-get install nginx -y
Una vez instalado Nginx, crea un archivo de configuración de host virtual Nginx con el siguiente comando:
nano /etc/nginx/conf.d/jupyter.conf
Añade las siguientes configuraciones:
upstream notebook {
server 127.0.0.1:8888;
}

server {
listen 80;
server_name jupyter.example.com;

access_log /var/log/nginx/example.com.access.log;
error_log /var/log/nginx/example.com.error.log;

location / {
     proxy_pass http://localhost:8888;
     proxy_set_header X-Forwarded-For $proxy_add_x_forwarded_for;
     proxy_set_header X-Real-IP $remote_addr;
     proxy_set_header Host $http_host;
     proxy_http_version 1.1;
     proxy_redirect off;
     proxy_buffering off;
     proxy_set_header Upgrade $http_upgrade;
     proxy_set_header Connection "upgrade";
     proxy_read_timeout 86400;
     }
}
Guarda y cierra el archivo y, a continuación, comprueba si Nginx tiene algún error de sintaxis con el siguiente comando:
nginx -t
Deberías ver la siguiente salida:
nginx: the configuration file /etc/nginx/nginx.conf syntax is ok
nginx: configuration file /etc/nginx/nginx.conf test is successful
A continuación, reinicia el servicio Nginx para aplicar los cambios:
systemctl restart nginx
También puedes comprobar el estado de Nginx con el siguiente comando:
systemctl status nginx
Obtendrás la siguiente salida:
? nginx.service - A high performance web server and a reverse proxy server
     Loaded: loaded (/lib/systemd/system/nginx.service; enabled; vendor preset: enabled)
     Active: active (running) since Tue 2022-10-11 14:28:53 UTC; 54s ago
       Docs: man:nginx(8)
    Process: 4193 ExecStartPre=/usr/sbin/nginx -t -q -g daemon on; master_process on; (code=exited, status=0/SUCCESS)
    Process: 4194 ExecStart=/usr/sbin/nginx -g daemon on; master_process on; (code=exited, status=0/SUCCESS)
   Main PID: 4195 (nginx)
      Tasks: 2 (limit: 2242)
     Memory: 2.6M
        CPU: 40ms
     CGroup: /system.slice/nginx.service
             ??4195 "nginx: master process /usr/sbin/nginx -g daemon on; master_process on;"
             ??4196 "nginx: worker process" "" "" "" "" "" "" "" "" "" "" "" "" "" "" "" "" "" "" "" "" "" "" "" "" "" "" ""

Oct 11 14:28:53 ubuntu2204 systemd[1]: Starting A high performance web server and a reverse proxy server...
Oct 11 14:28:53 ubuntu2204 systemd[1]: Started A high performance web server and a reverse proxy server.
A continuación, añade el usuario root al grupo www-data mediante el siguiente comando:
usermod -g www-data root
A continuación, edita el archivo de configuración de Jupyter Notebook y habilita el acceso remoto:
nano /root/.jupyter/jupyter_notebook_config.py
Cambia la siguiente línea:
c.NotebookApp.allow_remote_access = True
Guarda y cierra el archivo, luego reinicia el servicio Jupyter Notebook para aplicar los cambios:
systemctl restart jupyter
Cuando hayas terminado, puedes pasar al siguiente paso.
Accede a Jupyter Notebook
Ahora, abre tu navegador web y accede al Jupyter Notebook utilizando la URL http://jupyter.example.com. En la siguiente pantalla se te pedirá que indiques tu contraseña de Jupyter Notebook:

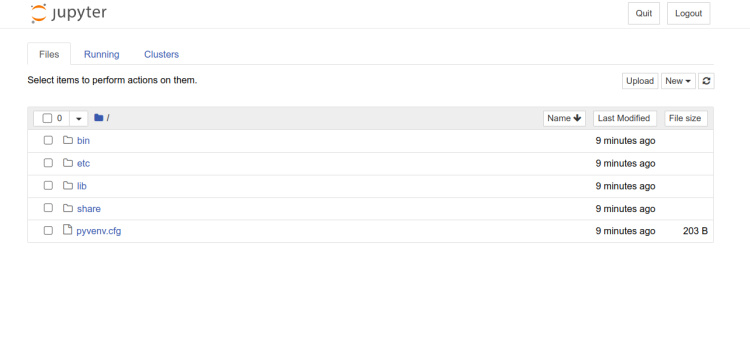
Introduce tu contraseña y pulsa el botón Iniciar sesión. Deberías ver el panel de Jupyter Notebook en la siguiente pantalla:
Conclusión
Enhorabuena! has instalado correctamente Jupyter Notebook con Nginx como proxy inverso en Ubuntu 22.04. Ahora puedes crear, compartir y ejecutar tu Notebook a través de Internet. No dudes en preguntarme si tienes alguna duda.