Cómo instalar Grav CMS con Nginx en Ubuntu
Grav es un CMS gratuito, de código abierto y de archivo plano que no requiere ninguna base de datos. Está basado en PHP y ofrece varias características que pueden no estar disponibles en otros CMS como WordPress, Joomla, etc. Es sencillo, fácil de usar y viene con algunas de las tecnologías clave, como Twig Templating, Markdown, YAML, Parsedown, Doctrine Cache, Gregwar Image Library y Symfony Console.
En este tutorial, te mostraré cómo instalar Grav CMS con Nginx y Let’s Encrypt SSL en un servidor Ubuntu 20.04.
Requisitos previos
- Un servidor con Ubuntu 20.04.
- Un nombre de dominio válido apuntado con la IP de tu servidor.
- Una contraseña de root configurada en el servidor.
Cómo empezar
En primer lugar, actualiza los paquetes del sistema a la versión actualizada ejecutando el siguiente comando:
apt-get update -y
Una vez actualizados todos los paquetes, puedes pasar al siguiente paso.
Instalar Nginx y PHP
En primer lugar, tendrás que instalar el servidor web Nginx, PHP y otras extensiones PHP en tu sistema. Puedes instalarlos todos con el siguiente comando:
apt-get install nginx php php-cli php-fpm php-common php-curl php-gd php-json php-mbstring php-xml php-zip php-opcache php-apcu unzip -y
Una vez instalados todos los paquetes, verifica la versión de PHP con el siguiente comando:
php --version
Deberías obtener la siguiente salida:
PHP 7.4.3 (cli) (built: Jul  5 2021 15:13:35) ( NTS )
Copyright (c) The PHP Group
Zend Engine v3.4.0, Copyright (c) Zend Technologies
    with Zend OPcache v7.4.3, Copyright (c), by Zend Technologies
A continuación, edita el archivo php.ini y realiza algunos cambios:
nano /etc/php/7.4/fpm/php.ini
Cambia las siguientes líneas:
memory_limit = 256M
upload_max_filesize = 100M
max_execution_time = 360
max_input_vars = 1500
date.timezone = America/Chicago
Guarda y cierra el archivo y reinicia el servicio PHP-FPM para aplicar los cambios:
systemctl restart php7.4-fpm
Una vez que hayas terminado, puedes pasar al siguiente paso.
Instalar Grav CMS
A continuación, tendrás que descargar el Grav CMS al directorio raíz web de Nginx. Puedes descargarlo desde la página de descargas de Grav utilizando el siguiente comando:
cd /var/www/html
wget https://getgrav.org/download/core/grav-admin/1.7.17
Una vez completada la descarga, descomprime el archivo descargado con el siguiente comando:
unzip 1.7.17
A continuación, renombra el directorio extraído a grav con el siguiente comando:
mv grav-admin grav
A continuación, asigna la propiedad adecuada al directorio grav:
chown -R www-data:www-data /var/www/html/grav
Una vez que hayas terminado, puedes pasar al siguiente paso.
Configurar Nginx para Grav CMS
A continuación, tendrás que crear un archivo de configuración de host virtual Nginx para alojar Grav CMS. Puedes crearlo con el siguiente comando:
nano /etc/nginx/conf.d/grav.conf
Añade las siguientes líneas:
server {

listen 80;

server_name grav.example.com;
root /var/www/html/grav;

index index.html index.php;

location / {
   try_files $uri $uri/ /index.php?$query_string;
 }

   location ~* /(\.git|cache|bin|logs|backup|tests)/.*$ { return 403; }
   location ~* /(system|vendor)/.*\.(txt|xml|md|html|yaml|yml|php|pl|py|cgi|twig|sh|bat)$ { return 403; }
   location ~* /user/.*\.(txt|md|yaml|yml|php|pl|py|cgi|twig|sh|bat)$ { return 403; }
   location ~ /(LICENSE\.txt|composer\.lock|composer\.json|nginx\.conf|web\.config|htaccess\.txt|\.htaccess) { return 403; }

location ~ \.php$ {
   fastcgi_pass unix:/var/run/php/php7.4-fpm.sock;
   fastcgi_split_path_info ^(.+\.php)(/.+)$;
   fastcgi_index index.php;
   include fastcgi_params;
   fastcgi_param SCRIPT_FILENAME $document_root/$fastcgi_script_name;
 }

}
Guarda y cierra el archivo cuando hayas terminado, luego verifica el Nginx por si hay algún error de sintaxis:
nginx -t
Deberías obtener la siguiente salida:
nginx: the configuration file /etc/nginx/nginx.conf syntax is ok
nginx: configuration file /etc/nginx/nginx.conf test is successful
Por último, reinicia el servicio Nginx para aplicar los cambios:
systemctl restart nginx
También puedes verificar el estado del Nginx con el siguiente comando:
systemctl status nginx
Deberías ver la siguiente salida:
? nginx.service - A high performance web server and a reverse proxy server
     Loaded: loaded (/lib/systemd/system/nginx.service; enabled; vendor preset: enabled)
     Active: active (running) since Fri 2021-07-09 06:45:28 UTC; 3s ago
       Docs: man:nginx(8)
    Process: 33099 ExecStartPre=/usr/sbin/nginx -t -q -g daemon on; master_process on; (code=exited, status=0/SUCCESS)
    Process: 33110 ExecStart=/usr/sbin/nginx -g daemon on; master_process on; (code=exited, status=0/SUCCESS)
   Main PID: 33111 (nginx)
      Tasks: 2 (limit: 2353)
     Memory: 2.6M
     CGroup: /system.slice/nginx.service
             ??33111 nginx: master process /usr/sbin/nginx -g daemon on; master_process on;
             ??33112 nginx: worker process

Jul 09 06:45:28 node1 systemd[1]: Starting A high performance web server and a reverse proxy server...
Jul 09 06:45:28 node1 systemd[1]: Started A high performance web server and a reverse proxy server.
Una vez que todo esté bien, puedes pasar al siguiente paso.
Accede a Grav CMS
Ahora puedes acceder a la interfaz web de Grav CMS utilizando la URL http://grav.example.com. Deberías ver la siguiente pantalla:
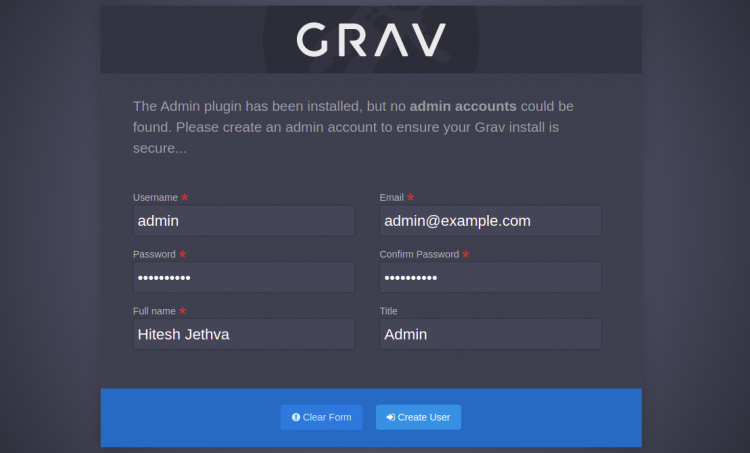
Establece tu nombre de usuario y contraseña de administrador y haz clic en el botón Crear usuario. Serás redirigido al panel de control de Grav CMS:

Página de Configuración

Página de Cuentas

Página de Plugins

Página de Herramientas

Proteger Grav CMS con Let’s Encrypt SSL
A continuación, tendrás que instalar el paquete cliente Certbot para instalar y gestionar el SSL Let’s Encrypt.
Primero, instala el Certbot con el siguiente comando:
apt-get install python3-certbot-nginx -y
Una vez finalizada la instalación, ejecuta el siguiente comando para instalar el SSL de Let’s Encrypt en tu sitio web:
certbot --nginx -d grav.example.com
Se te pedirá que proporciones una dirección de correo electrónico válida y que aceptes las condiciones del servicio, como se muestra a continuación:
Saving debug log to /var/log/letsencrypt/letsencrypt.log
Plugins selected: Authenticator nginx, Installer nginx
Enter email address (used for urgent renewal and security notices) (Enter 'c' to
cancel): [email protected]

- - - - - - - - - - - - - - - - - - - - - - - - - - - - - - - - - - - - - - - -
Please read the Terms of Service at
https://letsencrypt.org/documents/LE-SA-v1.2-November-15-2017.pdf. You must
agree in order to register with the ACME server at
https://acme-v02.api.letsencrypt.org/directory
- - - - - - - - - - - - - - - - - - - - - - - - - - - - - - - - - - - - - - - -
(A)gree/(C)ancel: A

- - - - - - - - - - - - - - - - - - - - - - - - - - - - - - - - - - - - - - - -
Would you be willing to share your email address with the Electronic Frontier
Foundation, a founding partner of the Let's Encrypt project and the non-profit
organization that develops Certbot? We'd like to send you email about our work
encrypting the web, EFF news, campaigns, and ways to support digital freedom.
- - - - - - - - - - - - - - - - - - - - - - - - - - - - - - - - - - - - - - - -
(Y)es/(N)o: Y
Obtaining a new certificate
Performing the following challenges:
http-01 challenge for grav.example.com
Waiting for verification...
Cleaning up challenges
Deploying Certificate to VirtualHost /etc/nginx/conf.d/grav.conf
A continuación, elige si deseas o no redirigir el tráfico HTTP a HTTPS, como se muestra a continuación:
- - - - - - - - - - - - - - - - - - - - - - - - - - - - - - - - - - - - - - - -
1: No redirect - Make no further changes to the webserver configuration.
2: Redirect - Make all requests redirect to secure HTTPS access. Choose this for
new sites, or if you're confident your site works on HTTPS. You can undo this
change by editing your web server's configuration.
- - - - - - - - - - - - - - - - - - - - - - - - - - - - - - - - - - - - - - - -
Select the appropriate number [1-2] then [enter] (press 'c' to cancel): 2
Escribe 2 y pulsa Intro para finalizar la instalación. Deberías ver el siguiente resultado:
Redirecting all traffic on port 80 to ssl in /etc/nginx/conf.d/grav.conf

- - - - - - - - - - - - - - - - - - - - - - - - - - - - - - - - - - - - - - - -
Congratulations! You have successfully enabled https://grav.example.com

You should test your configuration at:
https://www.ssllabs.com/ssltest/analyze.html?d=grav.example.com
- - - - - - - - - - - - - - - - - - - - - - - - - - - - - - - - - - - - - - - -

IMPORTANT NOTES:
 - Congratulations! Your certificate and chain have been saved at:
   /etc/letsencrypt/live/grav.example.com/fullchain.pem
   Your key file has been saved at:
   /etc/letsencrypt/live/grav.example.com/privkey.pem
   Your cert will expire on 2021-12-30. To obtain a new or tweaked
   version of this certificate in the future, simply run certbot again
   with the "certonly" option. To non-interactively renew *all* of
   your certificates, run "certbot renew"
 - Your account credentials have been saved in your Certbot
   configuration directory at /etc/letsencrypt. You should make a
   secure backup of this folder now. This configuration directory will
   also contain certificates and private keys obtained by Certbot so
   making regular backups of this folder is ideal.
 - If you like Certbot, please consider supporting our work by:

   Donating to ISRG / Let's Encrypt:   https://letsencrypt.org/donate
   Donating to EFF:                    https://eff.org/donate-le

 - We were unable to subscribe you the EFF mailing list because your
   e-mail address appears to be invalid. You can try again later by
   visiting https://act.eff.org.
Ahora puedes acceder al Grav CMS de forma segura utilizando el protocolo HTTPS.
Conclusión
Enhorabuena! has instalado con éxito Grav CMS con Nginx y Let’s Encrypt SSL en el servidor Ubuntu 20.04. Ahora puedes crear tu sitio web fácilmente utilizando Grav CMS.