Cómo instalar el sistema de mensajería en equipo Mattermost en Ubuntu 20.04
Mattermost es una aplicación de mensajería de código abierto y autoalojada que sirve para chatear, compartir archivos, buscar e integrar. Es una alternativa al chat de Slack que reúne toda la comunicación de tu equipo en un solo lugar. Está escrito en React y Golang, y utiliza bases de datos PostgreSQL o MySQL en el backend. Ofrece un rico conjunto de características que incluyen, Notificaciones Push, Historial de búsqueda ilimitado, Emojis personalizados, Webhooks y comandos, Directorio activo, Soporte de despliegue de base de datos multi-nodo, Foro, Tablero de discusión y muchas más.
En este tutorial, te mostraremos cómo instalar Mattermost con Nginx y Let’s Encrypt SSL en Ubuntu 20.04.
Requisitos previos
- Un servidor con Ubuntu 20.04.
- Un nombre de dominio válido apuntado con la IP de tu servidor.
- Una contraseña de root configurada en el servidor.
Cómo empezar
En primer lugar, se recomienda actualizar los paquetes de tu sistema con la última versión. Puedes actualizarlos ejecutando el siguiente comando:
apt-get update -y
Una vez actualizados todos los paquetes, instala otras dependencias necesarias ejecutando el siguiente comando:
apt-get install curl wget vim git unzip gnupg2 -y
Después de instalar todos los paquetes necesarios, puedes pasar al siguiente paso.
Instalar y configurar MariaDB
Mattermost utiliza MySQL/MariaDB como base de datos. Así que el servidor MariaDB debe estar instalado en tu servidor. Si no está instalado, puedes instalarlo con el siguiente comando:
apt-get install mariadb-server -y
Después de instalar el servidor MariaDB, inicia sesión en el MariaDB con el siguiente comando:
mysql
Una vez iniciada la sesión, crea una base de datos y un usuario para Mattermost con el siguiente comando:
MariaDB [(none)]> CREATE DATABASE mattermostdb;
MariaDB [(none)]> CREATE USER 'mattermost'@'%' IDENTIFIED BY 'password';
A continuación, concede todos los privilegios a Mattermost con el siguiente comando:
MariaDB [(none)]> GRANT ALL PRIVILEGES ON mattermostdb.* TO 'mattermost'@'%';
A continuación, vacía los privilegios y sal del shell de MariaDB con el siguiente comando:
MariaDB [(none)]> FLUSH PRIVILEGES;
MariaDB [(none)]> EXIT;
Una vez configurada tu base de datos MariaDB, puedes pasar al siguiente paso.
Instalar y configurar Mattermost
En primer lugar, tendrás que descargar la última versión de Mattermost desde su sitio web oficial. Puedes descargarla con el siguiente comando:
wget https://releases.mattermost.com/5.24.2/mattermost-5.24.2-linux-amd64.tar.gz
Una vez descargado, extrae el archivo descargado con el siguiente comando:
tar -xvzf mattermost-5.24.2-linux-amd64.tar.gz
A continuación, copia el directorio extraído en el directorio /opt:
cp -r mattermost /opt
A continuación, crea un directorio de datos para Mattermost:
mkdir /opt/mattermost/data
A continuación, tendrás que crear un usuario independiente para ejecutar Mattermost. Puedes crearlo con el siguiente comando:
useradd --system --user-group mattermost
A continuación, cambia la propiedad del directorio de Mattermost a Mattermost y dale los permisos adecuados con el siguiente comando:
chown -R mattermost:mattermost /opt/mattermost
chmod -R g+w /opt/mattermost
A continuación, edita el archivo de configuración por defecto de Mattermost y define la configuración de tu base de datos y la URL del sitio.
nano /opt/mattermost/config/config.json
Cambia las siguientes líneas según tus necesidades:
    "SiteURL": "https://mattermost.linuxbuz.com",

    "DriverName": "mysql",
    "DataSource": "mattermost:password@tcp(localhost:3306)/mattermostdb?charset=utf8mb4,utf8\u0026readTimeout=30s\u0026writeTimeout=30s",
Guarda y cierra el archivo cuando hayas terminado.
Crear un archivo de servicio Systemd para Mattermost
A continuación, tendrás que crear un archivo de servicio systemd para gestionar el servicio Mattermost. Puedes crearlo con el siguiente comando:
nano /lib/systemd/system/mattermost.service
Añade las siguientes líneas:
[Unit]
Description=Mattermost
After=network.target
After=mysql.service
Requires=mysql.service

[Service]
Type=notify
User=mattermost
Group=mattermost
ExecStart=/opt/mattermost/bin/mattermost
TimeoutStartSec=3600
Restart=always
RestartSec=10
WorkingDirectory=/opt/mattermost
LimitNOFILE=49152

[Install]
WantedBy=mariadb.service
Guarda y cierra el archivo y luego relanza el demonio systemd con el siguiente comando:
systemctl daemon-reload
A continuación, inicia el servicio Mattermost y permite que se inicie al reiniciar el sistema con el siguiente comando:
systemctl start mattermost
systemctl enable mattermost
A continuación, verifica el estado del servicio Mattermost con el siguiente comando:
systemctl status mattermost
Deberías obtener la siguiente salida:
? mattermost.service - Mattermost
     Loaded: loaded (/lib/systemd/system/mattermost.service; disabled; vendor preset: enabled)
     Active: active (running) since Sat 2020-08-01 09:12:52 UTC; 17s ago
   Main PID: 4106 (mattermost)
      Tasks: 20 (limit: 2353)
     Memory: 85.9M
     CGroup: /system.slice/mattermost.service
             ??4106 /opt/mattermost/bin/mattermost
             ??4198 plugins/com.mattermost.nps/server/dist/plugin-linux-amd64

Aug 01 09:12:52 ubuntu2004 mattermost[4106]: {"level":"info","ts":1596273172.131499,"caller":"mlog/sugar.go:19","msg":"Sent notification of ne>
Aug 01 09:12:52 ubuntu2004 mattermost[4106]: {"level":"info","ts":1596273172.1841655,"caller":"jobs/workers.go:73","msg":"Starting workers"}
Aug 01 09:12:52 ubuntu2004 mattermost[4106]: {"level":"info","ts":1596273172.1842792,"caller":"bleveengine/bleve.go:267","msg":"UpdateConf Ble>
Aug 01 09:12:52 ubuntu2004 mattermost[4106]: {"level":"info","ts":1596273172.1930475,"caller":"jobs/schedulers.go:74","msg":"Starting schedule>
Aug 01 09:12:52 ubuntu2004 mattermost[4106]: {"level":"info","ts":1596273172.20063,"caller":"app/web_hub.go:83","msg":"Starting websocket hubs>
Aug 01 09:12:52 ubuntu2004 mattermost[4106]: {"level":"info","ts":1596273172.2099638,"caller":"app/license.go:37","msg":"License key from http>
Aug 01 09:12:52 ubuntu2004 mattermost[4106]: {"level":"info","ts":1596273172.2205582,"caller":"app/server.go:525","msg":"Starting Server..."}
Aug 01 09:12:52 ubuntu2004 mattermost[4106]: {"level":"info","ts":1596273172.2208374,"caller":"app/server.go:594","msg":"Server is listening o>
Aug 01 09:12:52 ubuntu2004 mattermost[4106]: {"level":"info","ts":1596273172.2211802,"caller":"commands/server.go:106","msg":"Sending systemd >
Aug 01 09:12:52 ubuntu2004 systemd[1]: Started Mattermost.
En este punto, Mattermost se está ejecutando y escuchando en el puerto 8065.
Configurar Nginx como proxy inverso
A continuación, tendrás que configurar Nginxx como proxy inverso para Mattermost. Primero, instala el paquete Nginx con el siguiente comando:
apt-get install nginx -y
Una vez instalado, crea un archivo de configuración del host virtual de Nginx con el siguiente comando:
nano /etc/nginx/sites-available/mattermost.conf
Añade las siguientes líneas:
upstream mattermost {
   server localhost:8065;
   keepalive 32;
}

proxy_cache_path /var/cache/nginx levels=1:2 keys_zone=mattermost_cache:10m max_size=3g inactive=120m use_temp_path=off;

server {
   listen 80;
   server_name mattermost.linuxbuz.com;

   location ~ /api/v[0-9]+/(users/)?websocket$ {
       proxy_set_header Upgrade $http_upgrade;
       proxy_set_header Connection "upgrade";
       client_max_body_size 50M;
       proxy_set_header Host $http_host;
       proxy_set_header X-Real-IP $remote_addr;
       proxy_set_header X-Forwarded-For $proxy_add_x_forwarded_for;
       proxy_set_header X-Forwarded-Proto $scheme;
       proxy_set_header X-Frame-Options SAMEORIGIN;
       proxy_buffers 256 16k;
       proxy_buffer_size 16k;
       client_body_timeout 60;
       send_timeout 300;
       lingering_timeout 5;
       proxy_connect_timeout 90;
       proxy_send_timeout 300;
       proxy_read_timeout 90s;
       proxy_pass http://mattermost;
   }

   location / {
       client_max_body_size 50M;
       proxy_set_header Connection "";
       proxy_set_header Host $http_host;
       proxy_set_header X-Real-IP $remote_addr;
       proxy_set_header X-Forwarded-For $proxy_add_x_forwarded_for;
       proxy_set_header X-Forwarded-Proto $scheme;
       proxy_set_header X-Frame-Options SAMEORIGIN;
       proxy_buffers 256 16k;
       proxy_buffer_size 16k;
       proxy_read_timeout 600s;
       proxy_cache mattermost_cache;
       proxy_cache_revalidate on;
       proxy_cache_min_uses 2;
       proxy_cache_use_stale timeout;
       proxy_cache_lock on;
       proxy_http_version 1.1;
       proxy_pass http://mattermost;
   }
}
Guarda y cierra el archivo y luego activa la configuración del host virtual con el siguiente comando:
ln -s /etc/nginx/sites-available/mattermost.conf /etc/nginx/sites-enabled/mattermost.conf
A continuación, verifica que Nginx no tenga ningún error de configuración:
nginx -t
Deberías obtener la siguiente salida:
nginx: the configuration file /etc/nginx/nginx.conf syntax is ok
nginx: configuration file /etc/nginx/nginx.conf test is successful
Por último, reinicia el servicio Nginx para aplicar los cambios:
systemctl restart nginx
Asegura Mattermost con Let’s Encrypt SSL
En primer lugar, necesitarás instalar el cliente Certbot en tu sistema para gestionar el SSL de Let’s Encrypt. Puedes instalarlo con el siguiente comando:
apt-get install python3-certbot-nginx -y
Después de instalar Certbot, ejecuta el siguiente comando para instalar el SSL de Let’s Encrypt para tu sitio web.
certbot --nginx -d mattermost.linuxbuz.com
Se te pedirá que proporciones una dirección de correo electrónico válida y que aceptes las condiciones del servicio, como se muestra a continuación:
Saving debug log to /var/log/letsencrypt/letsencrypt.log
Plugins selected: Authenticator nginx, Installer nginx
Enter email address (used for urgent renewal and security notices) (Enter 'c' to
cancel): [email protected]

- - - - - - - - - - - - - - - - - - - - - - - - - - - - - - - - - - - - - - - -
Please read the Terms of Service at
https://letsencrypt.org/documents/LE-SA-v1.2-November-15-2017.pdf. You must
agree in order to register with the ACME server at
https://acme-v02.api.letsencrypt.org/directory
- - - - - - - - - - - - - - - - - - - - - - - - - - - - - - - - - - - - - - - -
(A)gree/(C)ancel: A

- - - - - - - - - - - - - - - - - - - - - - - - - - - - - - - - - - - - - - - -
Would you be willing to share your email address with the Electronic Frontier
Foundation, a founding partner of the Let's Encrypt project and the non-profit
organization that develops Certbot? We'd like to send you email about our work
encrypting the web, EFF news, campaigns, and ways to support digital freedom.
- - - - - - - - - - - - - - - - - - - - - - - - - - - - - - - - - - - - - - - -
(Y)es/(N)o: Y
Obtaining a new certificate
Performing the following challenges:
http-01 challenge for mattermost.linuxbuz.com
Waiting for verification...
Cleaning up challenges
Deploying Certificate to VirtualHost /etc/nginx/sites-enabled/mattermost.conf
A continuación, selecciona si quieres redirigir el tráfico HTTP a HTTPS:
- - - - - - - - - - - - - - - - - - - - - - - - - - - - - - - - - - - - - - - -
1: No redirect - Make no further changes to the webserver configuration.
2: Redirect - Make all requests redirect to secure HTTPS access. Choose this for
new sites, or if you're confident your site works on HTTPS. You can undo this
change by editing your web server's configuration.
- - - - - - - - - - - - - - - - - - - - - - - - - - - - - - - - - - - - - - - -
Select the appropriate number [1-2] then [enter] (press 'c' to cancel): 2
Escribe 2 y pulsa Intro para instalar el SSL de Let’s Encrypt en tu dominio. Una vez instalado, deberías ver la siguiente salida:
Redirecting all traffic on port 80 to ssl in /etc/nginx/sites-enabled/mattermost.conf

- - - - - - - - - - - - - - - - - - - - - - - - - - - - - - - - - - - - - - - -
Congratulations! You have successfully enabled https://mattermost.linuxbuz.com

You should test your configuration at:
https://www.ssllabs.com/ssltest/analyze.html?d=mattermost.linuxbuz.com
- - - - - - - - - - - - - - - - - - - - - - - - - - - - - - - - - - - - - - - -

IMPORTANT NOTES:
 - Congratulations! Your certificate and chain have been saved at:
   /etc/letsencrypt/live/mattermost.linuxbuz.com/fullchain.pem
   Your key file has been saved at:
   /etc/letsencrypt/live/mattermost.linuxbuz.com/privkey.pem
   Your cert will expire on 2020-10-30. To obtain a new or tweaked
   version of this certificate in the future, simply run certbot again
   with the "certonly" option. To non-interactively renew *all* of
   your certificates, run "certbot renew"
 - Your account credentials have been saved in your Certbot
   configuration directory at /etc/letsencrypt. You should make a
   secure backup of this folder now. This configuration directory will
   also contain certificates and private keys obtained by Certbot so
   making regular backups of this folder is ideal.
 - If you like Certbot, please consider supporting our work by:

   Donating to ISRG / Let's Encrypt:   https://letsencrypt.org/donate
   Donating to EFF:                    https://eff.org/donate-le

 - We were unable to subscribe you the EFF mailing list because your
   e-mail address appears to be invalid. You can try again later by
   visiting https://act.eff.org.
Accede a la interfaz web de Mattermost
Ahora, abre tu navegador web y escribe la URL https://mattermost.linuxbuz.com. Serás redirigido a la pantalla de registro de Mattermost:
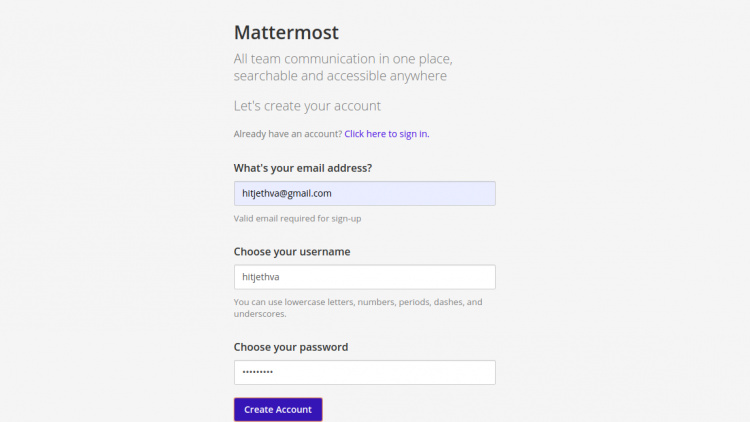
Proporciona tu dirección de correo electrónico, nombre, contraseña y haz clic en el botón Crear cuenta. Deberías ver la siguiente pantalla:
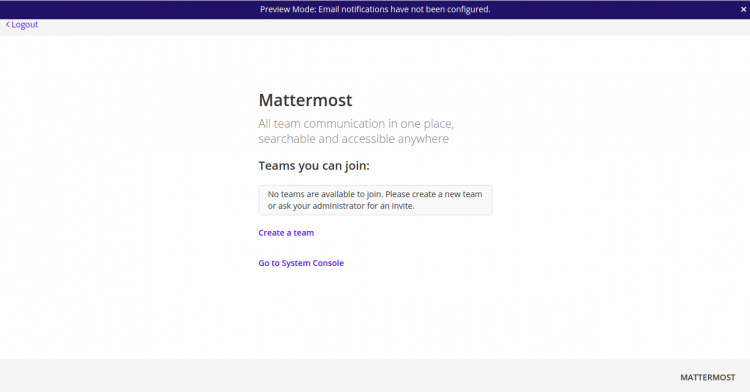
Haz clic en el botón Crear un equipo. Deberías ver la siguiente pantalla:

Proporciona el nombre de tu equipo y haz clic en el botón Siguiente. Deberías ver la siguiente pantalla:
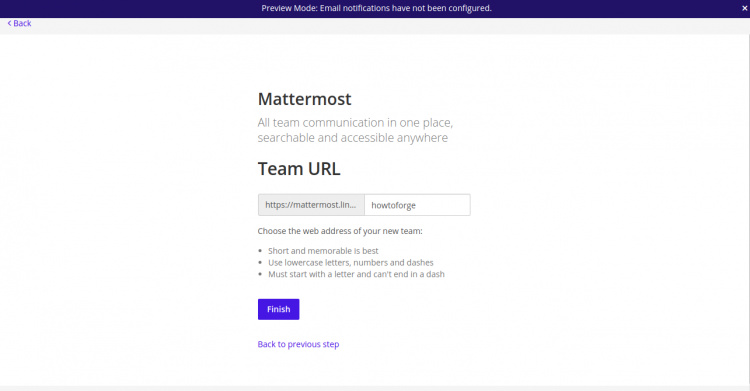
Proporciona la URL de tu equipo y haz clic en el botón Finalizar. Deberías ver la pantalla de bienvenida de Mattermost:
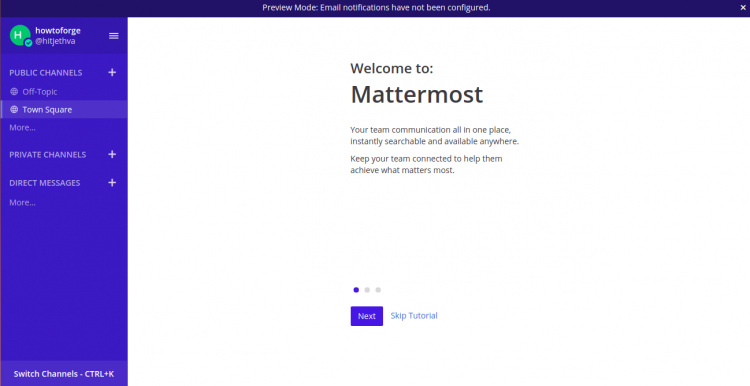
Haz clic en el botón Omitir tutoriales. Deberías ver el panel de control de Mattermost en la siguiente pantalla:

Conclusión
En esta guía has aprendido a instalar la aplicación Mattermost Team Messaging en un servidor Ubuntu 20.04. También has aprendido a configurar Nginx como proxy inverso y a asegurarlo con Let’s Encrypt SSL. Ahora puedes explorar los servicios de Mattermost y trabajar con tu equipo.