Cómo instalar el paquete de ofimática colaborativa CryptPad en Ubuntu 22.04
Cryptpad es una suite ofimática colaborativa de código abierto que es una alternativa a Office 365. Te permite acceder a las aplicaciones ofimáticas a través del navegador web. La diferencia entre Cryptpad y Office 365 es que Cryptpad está cifrado de extremo a extremo, lo que significa que puedes crear y compartir documentos con otros sin riesgo de que se filtre información personal. Las aplicaciones ofrecidas con Cryptpad incluyen Texto enriquecido, Hojas de cálculo, Código/Markdown, Kanban, Diapositivas, Pizarras y Formularios.
En este tutorial, aprenderás a instalar la suite Cryptpad en un servidor Ubuntu 22.04.
Requisitos previos
- Un servidor que ejecute Ubuntu 22.04 con un mínimo de 2 GB de RAM y 2 núcleos de CPU.
- Un usuario no root con privilegios sudo.
- Dos nombres de dominio completos (FQDN) como
example.comydocs.example.com. - Asegúrate de que todo está actualizado.
$ sudo apt update
$ sudo apt upgrade
- Pocos paquetes que necesite tu sistema.
$ sudo apt install wget curl nano software-properties-common dirmngr apt-transport-https gnupg2 ca-certificates lsb-release ubuntu-keyring unzip -y
Puede que algunos de estos paquetes ya estén instalados en tu sistema.
Paso 1 – Configurar el Cortafuegos
El primer paso es configurar el cortafuegos. Ubuntu viene con ufw (Uncomplicated Firewall) por defecto.
Comprueba si el cortafuegos se está ejecutando.
$ sudo ufw status
Deberías obtener la siguiente salida.
Status: inactive
Permite el puerto SSH para que el cortafuegos no rompa la conexión actual al activarlo.
$ sudo ufw allow OpenSSH
Permite también los puertos HTTP y HTTPS.
$ sudo ufw allow http
$ sudo ufw allow https
Habilita el cortafuegos
$ sudo ufw enable
Command may disrupt existing ssh connections. Proceed with operation (y|n)? y
Firewall is active and enabled on system startup
Comprueba de nuevo el estado del cortafuegos.
$ sudo ufw status
Deberías ver un resultado similar.
Status: active

To                         Action      From
--                         ------      ----
OpenSSH                    ALLOW       Anywhere
80/tcp                     ALLOW       Anywhere
443                        ALLOW       Anywhere
OpenSSH (v6)               ALLOW       Anywhere (v6)
80/tcp (v6)                ALLOW       Anywhere (v6)
443 (v6)                   ALLOW       Anywhere (v6)
Paso 2 – Instala Git
Git suele venir preinstalado con Ubuntu 22.04, pero en caso de que no esté instalado, ejecuta el siguiente comando para instalarlo.
$ sudo apt install git -y
Comprueba la versión de Git.
$ git --version
git version 2.34.1
Ejecuta los siguientes comandos para configurar Git y añadirle tu nombre y dirección de correo electrónico.
git config --global user.name "Your Name"
git config --global user.email "[email protected]"
Paso 3 – Instalar Nodejs
Utilizaremos el Gestor de Versiones de Node (N VM) para instalar Nodejs. Instala el script NVM utilizando el siguiente comando.
$ curl -o- https://raw.githubusercontent.com/nvm-sh/nvm/v0.39.3/install.sh | bash
Puedes obtener la última versión de NVM en su repositorio de GitHub.
Para utilizarlo, necesitas el código fuente de tu archivo .bashrc.
$ source ~/.bashrc
Comprueba la lista de versiones de Node disponibles.
$ nvm list-remote
Obtendrás un resultado similar.
.....
        v18.9.0
        v18.9.1
       v18.10.0
       v18.11.0
       v18.12.0   (LTS: Hydrogen)
       v18.12.1   (LTS: Hydrogen)
       v18.13.0   (LTS: Hydrogen)
       v18.14.0   (LTS: Hydrogen)
->     v18.14.1   (Latest LTS: Hydrogen)
        v19.0.0
        v19.0.1
        v19.1.0
        v19.2.0
        v19.3.0
        v19.4.0
        v19.5.0
        v19.6.0
        v19.6.1
Instala la última versión LTS (v18.x o) de Node en el momento de escribir este tutorial.
$ nvm install lts/hydrogen
Verifica la instalación.
$ node -v
v18.14.1
Paso 4 – Instala Bower
Bower es un gestor de paquetes para componentes frontales utilizado por Cryptpad. Instálalo utilizando el siguiente comando.
$ npm install -g bower
Paso 5 – Instala Cryptpad
Clona el repositorio GitHub de Cryptpad.
$ git clone https://github.com/xwiki-labs/cryptpad.git cryptpad
Cambia al directorio.
$ cd cryptpad
Cambia el repositorio a la última versión.
$ git checkout $(git tag -l | grep -v 'v1.*$' | sort -V | tail -n 1)
Instala Cryptpad utilizando los siguientes comandos.
$ npm install
$ bower install
Construye las páginas estáticas de Cryptpad y habilita las vistas previas de los enlaces a las redes sociales utilizando el siguiente comando.
$ npm run build
Paso 6 – Configurar Cryptpad
Crea el archivo de configuración utilizando el archivo de ejemplo proporcionado.
$ cp /home/$USER/cryptpad/config/config.example.js /home/$USER/cryptpad/config/config.js
Abre el archivo de configuración para editarlo.
$ nano ~/cryptpad/config/config.js
Busca la línea httpUnsafeOrigin: 'http://localhost:3000', y cambia su valor por el de tu dominio principal.
httpUnsafeOrigin: 'https://example.com',
Busca la línea // httpSafeOrigin: "https://some-other-domain.xyz", y descoméntala eliminando las barras delante de ella y cambia su valor a tu subdominio.
httpSafeOrigin: "https://docs.example.com",
Añade la siguiente línea justo debajo de la variable httpSafeOrigin.
httpSafeOrigin: "https://docs.example.com",
    adminEmail: "[email protected]",
Guarda el archivo pulsando Ctrl + X e introduciendo Y cuando se te pida una vez hayas terminado.
Para seguir configurando, crea una copia de ~/cryptpad/customize.dist/application_config.js en el directorio ~/cryptpad/customize.
$ cp ~/cryptpad/customize.dist/application_config.js ~/cryptpad/customize
Abre el archivo ~/cryptpad/customize/application_config.js para editarlo.
$ nano ~/cryptpad/customize/application_config.js
Asegúrate de añadir todas las configuraciones antes de la línea return AppConfig;.
Para desactivar el uso no registrado de Cryptpad, añade la siguiente línea.
AppConfig.registeredOnlyTypes = AppConfig.availablePadTypes;
Añade enlaces a las páginas de Política de privacidad, Condiciones del servicio y Pie de imprenta.
// Privacy Policy
AppConfig.privacy = 'https://example.com/privacy-policy/';
// Terms of Service
AppConfig.terms = 'https://example.com/terms-of-service/';
// Imprint / Legal Notice
AppConfig.imprint = 'https://example.com/imprint/';
Añade una sal de contraseña para proteger Cryptpad.
AppConfig.loginSalt = 'ggkljerthhkletho0the90hoserhtgse90rh4ohzisdofh90-43kbdf9009io';
Para aumentar la longitud mínima de la contraseña, añade la siguiente línea.
AppConfig.minimumPasswordLength = 10;
Guarda el archivo pulsando Ctrl + X e introduciendo Y cuando se te pida una vez hayas terminado. Antes de iniciar Cryptpad, primero tenemos que instalar Nginx, crear un certificado SSL y configurar el servidor Nginx para preparar los dominios de Cryptpad para el acceso.
Paso 7 – Instalar Nginx
Ubuntu 22.04 viene con una versión antigua de Nginx. Para instalar la última versión, necesitas descargar el repositorio oficial de Nginx.
Importa la clave de firma de Nginx.
$ curl https://nginx.org/keys/nginx_signing.key | gpg --dearmor \
	| sudo tee /usr/share/keyrings/nginx-archive-keyring.gpg >/dev/null
Añade el repositorio de la versión estable de Nginx.
$ echo "deb [signed-by=/usr/share/keyrings/nginx-archive-keyring.gpg arch=amd64] \
http://nginx.org/packages/ubuntu `lsb_release -cs` nginx" \
    | sudo tee /etc/apt/sources.list.d/nginx.list
Actualiza los repositorios del sistema.
$ sudo apt update
Instala Nginx.
$ sudo apt install nginx
Verifica la instalación.
$ nginx -v
nginx version: nginx/1.22.1
Iniciar el servidor Nginx.
$ sudo systemctl start nginx
Paso 8 – Instalar SSL
Necesitamos instalar Certbot para generar el certificado SSL. Puedes instalar Certbot utilizando el repositorio de Ubuntu u obtener la última versión utilizando la herramienta Snapd. Nosotros utilizaremos la versión Snapd.
Ubuntu 22.04 viene con Snapd instalado por defecto. Ejecuta los siguientes comandos para asegurarte de que tu versión de Snapd está actualizada. Asegúrate de que tu versión de Snapd está actualizada.
$ sudo snap install core
$ sudo snap refresh core
Instala Certbot.
$ sudo snap install --classic certbot
Utiliza el siguiente comando para asegurarte de que se ejecuta el comando Certbot creando un enlace simbólico al directorio /usr/bin.
$ sudo ln -s /snap/bin/certbot /usr/bin/certbot
Ejecuta el siguiente comando para generar un certificado SSL.
$ sudo certbot certonly --nginx --agree-tos --no-eff-email --staple-ocsp --preferred-challenges http -m [email protected] -d example.com -d docs.example.com
El comando anterior descargará un certificado en el directorio /etc/letsencrypt/live/example.com de tu servidor para los dominios example.com, y docs.example.com.
Genera un certificado de grupo Diffie-Hellman.
$ sudo openssl dhparam -dsaparam -out /etc/ssl/certs/dhparam.pem 4096
Para comprobar si la renovación SSL funciona correctamente, realiza una ejecución en seco del proceso.
$ sudo certbot renew --dry-run
Si no ves ningún error, ya está todo listo. Tu certificado se renovará automáticamente.
Paso 9 – Configurar Nginx
Abre el archivo /etc/nginx/nginx.conf para editarlo.
$ sudo nano /etc/nginx/nginx.conf
Añade la siguiente línea antes de la línea include /etc/nginx/conf.d/*.conf;.
server_names_hash_bucket_size 64;
Guarda el archivo pulsando Ctrl + X e introduciendo Y cuando se te solicite.
Crea y abre el archivo /etc/nginx/conf.d/cryptpad.conf para editarlo.
$ sudo nano /etc/nginx/conf.d/cryptpad.conf
Pega en él el siguiente código.
server {
    # Redirect any http requests to https
    listen 80;
    listen [::]:80;
    server_name example.com docs.example.com;
    return 301 https://$host$request_uri;
}

server {
    listen 443 ssl http2;
    listen [::]:443 ssl http2;

    # CryptPad serves static assets over these two domains.
    # `main_domain` is what users will enter in their address bar.
    # Privileged computation such as key management is handled in this scope
    # UI content is loaded via the `sandbox_domain`.
    # "Content Security Policy" headers prevent content loaded via the sandbox
    # from accessing privileged information.
    # These variables must be different to take advantage of CryptPad's sandboxing techniques.
    # In the event of an XSS vulnerability in CryptPad's front-end code
    # this will limit the amount of information accessible to attackers.
    set $main_domain "example.com";
    set $sandbox_domain "docs.example.com";

    # By default CryptPad allows remote domains to embed CryptPad documents in iframes.
    # This behaviour can be blocked by changing $allowed_origins from "*" to the
    # sandbox domain, which must be permitted to load content from the main domain
    # in order for CryptPad to work as expected.
    #
    # An example is given below which can be uncommented if you want to block
    # remote sites from including content from your server
    set $allowed_origins "*";
    # set $allowed_origins "https://${sandbox_domain}";

    # CryptPad's dynamic content (websocket traffic and encrypted blobs)
    # can be served over separate domains. Using dedicated domains (or subdomains)
    # for these purposes allows you to move them to a separate machine at a later date
    # if you find that a single machine cannot handle all of your users.
    # If you don't use dedicated domains, this can be the same as $main_domain
    # If you do, they can be added as exceptions to any rules which block connections to remote domains.
    # You can find these variables referenced below in the relevant places
    set $api_domain "example.com";
    set $files_domain "example.com";

    # nginx doesn't let you set server_name via variables, so you need to hardcode your domains here
    server_name example.com docs.example.com;

    # You'll need to Set the path to your certificates and keys here
    # IMPORTANT: this config is intended to serve assets for at least two domains
    # (your main domain and your sandbox domain). As such, you'll need to generate a single SSL certificate
    # that includes both domains in order for things to work as expected.
    ssl_certificate /etc/letsencrypt/live/example.com/fullchain.pem;
    ssl_certificate_key /etc/letsencrypt/live/example.com/privkey.pem;
    ssl_trusted_certificate /etc/letsencrypt/live/example.com/chain.pem;

    # diffie-hellman parameters are used to negotiate keys for your session
    # generate strong parameters using the following command
    ssl_dhparam /etc/ssl/certs/dhparam.pem;

    # Speeds things up a little bit when resuming a session
    ssl_session_timeout 1d;
    ssl_session_cache shared:MozSSL:10m;
    ssl_session_tickets off;

    ssl_protocols TLSv1.2 TLSv1.3;
    ssl_ciphers ECDHE-ECDSA-AES128-GCM-SHA256:ECDHE-RSA-AES128-GCM-SHA256:ECDHE-ECDSA-AES256-GCM-SHA384:ECDHE-RSA-AES256-GCM-SHA384:ECDHE-ECDSA-CHACHA20-POLY1305:ECDHE-RSA-CHACHA20-POLY1305:DHE-RSA-AES128-GCM-SHA256:DHE-RSA-AES256-GCM-SHA384;
    ssl_prefer_server_ciphers off;

    # HSTS (ngx_http_headers_module is required) (63072000 seconds)
    add_header Strict-Transport-Security "max-age=63072000; includeSubDomains" always;

    # OCSP stapling
    ssl_stapling on;
    ssl_stapling_verify on;
    resolver 8.8.8.8 8.8.4.4 valid=300s;
    resolver_timeout 5s;

    # verify chain of trust of OCSP response using Root CA and Intermediate certs
    ssl_trusted_certificate /etc/ssl/certs/ca-certificates.crt;

    # replace with the IP address of your resolver
    resolver 8.8.8.8 8.8.4.4 1.1.1.1 1.0.0.1 9.9.9.9 149.112.112.112 208.67.222.222 208.67.220.220;

    add_header X-XSS-Protection "1; mode=block";
    add_header X-Content-Type-Options nosniff;
    add_header Access-Control-Allow-Origin "${allowed_origins}";
    # add_header X-Frame-Options "SAMEORIGIN";

    # Opt out of Google's FLoC Network
    add_header Permissions-Policy interest-cohort=();

    # Enable SharedArrayBuffer in Firefox (for .xlsx export)
    add_header Cross-Origin-Resource-Policy cross-origin;
    add_header Cross-Origin-Embedder-Policy require-corp;

    # Insert the path to your CryptPad repository root here
    root /home/username/cryptpad;
    index index.html;
    error_page 404 /customize.dist/404.html;

    # any static assets loaded with "ver=" in their URL will be cached for a year
    if ($args ~ ver=) {
        set $cacheControl max-age=31536000;
    }
    # This rule overrides the above caching directive and makes things somewhat less efficient.
    # We had inverted them as an optimization, but Safari 16 introduced a bug that interpreted
    # some important headers incorrectly when loading these files from cache.
    # This is why we can't have nice things :(
    if ($uri ~ ^(\/|.*\/|.*\.html)$) {
        set $cacheControl no-cache;
    }

    # Will not set any header if it is emptystring
    add_header Cache-Control $cacheControl;

    # CSS can be dynamically set inline, loaded from the same domain, or from $main_domain
    set $styleSrc   "'unsafe-inline' 'self' https://${main_domain}";

    # connect-src restricts URLs which can be loaded using script interfaces
    # if you have configured your instance to use a dedicated $files_domain or $api_domain
    # you will need to add them below as: https://${files_domain} and https://${api_domain}
    set $connectSrc "'self' https://${main_domain} blob: wss://${api_domain} https://${sandbox_domain}";

    # fonts can be loaded from data-URLs or the main domain
    set $fontSrc    "'self' data: https://${main_domain}";

    # images can be loaded from anywhere, though we'd like to deprecate this as it allows the use of images for tracking
    set $imgSrc     "'self' data: blob: https://${main_domain}";

    # frame-src specifies valid sources for nested browsing contexts.
    # this prevents loading any iframes from anywhere other than the sandbox domain
    set $frameSrc   "'self' https://${sandbox_domain} blob:";

    # specifies valid sources for loading media using video or audio
    set $mediaSrc   "blob:";

    # defines valid sources for webworkers and nested browser contexts
    # deprecated in favour of worker-src and frame-src
    set $childSrc   "https://${main_domain}";

    # specifies valid sources for Worker, SharedWorker, or ServiceWorker scripts.
    # supercedes child-src but is unfortunately not yet universally supported.
    set $workerSrc  "'self'";

    # script-src specifies valid sources for javascript, including inline handlers
    set $scriptSrc  "'self' resource: https://${main_domain}";

    # frame-ancestors specifies which origins can embed your CryptPad instance
    # this must include 'self' and your main domain (over HTTPS) in order for CryptPad to work
    # if you have enabled remote embedding via the admin panel then this must be more permissive.
    # note: cryptpad.fr permits web pages served via https: and vector: (element desktop app)
    set $frameAncestors "'self' https://${main_domain}";
    # set $frameAncestors "'self' https: vector:";

    set $unsafe 0;
    # the following assets are loaded via the sandbox domain
    # they unfortunately still require exceptions to the sandboxing to work correctly.
    if ($uri ~ ^\/(sheet|doc|presentation)\/inner.html.*$) { set $unsafe 1; }
    if ($uri ~ ^\/common\/onlyoffice\/.*\/.*\.html.*$) { set $unsafe 1; }

    # everything except the sandbox domain is a privileged scope, as they might be used to handle keys
    if ($host != $sandbox_domain) { set $unsafe 0; }
    # this iframe is an exception. Office file formats are converted outside of the sandboxed scope
    # because of bugs in Chromium-based browsers that incorrectly ignore headers that are supposed to enable
    # the use of some modern APIs that we require when javascript is run in a cross-origin context.
    # We've applied other sandboxing techniques to mitigate the risk of running WebAssembly in this privileged scope
    if ($uri ~ ^\/unsafeiframe\/inner\.html.*$) { set $unsafe 1; }

    # privileged contexts allow a few more rights than unprivileged contexts, though limits are still applied
    if ($unsafe) {
        set $scriptSrc "'self' 'unsafe-eval' 'unsafe-inline' resource: https://${main_domain}";
    }

    # Finally, set all the rules you composed above.
    add_header Content-Security-Policy "default-src 'none'; child-src $childSrc; worker-src $workerSrc; media-src $mediaSrc; style-src $styleSrc; script-src $scriptSrc; connect-src $connectSrc; font-src $fontSrc; img-src $imgSrc; frame-src $frameSrc; frame-ancestors $frameAncestors";

    # The nodejs process can handle all traffic whether accessed over websocket or as static assets
    # We prefer to serve static content from nginx directly and to leave the API server to handle
    # the dynamic content that only it can manage. This is primarily an optimization
    location ^~ /cryptpad_websocket {
        proxy_pass http://localhost:3000;
        proxy_set_header X-Real-IP $remote_addr;
        proxy_set_header Host $host;
        proxy_set_header X-Forwarded-For $proxy_add_x_forwarded_for;

        # WebSocket support (nginx 1.4)
        proxy_http_version 1.1;
        proxy_set_header Upgrade $http_upgrade;
        proxy_set_header Connection upgrade;
    }

    location ^~ /customize.dist/ {
        # This is needed in order to prevent infinite recursion between /customize/ and the root
    }
    # try to load customizeable content via /customize/ and fall back to the default content
    # located at /customize.dist/
    # This is what allows you to override behaviour.
    location ^~ /customize/ {
        rewrite ^/customize/(.*)$ $1 break;
        try_files /customize/$uri /customize.dist/$uri;
    }

    # /api/config is loaded once per page load and is used to retrieve
    # the caching variable which is applied to every other resource
    # which is loaded during that session.
    location ~ ^/api/.*$ {
        proxy_pass http://localhost:3000;
        proxy_set_header X-Real-IP $remote_addr;
        proxy_set_header Host $host;
        proxy_set_header X-Forwarded-For $proxy_add_x_forwarded_for;

        # These settings prevent both NGINX and the API server
        # from setting the same headers and creating duplicates
        proxy_hide_header Cross-Origin-Resource-Policy;
        add_header Cross-Origin-Resource-Policy cross-origin;
        proxy_hide_header Cross-Origin-Embedder-Policy;
        add_header Cross-Origin-Embedder-Policy require-corp;
    }

    # encrypted blobs are immutable and are thus cached for a year
    location ^~ /blob/ {
        if ($request_method = 'OPTIONS') {
            add_header 'Access-Control-Allow-Origin' "${allowed_origins}";
            add_header 'Access-Control-Allow-Methods' 'GET, POST, OPTIONS';
            add_header 'Access-Control-Allow-Headers' 'DNT,X-CustomHeader,Keep-Alive,User-Agent,X-Requested-With,If-Modified-Since,Cache-Control,Content-Type,Content-Range,Range';
            add_header 'Access-Control-Max-Age' 1728000;
            add_header 'Content-Type' 'application/octet-stream; charset=utf-8';
            add_header 'Content-Length' 0;
            return 204;
        }
        add_header X-Content-Type-Options nosniff;
        add_header Cache-Control max-age=31536000;
        add_header 'Access-Control-Allow-Origin' "${allowed_origins}";
        add_header 'Access-Control-Allow-Methods' 'GET, POST, OPTIONS';
        add_header 'Access-Control-Allow-Headers' 'DNT,X-CustomHeader,Keep-Alive,User-Agent,X-Requested-With,If-Modified-Since,Cache-Control,Content-Type,Content-Range,Range,Content-Length';
        add_header 'Access-Control-Expose-Headers' 'DNT,X-CustomHeader,Keep-Alive,User-Agent,X-Requested-With,If-Modified-Since,Cache-Control,Content-Type,Content-Range,Range,Content-Length';
        try_files $uri =404;
    }

    # the "block-store" serves encrypted payloads containing users' drive keys
    # these payloads are unlocked via login credentials. They are mutable
    # and are thus never cached. They're small enough that it doesn't matter, in any case.
    location ^~ /block/ {
        add_header X-Content-Type-Options nosniff;
        add_header Cache-Control max-age=0;
        try_files $uri =404;
    }

    # This block provides an alternative means of loading content
    # otherwise only served via websocket. This is solely for debugging purposes,
    # and is thus not allowed by default.
    #location ^~ /datastore/ {
        #add_header Cache-Control max-age=0;
        #try_files $uri =404;
    #}

    # The nodejs server has some built-in forwarding rules to prevent
    # URLs like /pad from resulting in a 404. This simply adds a trailing slash
    # to a variety of applications.
    location ~ ^/(register|login|settings|user|pad|drive|poll|slide|code|whiteboard|file|media|profile|contacts|todo|filepicker|debug|kanban|sheet|support|admin|notifications|teams|calendar|presentation|doc|form|report|convert|checkup)$ {
        rewrite ^(.*)$ $1/ redirect;
    }

    # Finally, serve anything the above exceptions don't govern.
    try_files /customize/www/$uri /customize/www/$uri/index.html /www/$uri /www/$uri/index.html /customize/$uri;
}
Guarda el archivo pulsando Ctrl + X e introduciendo Y cuando se te solicite una vez hayas terminado.
Comprueba la sintaxis del archivo de configuración de Nginx.
$ sudo nginx -t
nginx: the configuration file /etc/nginx/nginx.conf syntax is ok
nginx: configuration file /etc/nginx/nginx.conf test is successful
Reinicia el servicio Nginx.
$ sudo systemctl restart nginx
Paso 10 – Crear un servicio Cryptpad Systemd
Abre el archivo ~/cryptpad/docs/cryptpad.service para editarlo.
$ nano ~/cryptpad/docs/cryptpad.service
Modifica el código para que se parezca a lo siguiente. Asegúrate de que la ruta para el binario Node es correcta y sustituye username por tu nombre de usuario Linux actualmente conectado.
[Unit]
Description=CryptPad API server

[Service]
ExecStart=/home/username/.nvm/versions/node/v18.14.1/bin/node /home/username/cryptpad/server.js
# modify to match the location of your cryptpad repository
WorkingDirectory=/home/username/cryptpad

Restart=always
# Restart service after 10 seconds if node service crashes
RestartSec=2

# Output to syslog
StandardOutput=syslog
StandardError=syslog
SyslogIdentifier=cryptpad
User=username
Group=username
# modify to match your working directory
Environment='PWD="/home/username/cryptpad"'

# systemd sets the open file limit to 4000 unless you override it
# cryptpad stores its data with the filesystem, so you should increase this to match the value of `ulimit -n`
# or risk EMFILE errors.
LimitNOFILE=1000000

[Install]
WantedBy=multi-user.target
Guarda el archivo pulsando Ctrl + X e introduciendo Y cuando se te solicite una vez hayas terminado.
Copia el archivo en la carpeta Systemd.
sudo cp ~/cryptpad/docs/cryptpad.service /etc/systemd/system/cryptpad.service
Recarga el demonio de servicio.
$ sudo systemctl daemon-reload
Activa e inicia el servicio Cryptpad.
$ sudo systemctl enable cryptpad --now
Comprueba el estado del servicio.
$ suddo systemctl status cryptpad
Obtendrás la siguiente salida.
? cryptpad.service - CryptPad API server
     Loaded: loaded (/etc/systemd/system/cryptpad.service; enabled; vendor preset: enabled)
     Active: active (running) since Tue 2023-02-21 08:43:50 UTC; 1h 52min ago
   Main PID: 8145 (node)
      Tasks: 33 (limit: 2237)
     Memory: 53.4M
        CPU: 2.323s
     CGroup: /system.slice/cryptpad.service
             ??8145 /home/navjot/.nvm/versions/node/v18.14.1/bin/node /home/navjot/cryptpad/server.js
             ??8158 /home/navjot/.nvm/versions/node/v18.14.1/bin/node lib/workers/db-worker
             ??8159 /home/navjot/.nvm/versions/node/v18.14.1/bin/node lib/workers/db-worker

Feb 21 08:43:50 nspeaks systemd[1]: Started CryptPad API server.
Feb 21 08:43:50 nspeaks cryptpad[8145]: Serving content for https://example.com/ via http://127.0.0.1:3000.
Paso 11 – Accede y Configura Cryptpad
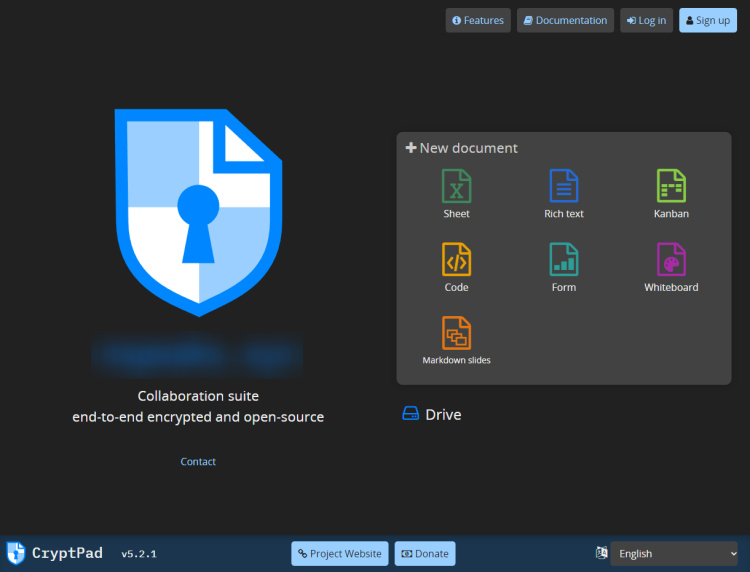
Abre la URL https://example.com en tu navegador y obtendrás la siguiente pantalla.
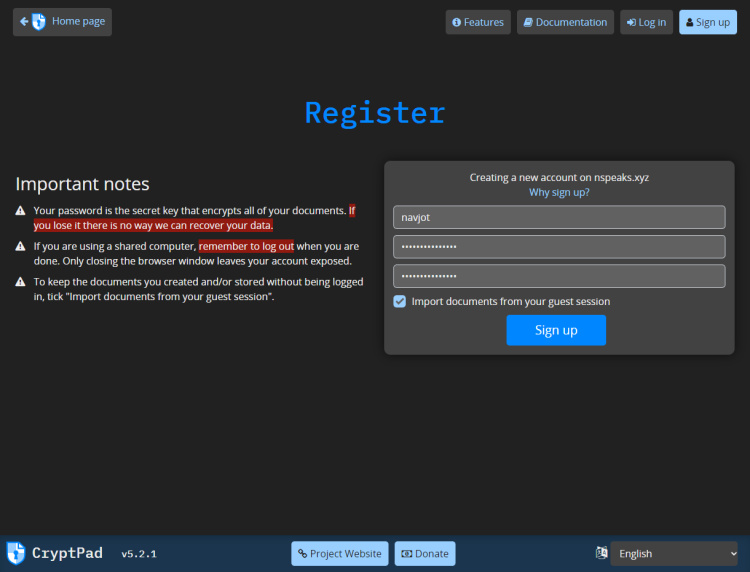
Haz clic en el botón Regístrate para crear una cuenta. Introduce tus credenciales y haz clic en el botón Regístrate para crear tu cuenta.
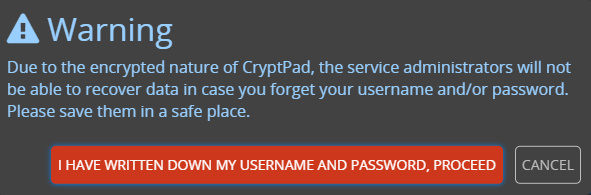
Aparecerá la siguiente ventana emergente de confirmación. Haz clic en el botón rojo para terminar de crear la cuenta.
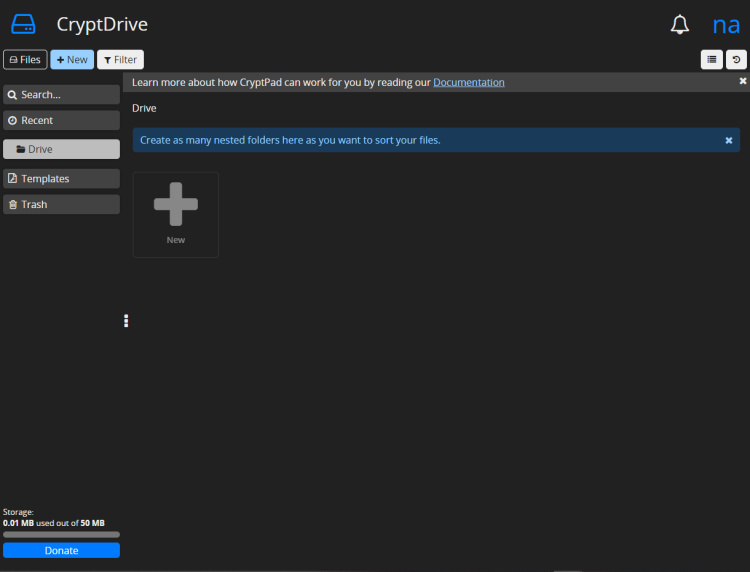
Iniciarás sesión y accederás al panel de control de CryptDrive.
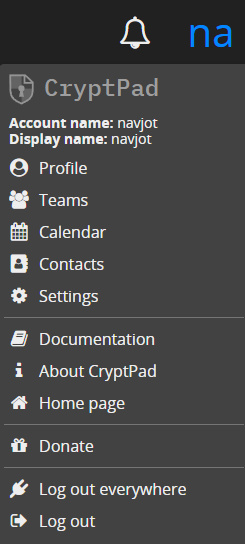
Haz clic en el menú Usuario de la esquina superior derecha y en la opción Configuración.
Aparecerá la siguiente página de configuración.
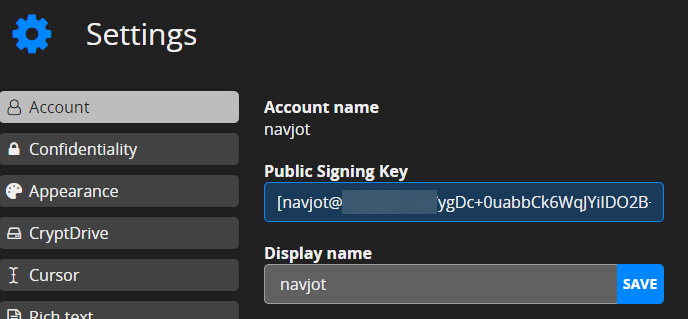
Copia el valor de la Clave Pública de Firma y vuelve al terminal y abre el archivo de configuración.
$ nano ~/cryptpad/config/config.js
Busca la variable adminKeys y pega la clave entre los corchetes, como se muestra a continuación.
adminKeys: ["[[email protected]/ygDc+0uabbCk6WqJYiIDO2B+gP6mYZ9FlQ94zL3UAoU=]"],
Guarda el archivo pulsando Ctrl + X e introduciendo Y cuando se te pida una vez hayas terminado.
Reinicia el servicio Cryptpad.
$ sudo systemctl restart cryptpad
Tu suite ofimática Cryptpad está lista para ser utilizada.
Paso 12 – Actualizar Cryptpad
Actualizar Cryptpad es bastante más sencillo y consiste en obtener las últimas actualizaciones del repositorio de GitHub y luego ejecutar los comandos de actualización de Node.
El primer paso es detener el servicio Cryptpad.
$ sudo systemctl stop cryptpad
Ejecuta los siguientes comandos para actualizar Cryptpad.
$ cd ~/cryptpad
$ git pull
$ git checkout $(git tag -l | grep -v 'v1.*$' | sort -V | tail -n 1)
$ npm update
$ bower update
Inicia el servicio Cryptpad.
$ sudo systemctl start cryptpad
Conclusión
Con esto concluye nuestro tutorial sobre la instalación de Cryptpad Collaborative Office Suite en un servidor Ubuntu 22.04. Si tienes alguna pregunta, publícala en los comentarios a continuación.