Cómo instalar el Generador de Sitios Hugo con Nginx en Rocky Linux 9
Un sitio estático se construye con páginas de contenido estático o código HTML, JavaScript o CSS plano. El contenido no se genera dinámicamente y no implica ninguna base de datos o procesamiento del lado del servidor. Estos sitios son increíblemente rápidos e inmunes a los exploits que dependen de código dinámico o SQL.
Hugo es un generador de sitios estáticos de código abierto escrito en Go. Genera contenido convirtiendo a HTML las entradas escritas en lenguaje markdown. Hugo también incluye un servidor integrado para alojar los sitios que genera. También puedes alojar un sitio web Hugo en Amazon S3, páginas de GitHub, Google Cloud, Netlify, Vercel, etc.
En este tutorial, exploraremos cómo instalar Hugo para crear un sitio web estático en un servidor con Rocky Linux 9. Utilizaremos el servidor Nginx para alojar el sitio y el certificado SSL Let’s Encrypt para asegurar nuestra instalación.
Requisitos previos
- Un servidor con Rocky Linux 9.
- Un usuario no root con privilegios sudo.
- Un nombre de dominio completo (FQDN) que apunte a tu servidor. Para nuestros propósitos, utilizaremos
hugo.example.comcomo nombre de dominio. - Asegúrate de que todo está actualizado.
$ sudo dnf update
- Instala los paquetes de utilidades básicas. Es posible que algunos de ellos ya estén instalados.
$ sudo dnf install wget curl nano unzip yum-utils tree -y
Paso 1 – Configurar el Cortafuegos
El primer paso es configurar el cortafuegos. Rocky Linux utiliza el cortafuegos Firewalld. Comprueba el estado del cortafuegos.
$ sudo firewall-cmd --state
running
El cortafuegos funciona con diferentes zonas, y la zona pública es la que utilizaremos por defecto. Enumera todos los servicios y puertos activos en el cortafuegos.
$ sudo firewall-cmd --permanent --list-services
Debería mostrar la siguiente salida.
cockpit dhcpv6-client ssh
Wiki.js necesita los puertos HTTP y HTTPS para funcionar. Ábrelos.
$ sudo firewall-cmd --add-service=http --permanent
$ sudo firewall-cmd --add-service=https --permanent
Recarga el cortafuegos para aplicar los cambios.
$ sudo firewall-cmd --reload
Paso 2 – Instalar Nginx
Rocky Linux 9 viene con una versión antigua de Nginx. Necesitas descargar el repositorio oficial de Nginx para instalar la última versión.
Crea y abre el archivo /etc/yum.repos.d/nginx.repo para crear el repositorio oficial de Nginx.
$ sudo nano /etc/yum.repos.d/nginx.repo
Pega en él el siguiente código.
[nginx-stable]
name=nginx stable repo
baseurl=http://nginx.org/packages/centos/$releasever/$basearch/
gpgcheck=1
enabled=1
gpgkey=https://nginx.org/keys/nginx_signing.key
module_hotfixes=true

[nginx-mainline]
name=nginx mainline repo
baseurl=http://nginx.org/packages/mainline/centos/$releasever/$basearch/
gpgcheck=1
enabled=0
gpgkey=https://nginx.org/keys/nginx_signing.key
module_hotfixes=true
Guarda el archivo pulsando Ctrl + X e introduciendo Y cuando se te pida.
Instala el servidor Nginx.
$ sudo dnf install nginx -y
Verifica la instalación.
$ nginx -v
nginx version: nginx/1.24.0
Habilita e inicia el servidor Nginx.
$ sudo systemctl enable nginx --now
Comprueba el estado del servidor.
$ sudo systemctl status nginx
? nginx.service - nginx - high performance web server
     Loaded: loaded (/usr/lib/systemd/system/nginx.service; enabled; preset: disabled)
     Active: active (running) since Mon 2023-10-30 08:24:05 UTC; 7s ago
       Docs: http://nginx.org/en/docs/
    Process: 4265 ExecStart=/usr/sbin/nginx -c /etc/nginx/nginx.conf (code=exited, status=0/SUCCESS)
   Main PID: 4266 (nginx)
      Tasks: 2 (limit: 4402)
     Memory: 1.9M
        CPU: 7ms
     CGroup: /system.slice/nginx.service
             ??4266 "nginx: master process /usr/sbin/nginx -c /etc/nginx/nginx.conf"
             ??4267 "nginx: worker process"

Oct 30 08:24:05 hugo.example.com systemd[1]: Starting nginx - high performance web server...
Paso 3 – Instalar Git
Hugo necesita Git para funcionar. Ejecuta el siguiente comando para instalar Git
$ sudo dnf install git -y
Verifica la instalación de Git.
$ git --version
git version 2.39.3
Paso 4 – Instalar Hugo
Dado que Hugo está construido utilizando el lenguaje Go, instalarlo es bastante sencillo, ya que no requiere ninguna dependencia y puede ejecutarse de forma autónoma.
Descarga Hugo. Para nuestro tutorial, instalaremos la versión extendida de Hugo. La versión extendida puede codificar imágenes al formato Webp cuando procesa imágenes. Esto es útil si quieres que Hugo convierta las imágenes por ti sobre la marcha y mantenga su tamaño reducido. La versión extendida también incluye un compilador SASS que puede ser útil en ciertos casos por si lo necesitas.
Crea un directorio para Hugo.
$ sudo mkdir /var/www/html/hugo -p
Cambia al directorio recién creado.
$ cd /var/www/html/hugo
Descarga Hugo desde la página de versiones de GitHub. En el momento de escribir este tutorial, v0.119.0 es la última versión, que es la que vamos a descargar.
$ sudo wget https://github.com/gohugoio/hugo/releases/download/v0.119.0/hugo_extended_0.119.0_linux-amd64.tar.gz
Extrae los ficheros del archivo.
$ sudo tar -xzf hugo_extended_0.119.0_linux-amd64.tar.gz
Verás los tres archivos siguientes en tu directorio.
$ ls
hugo  hugo_extended_0.119.0_linux-amd64.tar.gz  LICENSE  README.md
Mueve el binario hugo al directorio /usr/bin.
$ sudo mv hugo /usr/bin/hugo
El archivo ya tiene configurado el permiso de ejecutable, por lo que no necesitas configurarlo.
Confirma la instalación.
$ hugo version
hugo v0.119.0-b84644c008e0dc2c4b67bd69cccf87a41a03937e+extended linux/amd64 BuildDate=2023-09-24T15:20:17Z VendorInfo=gohugoio
También puedes comprobar todas las opciones disponibles para su uso utilizando la bandera --help.
$ hugo --help
Obtendrás la siguiente salida.
hugo is the main command, used to build your Hugo site.

Hugo is a Fast and Flexible Static Site Generator
built with love by spf13 and friends in Go.

Complete documentation is available at https://gohugo.io/.

Usage:
  hugo [flags]
  hugo [command]

Available Commands:
  completion  Generate the autocompletion script for the specified shell
  config      Print the site configuration
  convert     Convert your content to different formats
  deploy      Deploy your site to a Cloud provider.
  env         Print Hugo version and environment info
  gen         A collection of several useful generators.
  help        Help about any command
  import      Import your site from others.
  list        Listing out various types of content
  mod         Various Hugo Modules helpers.
  new         Create new content for your site
  server      A high performance webserver
  version     Print Hugo version and environment info

Flags:
  -b, --baseURL string             hostname (and path) to the root, e.g. https://spf13.com/
  -D, --buildDrafts                include content marked as draft
  -E, --buildExpired               include expired content
  -F, --buildFuture                include content with publishdate in the future
      --cacheDir string            filesystem path to cache directory
      --cleanDestinationDir        remove files from destination not found in static directories
      --clock string               set the clock used by Hugo, e.g. --clock 2021-11-06T22:30:00.00+09:00
      --config string              config file (default is hugo.yaml|json|toml)
      --configDir string           config dir (default "config")
  -c, --contentDir string          filesystem path to content directory
      --debug                      debug output
  -d, --destination string         filesystem path to write files to
      --disableKinds strings       disable different kind of pages (home, RSS etc.)
      --enableGitInfo              add Git revision, date, author, and CODEOWNERS info to the pages
  -e, --environment string         build environment
      --forceSyncStatic            copy all files when static is changed.
      --gc                         enable to run some cleanup tasks (remove unused cache files) after the build
  -h, --help                       help for hugo
      --ignoreCache                ignores the cache directory
      --ignoreVendorPaths string   ignores any _vendor for module paths matching the given Glob pattern
  -l, --layoutDir string           filesystem path to layout directory
      --logLevel string            log level (debug|info|warn|error)
      --minify                     minify any supported output format (HTML, XML etc.)
      --noBuildLock                don't create .hugo_build.lock file
      --noChmod                    don't sync permission mode of files
      --noTimes                    don't sync modification time of files
      --panicOnWarning             panic on first WARNING log
      --poll string                set this to a poll interval, e.g --poll 700ms, to use a poll based approach to watch for file system changes
      --printI18nWarnings          print missing translations
      --printMemoryUsage           print memory usage to screen at intervals
      --printPathWarnings          print warnings on duplicate target paths etc.
      --printUnusedTemplates       print warnings on unused templates.
      --quiet                      build in quiet mode
      --renderToMemory             render to memory (only useful for benchmark testing)
  -s, --source string              filesystem path to read files relative from
      --templateMetrics            display metrics about template executions
      --templateMetricsHints       calculate some improvement hints when combined with --templateMetrics
  -t, --theme strings              themes to use (located in /themes/THEMENAME/)
      --themesDir string           filesystem path to themes directory
      --trace file                 write trace to file (not useful in general)
  -v, --verbose                    verbose output
  -w, --watch                      watch filesystem for changes and recreate as needed

Use "hugo [command] --help" for more information about a command.
Elimina todos los archivos restantes de la carpeta, puesto que ya no son necesarios.
$ sudo rm -rf *.*
Paso 5 – Crear un nuevo Sitio Hugo
Ejecuta el siguiente comando para crear un nuevo sitio web Hugo.
$ sudo hugo new site howtoforge
Obtendrás el siguiente resultado.
Congratulations! Your new Hugo site was created in /home/navjot/hugo/howtoforge.

Just a few more steps...

1. Change the current directory to /home/navjot/hugo/howtoforge.
2. Create or install a theme:
   - Create a new theme with the command "hugo new theme <THEMENAME>"
   - Install a theme from https://themes.gohugo.io/
3. Edit hugo.toml, setting the "theme" property to the theme name.
4. Create new content with the command "hugo new content <SECTIONNAME>/<FILENAME>.<FORMAT>".
5. Start the embedded web server with the command "hugo server --buildDrafts".

See documentation at https://gohugo.io/.
Ejecuta el comando tree para comprobar la estructura del sitio.
$ tree howtoforge/
Obtendrás el siguiente resultado.
howtoforge/
??? archetypes
?   ??? default.md
??? assets
??? content
??? data
??? hugo.toml
??? i18n
??? layouts
??? static
??? themes

8 directories, 2 files
Cambia al directorio Hugo.
$ cd howtoforge
Paso 6 – Instalar el Tema Hugo
El siguiente paso es instalar un tema Hugo. Hay dos formas de hacerlo y ambas requieren Git. El primer método es sencillo e implica clonar el repositorio GitHub del Tema. Esto es útil en la mayoría de los casos y la forma más fácil de hacerlo. Actualizar mediante este método es fácil, aunque implica descargar un montón de cosas innecesarias que no necesitas. Hay algunos temas, especialmente los de pago, que no tienen un repositorio de GitHub desde el que puedas obtenerlos. Estos temas suelen ofrecerse como un archivo comprimido. En ese caso, tienes que extraer el archivo manualmente y mantener el tema actualizado manualmente. El tercer método consiste en obtener el tema como un submódulo Git. Esto requiere que inicialices tu directorio Hugo como repositorio Git. Este es el método recomendado y es útil en caso de que quieras desplegar tu sitio en GitHub, Netlify o cualquier otro servicio de alojamiento. Empujar tu sitio Hugo a GitHub también garantiza copias de seguridad automáticas sin ningún esfuerzo adicional.
Cubriremos los tres métodos. Existe otro método para instalar un tema Hugo utilizando módulos Hugo Go. Este método sólo funciona si el tema está disponible como módulo Hugo. Sin embargo, no lo cubriremos ya que está fuera del alcance de este artículo.
Método 1 – Clonar un tema Hugo
Este es el método más utilizado para instalar un tema Hugo. Para nuestro tutorial, instalaremos el tema Paper. Cambia al directorio Hugo.
$ cd /var/www/html/hugo/howtoforge
Ejecuta el siguiente comando para clonar el repositorio GitHub del tema. La bandera --depth=1 sólo coge la última confirmación.
$ sudo git clone https://github.com/nanxiaobei/hugo-paper themes/Paper --depth=1
Para actualizar el tema descargado mediante este método, ejecuta los siguientes comandos.
$ cd ~/hugo/howtoforge/themes/Paper
$ sudo git pull
Método 2 – Instalar el tema desde un archivo comprimido
Este es el método más sencillo de todos. Coge el archivo comprimido del tema. El tema Paper no tiene una sección de versiones, por lo que no puedes descargar una versión concreta. Por lo tanto, descargaremos el archivo maestro de GitHub. Puedes obtener el enlace desde su página de repositorio de GitHub.
$ cd ~
$ wget https://github.com/nanxiaobei/hugo-paper/archive/refs/heads/main.zip
Extrae el archivo en el directorio themes. La bandera -q suprime la salida y la bandera -d especifica el directorio de salida.
$ sudo unzip -q main.zip -d /var/www/html/hugo/howtoforge/themes/
Para actualizar el tema, tienes que descargar el archivo más reciente y extraerlo de nuevo. Asegúrate de hacer una copia de seguridad de todos los archivos que hayas modificado.
Los dos últimos métodos sólo funcionan si tu sitio Hugo está alojado como un proyecto Git. De lo contrario, no necesitas utilizar los métodos siguientes.
Método 3 – Instalar el Tema como un Submódulo Git
Cambia a la carpeta Hugo.
$ cd /var/www/html/hugo/howtoforge
Inicializa la carpeta Hugo como repositorio Git. Este es un paso importante. Esto te permite empujar tu sitio Hugo a GitHub para utilizarlo más tarde para alojar utilizando Netlify, AWS, Vercel, etc.
$ sudo git init
Ejecuta el siguiente comando para añadir el tema como submódulo Git.
$ sudo git submodule add https://github.com/nanxiaobei/hugo-paper themes/paper
Para actualizar un tema añadido como Submódulo, ejecuta el siguiente comando desde la carpeta Hugo.
$ sudo git submodule update --remote --merge
Configurar Hugo
Una vez que hayas instalado el tema utilizando el método que prefieras, abre el archivo hugo.toml en el directorio raíz de tu Hugo. A partir de Hugo v0.110.0, el archivo de configuración por defecto se llama hugo.toml. Si utilizas una versión anterior de Hugo, encontrarás el archivo config.toml en tu directorio Hugo.
$ sudo nano hugo.toml
Añade la siguiente línea al archivo. El valor debe coincidir con el directorio del tema. Para el tema de papel, sería el directorio hugo-paper-theme si utilizaste la instalación de archivo o Paper si utilizaste el método de clon Git o submódulo anterior.
theme = 'hugo-paper-main'
Además, cambia el valor de la variable baseURL por el nombre de dominio de tu sitio web. Y cambia el title de tu sitio web.
Tu archivo de configuración debería tener el siguiente aspecto.
baseURL = 'https://hugo.example.com/'
languageCode = 'en-us'
title = 'Howtoforge Hugo Demo'
theme = 'hugo-paper-main'
Una vez terminado, guarda el archivo pulsando Ctrl + X e introduciendo Y cuando se te pida.
Paso 7 – Crear entradas y páginas
Para crear una nueva entrada, ejecuta el siguiente comando.
$ sudo hugo new post/first-post.md
Esto creará un nuevo archivo markdown first-post.md con el título First Post en la carpeta content/post. Abre el archivo en tu editor favorito y edita los detalles y escribe algo para tu primer post.
+++
title = 'First Post'
date = 2023-10-30T03:32:38Z
draft = true
+++
## Introduction

This is **bold** text, and this is *emphasized* text.

Visit the [Howtoforge](https://howtoforge.com) website!
Elimina el draft = true cuando hayas terminado de escribir el post. Guarda el archivo pulsando Ctrl + X e introduciendo Y cuando se te pida.
Para crear una nueva página, emite el siguiente comando.
$ sudo hugo new about.md
Esto creará una nueva página titulada Acerca de en la carpeta content. Ábrela y edítala del mismo modo que el post.
Configurar el tema
Antes de publicar, tenemos que hacer algunos cambios en el tema para mostrar la barra de menús. Estos cambios se harán en el archivo de configuración de Hugo y no en la configuración del tema.
Cambia al directorio Hugo.
$ cd /var/www/html/hugo/howtoforge
Abre el archivo hugo.toml para editarlo.
$ sudo nano hugo.toml
Pega el siguiente código en la parte inferior.
author = "Navjot Singh"
copyright = "Copyright © 2023, Navjot Singh; all rights reserved."
paginate = 3
enableInlineShortcodes = true
# needed to  render raw HTML (e.g. <sub>, <sup>, <kbd>, <mark>)
[markup]
  [markup.goldmark]
    [markup.goldmark.renderer]
      unsafe = true

[menu]
  [[menu.main]]
    identifier = "about"
    name = "About"
    url = "/about/"
    weight = 10

[taxonomies]
category = "categories"
tag = "tags"
series = "series"
Guarda el archivo pulsando Ctrl + X e introduciendo Y cuando se te pida.
Estos son algunos ajustes básicos para que el sitio funcione. Aquí hemos configurado el sitio para que muestre 3 entradas por página, muestre la página Acerca de como un elemento del menú y configure categorías, etiquetas y series de entradas. También hemos habilitado los códigos cortos en línea de Hugo y el HTML sin formato para el renderizado Goldmark Markdown. Puedes desactivarlo si no quieres incrustar HTML sin formato en tus entradas.
Paso 8 – Publicar el Sitio Hugo
Para crear y publicar el sitio, ejecuta el siguiente comando.
$ sudo hugo
Obtendrás una salida similar.
Start building sites …
hugo v0.119.0-b84644c008e0dc2c4b67bd69cccf87a41a03937e+extended linux/amd64 BuildDate=2023-09-24T15:20:17Z VendorInfo=gohugoio


                   | EN
-------------------+-----
  Pages            |  7
  Paginator pages  |  0
  Non-page files   |  0
  Static files     | 11
  Processed images |  0
  Aliases          |  3
  Sitemaps         |  1
  Cleaned          |  0

Total in 46 ms
Esto crea y publica el sitio web estático Hugo en la carpeta public. Estos son los archivos que necesitamos especificar en la configuración de Nginx para que el sitio funcione. Ejecuta de nuevo el comando después de realizar cualquier cambio y tu sitio web se actualizará en un abrir y cerrar de ojos.
Paso 9 – Instalar SSL
Antes de continuar, necesitamos instalar la herramienta Certbot e instalar un certificado SSL para nuestro dominio.
Para instalar Certbot, utilizaremos el instalador de paquetes Snapd. Snapd siempre lleva la última versión estable de Certbot y deberías utilizarla.
La herramienta Snapd necesita el repositorio Epel para funcionar.
$ sudo dnf install epel-release -y
Utilizaremos Snapd para instalar Certbot. Instala Snapd.
$ sudo dnf install snapd -y
Habilita e Inicia el servicio Snap.
$ sudo systemctl enable snapd.socket --now
Crea los enlaces necesarios para que Snapd funcione.
$ sudo ln -s /var/lib/snapd/snap /snap
$ echo 'export PATH=$PATH:/var/lib/snapd/snap/bin' | sudo tee -a /etc/profile.d/snapd.sh
Asegúrate de que tu versión de snapd está actualizada. Espera un par de segundos antes de emitir los siguientes comandos.
$ sudo snap install core
$ sudo snap refresh core
Instala Certbot.
$ sudo snap install --classic certbot
Utiliza el siguiente comando para asegurarte de que se puede ejecutar el comando Certbot creando un enlace simbólico al directorio /usr/bin.
$ sudo ln -s /snap/bin/certbot /usr/bin/certbot
Verifica la instalación.
$ certbot --version
certbot 2.7.3
Genera un certificado SSL.
$ sudo certbot certonly --nginx --agree-tos --no-eff-email --staple-ocsp --preferred-challenges http -m [email protected] -d hugo.example.com
El comando anterior descargará un certificado en el directorio /etc/letsencrypt/live/hugo.example.com de tu servidor.
Genera un certificado de grupo Diffie-Hellman.
$ sudo openssl dhparam -dsaparam -out /etc/ssl/certs/dhparam.pem 4096
Comprueba el servicio programador de renovaciones de Certbot.
$ sudo systemctl list-timers
Encontrarás snap.certbot.renew.service como uno de los servicios programados para ejecutarse.
NEXT                        LEFT          LAST                        PASSED    UNIT                         ACTIVATES
Wed 2023-10-29 10:00:17 UTC 57min left    Wed 2023-10-18 08:49:39 UTC 12min ago dnf-makecache.timer          dnf-makecache.service
Wed 2023-10-29 12:18:00 UTC 3h 15min left -                           -         snap.certbot.renew.timer     snap.certbot.renew.service
Thu 2023-10-30 00:00:00 UTC 14h left      Wed 2023-10-18 08:10:08 UTC 52min ago logrotate.timer              logrotate.service
Realiza una ejecución en seco del proceso para comprobar si la renovación SSL funciona correctamente.
$ sudo certbot renew --dry-run
Si no ves ningún error, ya está todo listo. Tu certificado se renovará automáticamente.
Paso 10 – Configurar Nginx
Crea y abre el archivo /etc/nginx/conf.d/hugo.conf para editarlo.
$ sudo nano /etc/nginx/conf.d/hugo.conf
Pega el siguiente código en el archivo hugo.conf. Sustituye todas las instancias de hugo.example.com por tu dominio.
## enforce HTTPS
server {
  listen 80;
  listen [::]:80;
  server_name hugo.example.com;
  return 301 https://$server_name$request_uri;
}

server {
  listen 443 ssl http2;
  listen [::]:443 ssl http2;
  server_name hugo.example.com;

  root /home/navjot/hugo/howtoforge/public;
  index index.html

  access_log /var/log/nginx/hugo.access.log;
  error_log /var/log/nginx/hugo.error.log;
  client_max_body_size 20m;
  gzip on;

  http2_push_preload on; # Enable HTTP/2 Server Push

  ssl_certificate     /etc/letsencrypt/live/hugo.example.com/fullchain.pem;
  ssl_certificate_key /etc/letsencrypt/live/hugo.example.com/privkey.pem;
  ssl_trusted_certificate /etc/letsencrypt/live/hugo.example.com/chain.pem;
  ssl_session_timeout 1d;

  # Enable TLS versions (TLSv1.3 is required upcoming HTTP/3 QUIC).
  ssl_protocols TLSv1.2 TLSv1.3;

  # Enable TLSv1.3's 0-RTT. Use $ssl_early_data when reverse proxying to
  # prevent replay attacks.
  #
  # @see: https://nginx.org/en/docs/http/ngx_http_ssl_module.html#ssl_early_data
  ssl_early_data on;

  ssl_ciphers 'ECDHE-ECDSA-AES256-GCM-SHA384:ECDHE-RSA-AES256-GCM-SHA384:ECDHE-ECDSA-CHACHA20-POLY1305:ECDHE-RSA-CHACHA20-POLY1305:ECDHE-ECDSA-AES256-SHA384:ECDHE-RSA-AES256-SHA384';
  ssl_prefer_server_ciphers on;
  ssl_ecdh_curve X25519:prime256v1:secp384r1:secp521r1;
  ssl_session_cache shared:SSL:50m;
  ssl_session_tickets off;

  # OCSP Stapling ---
  # fetch OCSP records from URL in ssl_certificate and cache them
  ssl_stapling on;
  ssl_stapling_verify on;
  ssl_dhparam /etc/ssl/certs/dhparam.pem;

  add_header X-Early-Data $tls1_3_early_data;

  location / {
      try_files $uri $uri/ =404;
  }

  # Media
  location ~* \.(?:jpg|jpeg|gif|png|ico|cur|gz|svg|mp4|ogg|ogv|webm|htc)$ {
      expires 30d;
  }

  # CSS and Js
  location ~* \.(css|js)$ {
      expires 7d;
  }
}

# This block is useful for debugging TLS v1.3. Please feel free to remove this
# and use the `$ssl_early_data` variable exposed by NGINX directly should you
# wish to do so.
map $ssl_early_data $tls1_3_early_data {
  "~." $ssl_early_data;
  default "";
}
La configuración anterior redirigirá todas las peticiones HTTP a HTTPS y servirá como proxy para que el servicio Hugo lo sirva a través de tu dominio.
Guarda el archivo pulsando Ctrl + X e introduciendo Y cuando se te solicite.
Abre el archivo /etc/nginx/nginx.conf para editarlo.
$ sudo nano /etc/nginx/nginx.conf
Añade la siguiente línea antes de la línea include /etc/nginx/conf.d/*.conf;.
server_names_hash_bucket_size 64;
Guarda el archivo pulsando Ctrl + X e introduciendo Y cuando se te solicite.
Comprueba la configuración de Nginx.
$ sudo nginx -t
Si no ves ningún error, significa que puedes continuar. Vuelve a cargar el servidor Nginx.
$ sudo systemctl reload nginx
Paso 11 – Configurar SELinux
Cambia el contexto de seguridad de archivos para OpenEMR.
$ sudo semanage fcontext -a -t httpd_sys_rw_content_t "/var/www/html/hugo/howtoforge/public(/.*)?"
Aplica la política.
$ sudo restorecon -Rv /var/www/html/hugo/howtoforge/public/
Permite que Nginx se conecte a la red.
$ sudo setsebool -P httpd_can_network_connect 1
Paso 12 – Ejecuta el sitio
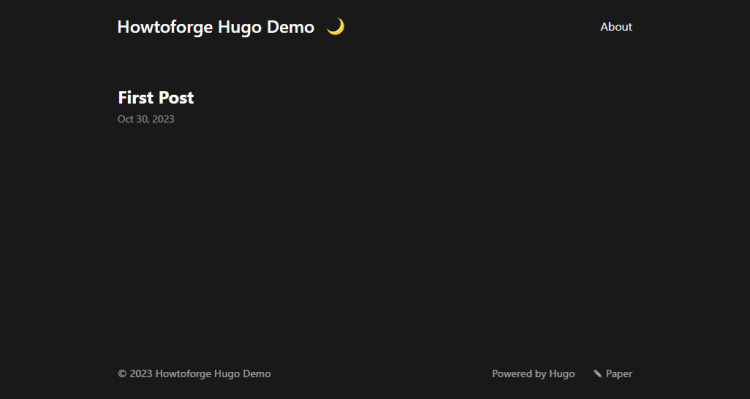
Ahora, puedes verificar tu instalación abriendo https://hugo.example.com en tu navegador web. Aparecerá la siguiente página indicando que la instalación se ha realizado correctamente.
Paso 13 – Actualizar Hugo
Actualizar Hugo es bastante sencillo. Descarga la última versión de la página GitHub de Hugo.
$ cd /var/www/html/hugo
$ sudo wget https://github.com/gohugoio/hugo/releases/download/v0.119.0/hugo_extended_0.119.0_linux-amd64.tar.gz
Extrae el archivo.
$ sudo tar -xzf hugo_extended_0.119.0_linux-amd64.tar.gz
Y sustituye el binario de Hugo por la última versión. La bandera -f sobrescribe el binario sin preguntar. Puedes utilizar la opción -i en su lugar si quieres que se te pida que sobrescribas.
$ sudo mv -f hugo /usr/bin/hugo
Eso es todo. Actualizar Hugo es tan sencillo como sustituir el binario.
Paso 14 – Hacer una copia de seguridad y restaurar Hugo
Para hacer una copia de seguridad, crea un archivo de toda la carpeta Hugo.
$ cd /var/www/html/hugo
$ sudo tar -czvf howtoforge.tar.gz howtoforge/
Para restaurarlo en un nuevo servidor, extrae el archivo e instala el binario y listo.
$ cd /var/www/html/hugo
$ sudo tar -xzf howtoforge.tar.gz
Conclusión
Con esto concluye nuestro tutorial sobre cómo configurar el generador de sitios estáticos Hugo en tu servidor Rocky Linux 9 utilizando Nginx. Si tienes alguna pregunta o comentario, compártelos en los comentarios a continuación.