Cómo configurar un servidor de streaming de vídeo con Nginx-RTMP en Ubuntu 22.04
El RTMP, también llamado «protocolo de mensajería en tiempo real», es una tecnología de transmisión de datos que admite la transmisión de vídeo en línea en directo. Se utiliza para transmitir archivos de vídeo desde un codificador a una plataforma de alojamiento de vídeo en línea. RTMP utiliza TCP para viajar y utiliza un apretón de manos a tres bandas cuando transporta datos. RTMP se utiliza con muchos tipos diferentes de medios de comunicación, incluyendo emisiones de televisión en directo, streaming de vídeo y servicios de telefonía por Internet.
Características
- Produce vídeos en directo de alta calidad sin buffering
- Fácil de instalar y configurar.
- Compatible con la mayoría de programas de transmisión en directo y servicios de vídeo.
Este tutorial te mostrará cómo configurar un servidor de streaming de vídeo utilizando Nginx-RTMP en un servidor Ubuntu 22.04.
Requisitos
- Un servidor con Ubuntu 22.04.
- Una contraseña de root configurada para tu servidor.
Instalar el servidor web Nginx
Antes de empezar, el servidor web Nginx debe estar instalado en tu servidor. Si no está instalado, puedes instalarlo con el siguiente comando.
apt install nginx -y
Tras instalar el paquete Nginx, inicia el servicio Nginx y habilítalo para que se inicie al reiniciar el sistema.
systemctl start nginx
systemctl enable nginx
Puedes verificar el estado del servicio Nginx con el siguiente comando.
systemctl status nginx
Obtendrás la siguiente salida.
? nginx.service - A high performance web server and a reverse proxy server
     Loaded: loaded (/lib/systemd/system/nginx.service; enabled; vendor preset: enabled)
     Active: active (running) since Mon 2023-01-09 14:54:55 UTC; 28s ago
       Docs: man:nginx(8)
    Process: 43294 ExecReload=/usr/sbin/nginx -g daemon on; master_process on; -s reload (code=exited, status=0/SUCCESS)
   Main PID: 43005 (nginx)
      Tasks: 3 (limit: 4575)
     Memory: 8.5M
        CPU: 35ms
     CGroup: /system.slice/nginx.service
             ??43005 "nginx: master process /usr/sbin/nginx -g daemon on; master_process on;"
             ??43295 "nginx: worker process" "" "" "" "" "" "" "" "" "" "" "" "" "" "" "" "" "" "" "" "" "" "" "" "" "" "" ""
             ??43296 "nginx: worker process" "" "" "" "" "" "" "" "" "" "" "" "" "" "" "" "" "" "" "" "" "" "" "" "" "" "" ""

Jan 09 14:54:55 vultr systemd[1]: Starting A high performance web server and a reverse proxy server...
Jan 09 14:54:55 vultr systemd[1]: Started A high performance web server and a reverse proxy server.
Jan 09 14:55:04 vultr systemd[1]: Reloading A high performance web server and a reverse proxy server...
Jan 09 14:55:04 vultr systemd[1]: Reloaded A high performance web server and a reverse proxy server.
Instalar y configurar Nginx-RTMP
Por defecto, el paquete Nginx-RTMP está incluido en el repositorio por defecto de Ubuntu. Puedes instalarlo con el siguiente comando.
apt install libnginx-mod-rtmp -y
Una vez instalado el paquete Nginx-RTMP, edita el archivo de configuración principal de Nginx y define tu flujo.
nano /etc/nginx/nginx.conf
Añade las siguientes líneas al final del archivo:
rtmp {
        server {
                listen 1935;
                chunk_size 4096;
                allow publish all;

                application live {
                        live on;
                        record off;
                }
        }
}
Guarda y cierra el archivo y luego comprueba si Nginx tiene algún error de configuración con el siguiente comando.
nginx -t
Deberías ver la siguiente salida.
nginx: the configuration file /etc/nginx/nginx.conf syntax is ok
nginx: configuration file /etc/nginx/nginx.conf test is successful
Por último, reinicia el servicio Nginx para aplicar los cambios.
systemctl restart nginx
En este punto, Nginx-RTMP está instalado y escucha en el puerto 1935. Puedes comprobarlo con el siguiente comando.
ss -antpl | grep 1935
Deberías ver la siguiente salida.
LISTEN 0 511 0.0.0.0:1935 0.0.0.0:* users:(("nginx",pid=43388,fd=8),("nginx",pid=43387,fd=8),("nginx",pid=43386,fd=8))
Enviar vídeo al servidor RTMP
A continuación, tendrás que descargar un vídeo de muestra de YouTube y enviarlo a tu servidor RTMP utilizando FFmpeg.
Primero, instala el paquete youtube-dl ad FFmpeg con el siguiente comando.
apt install python3-pip ffmpeg -y
pip install youtube-dl
A continuación, descarga cualquier vídeo de YouTube utilizando la herramienta de línea de comandos youtube-dl.
youtube-dl https://www.youtube.com/watch?v=oNEwEQ0uU1Y
Una vez descargado el vídeo en tu sistema, puedes enviar el vídeo descargado al servidor RTMP utilizando el comando FFmpeg.
ffmpeg -re -i "How to Install Ubuntu 22.04 LTS-oNEwEQ0uU1Y.mp4" -c:v copy -c:a aac -ar 44100 -ac 1 -f flv rtmp://your-server-ip/live/stream &
En este punto, tu vídeo descargado se envía a rtmp://tu-servidor-ip/live/stream
Transmitir vídeo a VLC Player
En esta sección, te mostraremos cómo transmitir tu vídeo desde el servidor RTMP en el software VLC player.
En primer lugar, inicia sesión en tu sistema de escritorio y abre el reproductor VLC. A continuación, haz clic en Medios => Abrir transmisión de red. Deberías ver la siguiente pantalla.
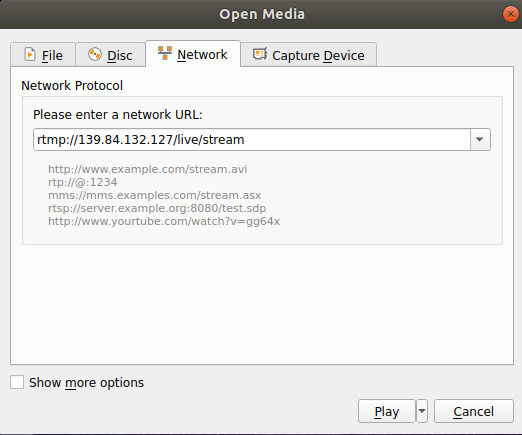
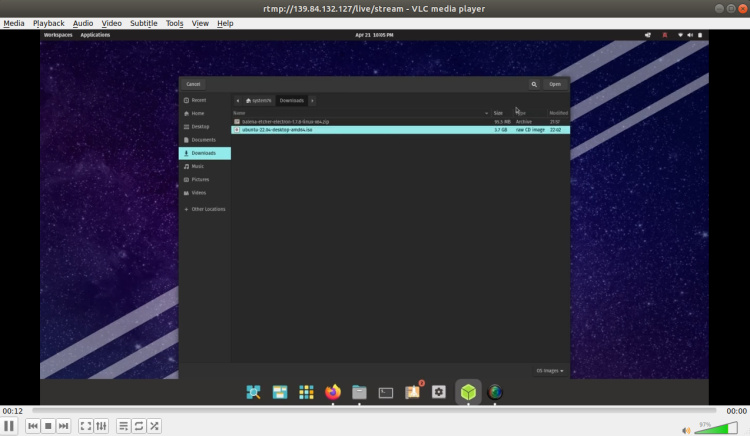
Define la URL de tu servidor RTMP y haz clic en el botón Reproducir. Si todo funciona, deberías ver tu vídeo en la siguiente pantalla.
Configurar las estadísticas RTMP para la monitorización
Llegados a este punto, tu servidor RTMP está instalado y funcionando. Ahora, tendrás que configurar la página de estadísticas RTMP para monitorizar tu streaming.
En primer lugar, crea un directorio para guardar el archivo de estadísticas RTMP utilizando el siguiente comando.
mkdir /var/www/html/rtmp
A continuación, copia el archivo RTMP stat en el directorio creado.
cp /usr/share/doc/libnginx-mod-rtmp/examples/stat.xsl /var/www/html/rtmp/stat.xsl
A continuación, edita el archivo de configuración del host virtual por defecto de Nginx.
nano /etc/nginx/sites-available/default
Elimina todas las líneas por defecto y añade las siguientes:
server {
    listen 8080;
    server_name  _;

    # rtmp stat
    location /stat {
        rtmp_stat all;
        rtmp_stat_stylesheet stat.xsl;
    }
    location /stat.xsl {
        root /var/www/html/rtmp;
    }

    # rtmp control
    location /control {
        rtmp_control all;
    }
}
Guarda y cierra el archivo cuando hayas terminado. A continuación, reinicia el servicio Nginx para aplicar los cambios.
systemctl restart nginx
Accede a la página RTMP Stat
Ahora, abre tu navegador web y accede a la página de estadísticas RTMP utilizando la URL http://your-server-ip:8080/stat. Deberías ver las Estadísticas RTMP en la siguiente pantalla.
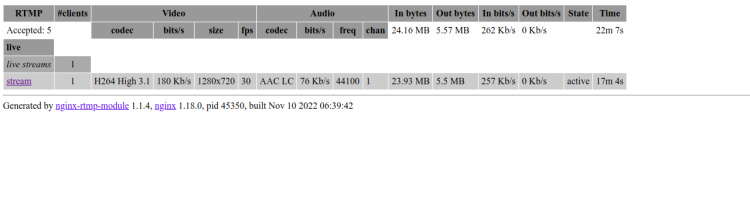
Tendrás que actualizar la página cada vez que transmitas un vídeo y observar cómo cambian las estadísticas de transmisión.
Conclusión
Este post explica cómo configurar un servidor de streaming de vídeo utilizando el Nginx-RTMP en Ubuntu 22.04. También probamos el servidor RTMP mediante el reproductor VLC. Ahora puedes transmitir cualquier vídeo al servidor RTMP y acceder a él desde cualquier reproductor multimedia compatible. No dudes en preguntarme si tienes alguna duda.